


No products in the cart.

Picture this: you've found the perfect campsite. The fire's going, the stars are out, and you're surrounded by the calm of the wilderness. Now, imagine that whole scene getting wrecked by a leaky water jug, water that tastes like plastic, or the slow-dawning horror that you're about to run out.
Getting your camping water storage right isn't just about having something to drink. It’s the bedrock of a good trip.
Why a Solid Water Strategy Is Non-Negotiable
A reliable water plan is just as crucial as your tent and sleeping bag—no exaggeration. It’s the silent partner in almost everything you do, from making that first cup of morning coffee to scrubbing the chili out of the pot after dinner.
Without a dependable water supply, you're looking at dehydration, questionable hygiene, and maybe even packing up early. Simple missteps can quickly ruin an otherwise amazing trip.
We've all seen (or made) the common mistakes. Maybe it's trusting everything to a single, giant container with no backup, or grabbing a cheap jug that cracks the first time you drop it. Or maybe it's just forgetting a filter for that "just in case" stream water. The key is to think of your water plan as a complete system, not just a single piece of gear.
The Core of Campsite Operations
Water is the lifeblood of your campsite, and it goes way beyond just hydration. Think about everything it does:
- Cooking: You need it for boiling pasta, making oatmeal, and bringing those freeze-dried meals back to life.
- Cleaning: Washing hands, dishes, and utensils is non-negotiable for staying healthy out there.
- Personal Hygiene: Brushing your teeth and washing your face feel like luxuries, but they depend on having water to spare.
A smart approach to water storage means you can handle all these jobs without a second thought. It's a key part of being prepared, just like having a good first-aid kit. In fact, it's a critical piece of your overall preparedness, much like the other gear discussed in our guide on the 8 essential items for your emergency kit.
Your water storage solution is more than just a container; it's your portable lifeline. The right system prevents contamination, simplifies access, and ensures you have enough clean water for drinking, cooking, and sanitation.
Growing Demand for Reliable Gear
As more people discover the outdoors, the demand for high-quality, dependable gear has exploded. You can see this trend in a related market: RV water tanks. That industry was already valued at USD 1.84 billion in 2023 and is only expected to grow.
This boom shows just how many people are realizing the importance of investing in solid water systems. You can read more about the growth of the RV water tank market on wiseguyreports.com. This guide will help you sort through all the options to find what truly works for your kind of camping.
Choosing The Right Water Container For Your Trip
Picking the right water container for a camping trip is a lot like packing the right clothes. You wouldn't wear a parka to the beach, and you definitely wouldn't bring a massive 7-gallon jug on a solo backpacking trip. The goal is to match your gear to your adventure, because the right container makes life easy, while the wrong one is a frustrating, heavy burden.
Let's walk through the main options out there so you can find the perfect fit for your style of camping.
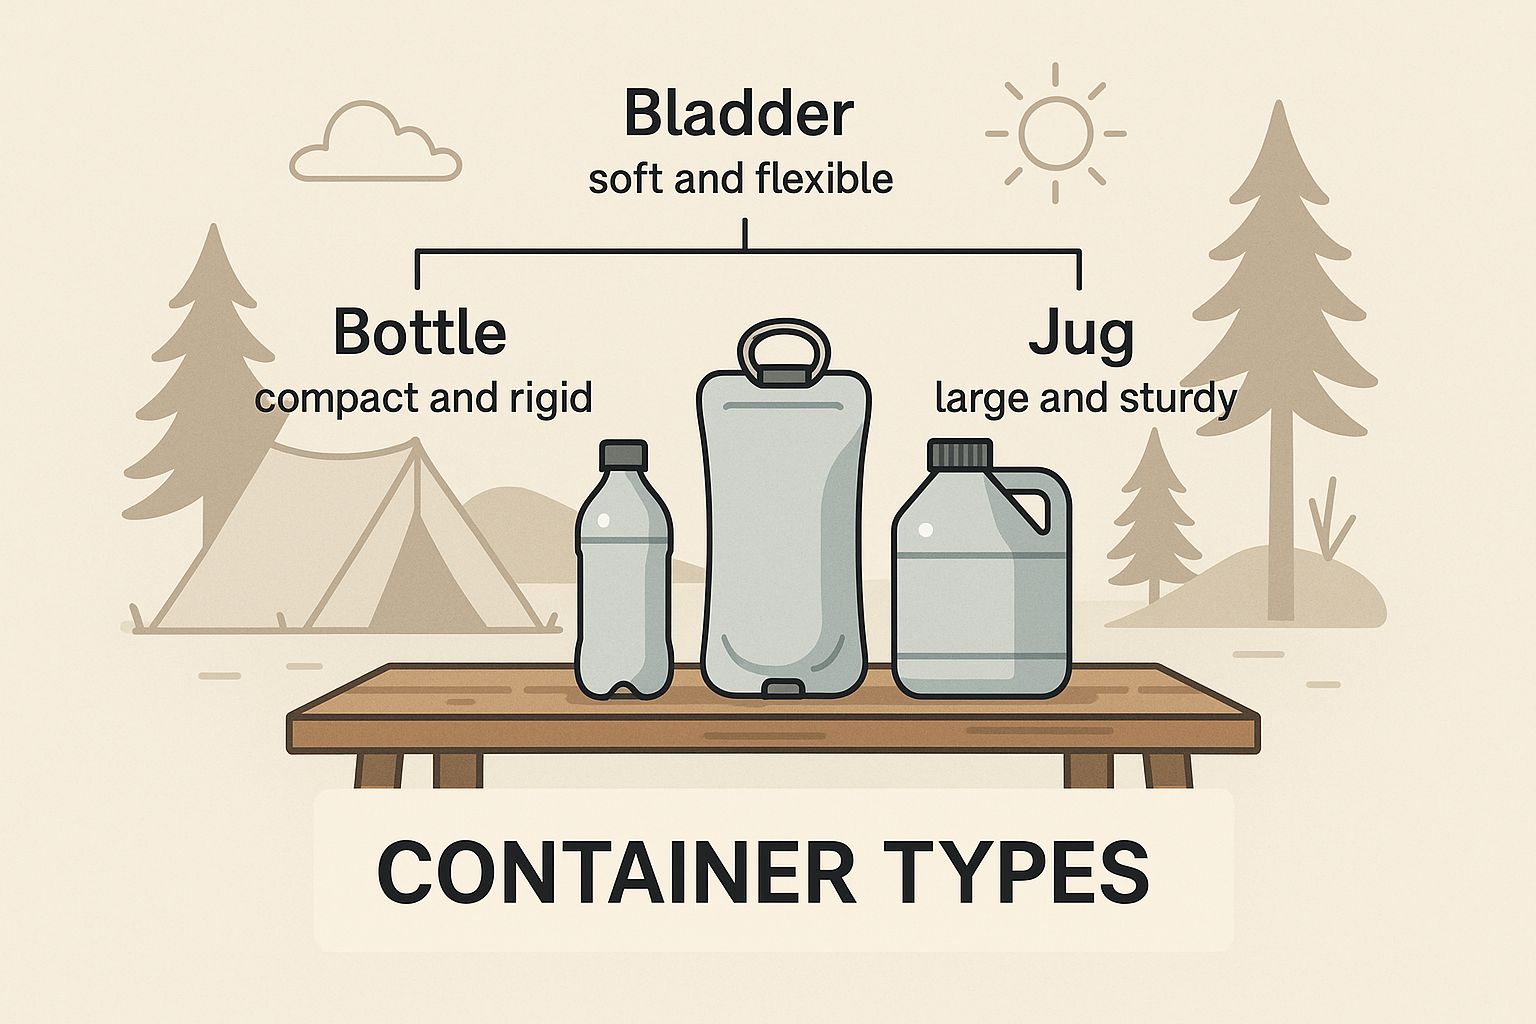
As you can see, each container type—from a simple bottle to a rugged jug—is built with a specific purpose in mind.
Rigid Water Containers
Think of rigid containers as the dependable workhorses of campsite water. These are your classic jerry cans and heavy-duty cubes, usually made from tough, thick plastic like HDPE. They’re built to get knocked around in the back of a truck and survive a few bumps and drops.
Their biggest selling point is durability and ease of use. Many even have a built-in spigot, which is a game-changer for filling a coffee pot or washing hands without having to lift and tip a heavy container. The trade-off? They're bulky. A 7-gallon jug takes up the same amount of space whether it's full or bone dry.
- Best For: Car camping, setting up a basecamp, or any family trip where you've got plenty of vehicle space.
- Capacity: Typically in the 3 to 7 gallon range.
These are your go-to when you need a reliable, stationary water station for the whole group.
Collapsible Water Containers
If you’re tight on space, collapsible containers are your best friend. We’re talking about soft-sided water bags, hydration bladders, and foldable jugs that are masters of efficiency. When they're empty, you can roll or fold them down to almost nothing.
The obvious win here is packability. They’re lightweight and free up a ton of cargo space for the drive home. The downside is usually a compromise in durability and stability. They can be more vulnerable to punctures and a bit wobbly or awkward to set on uneven ground when full.
A collapsible container is an absolute lifesaver when space is a premium. Its ability to shrink as you drink the water is a huge plus for backpackers or anyone with a packed car.
These are fantastic for hikers who need to carry a lot of water at the start of a trail but want to shed weight and bulk as they go.
Personal Water Bottles and Bladders
This category is all about personal hydration while you’re on the move. We're talking about the water bottles and hydration reservoirs (bladders) designed for easy access while you're hiking, biking, or just wandering around the campsite. Bottles are straightforward and reliable, while bladders offer that awesome hands-free convenience with a drinking hose.
For your day-to-day drinking, these are essential. They aren't meant for bulk water storage, but rather as the final step in getting water from your main container to you. To find a great one, it helps to check out guides on the best insulated water bottles that can keep your drink cold for hours. You can also explore our own guide on the https://findtoptrends.com/blogs/news/best-water-bottles-for-hiking to see more trail-ready options.
Camping Water Container Comparison
To make the choice a bit easier, here’s a quick breakdown comparing the different types of water containers. Think about what your average trip looks like and see which one checks the most boxes for you.
| Container Type | Best For | Capacity Range | Pros | Cons |
|---|---|---|---|---|
| Rigid Containers | Car camping, basecamps, group trips | 3 - 7 gallons | Extremely durable, easy to use (spigots), stable | Bulky, takes up same space empty or full |
| Collapsible Containers | Backpacking, trips with limited space | 1 - 5 gallons | Highly packable, lightweight | Less durable, can be unstable when full |
| Personal Bottles/Bladders | On-the-go hydration, personal use | 16 - 64 oz | Portable, easy access, reusable | Small capacity, not for group storage |
| Vehicle-Based Systems | Overlanding, van life, extended trips | 10 - 40+ gallons | High capacity, ultimate convenience (pumps) | Expensive, requires installation, heavy |
Ultimately, most experienced campers use a combination of these. A large rigid jug at the campsite and a personal bottle for hikes is a classic, effective setup.
Vehicle-Based Water Systems
For the serious overlanders, van-lifers, and anyone on a long-term expedition, vehicle-based systems are the pinnacle of water convenience. These are tanks that are either built into the vehicle or mounted to it, often connected to an electric pump and a real faucet. It's as close as you can get to having a tap in the middle of nowhere.
The clear advantage is massive capacity and on-demand convenience. The catch? They require professional installation, add a lot of weight to your vehicle, and are a significant financial investment. This is a specialized solution for people whose vehicle is their basecamp.
Decoding Container Materials for Safety and Taste
Picking the right size and type of water jug is a great start, but the real story is in the material it's made from. This decision directly affects everything from the container's durability to the taste of your water—and most importantly, your health. Trying to decipher the codes on a product label can feel a bit like reading a foreign language, but once you know what to look for, you'll be able to choose the best option with confidence.
After all, this is about more than just hauling water. It's about making sure the water you drink on day three of your trip is just as fresh and pure as it was when you filled up at home.
The World of Plastics
Plastic is everywhere in the camping world, and for good reason: it's lightweight, tough, and affordable. But here’s the catch—not all plastics are created equal. You’ll often see little acronyms stamped on the bottom of containers, and understanding them is the key to making a smart choice.
-
HDPE (High-Density Polyethylene): Think of this as the workhorse for bulk water storage. HDPE is that tough, usually opaque plastic you see in those classic blue jerry cans. It’s a beast, standing up to bumps, drops, and sun exposure without complaining. Best of all, it doesn't tend to make your water taste like plastic.
-
PET or PETE (Polyethylene Terephthalate): This is the clear, lightweight plastic used for most single-use water and soda bottles. While they’re fine for grabbing on the way out of town, they really aren't built for the long haul. They can break down, get scratched up, and become a breeding ground for bacteria if you try to reuse them over and over.
-
LDPE (Low-Density Polyethylene): This is the softer, more pliable cousin in the plastic family. You’ll find it in collapsible water bags and hydration bladders. Its biggest advantage is its flexibility—when it's empty, you can roll it up and stuff it into your pack, saving a ton of space.
The BPA-Free Standard
If you see one label on a plastic container, make sure it’s "BPA-free." Bisphenol A (BPA) is an industrial chemical that’s been used in plastics for decades.
There have been long-standing concerns about BPA leaching out of containers and into whatever you’re drinking. While scientists still debate the finer points, the entire outdoor industry has pretty much made "BPA-free" the gold standard. For your own peace of mind, always double-check that every piece of your water storage system, from your personal bottle to your big camp jug, is clearly marked as BPA-free.
A "BPA-free" label isn't just marketing fluff; it's a critical safety feature. It's your assurance that potentially harmful chemicals aren't seeping into your drinking water while it's sitting out in the sun at your campsite.
Metal and Other Options
Plastics may be the most common choice, but they aren't the only game in town. Other materials bring their own unique benefits to the table, especially when it comes to durability and taste.
Stainless Steel is a fantastic material, especially for personal water bottles. It's nearly indestructible, won't rust, and is completely inert. That means it will never impart any weird metallic or plastic taste to your water. The only real downsides are weight and cost. Steel is noticeably heavier and more expensive than plastic, which is why you don't often see massive stainless steel jugs for group camping.
Aluminum is another popular metal, often used for those sleek, single-walled bottles. It’s lighter than steel, which is nice, but it also dents more easily. The critical thing to know about aluminum bottles is that they must have an inner lining—usually made of epoxy or ceramic—to create a barrier between the metal and your water. You'll want to make sure that lining is fully intact and, you guessed it, also BPA-free.
Ultimately, knowing your materials is a non-negotiable step in getting your water system dialed in. Whether you go for the rugged dependability of HDPE, the packability of LDPE, or the pure, clean taste of stainless steel, making an informed choice is what guarantees you’ll have safe, great-tasting water on every trip.
How to Figure Out How Much Water Your Group Actually Needs
We've all heard the old rule of thumb: one gallon per person, per day. It's a decent starting point, but let's be honest, it's often a wild guess. A relaxing weekend by a cool mountain lake is a completely different ballgame than a tough, multi-day hike through the desert.
Getting your water calculation right is one of the most important parts of planning your trip. Bring too little, and you're flirting with real danger. Lug around gallons you don't need, and you're just hauling dead weight. A smarter approach will help you plan better, pack lighter, and keep everyone safe and hydrated.
To get a truly realistic estimate, we need to break down your water usage into three core areas and then tweak that number based on the specifics of your adventure.
The Three Pillars of Water Consumption
Think about your daily water use in three essential buckets. Each one is non-negotiable if you want to have a comfortable and safe time out there.
- Drinking Water: This is the big one, the absolute must-have. Your baseline here should be about a half-gallon (or 2 liters) per person, per day, just to stay hydrated. No skimping on this.
- Cooking & Cleaning: This covers everything from boiling water for pasta and rehydrating those freeze-dried meals to washing dishes and wiping down your cooking area. A good rule of thumb is another half-gallon per person, per day.
- Basic Hygiene: This is for brushing your teeth, washing your face and hands, and any other quick clean-ups. You can usually get by with about a quarter-gallon per person, per day for this.
Add it all up, and you land at 1.25 gallons per person, per day for a standard, low-key trip. But that’s just our starting point.
Fine-Tuning for Real-World Conditions
Now comes the important part—adjusting that baseline for the real world. These variables are what separate a good plan from a dangerously bad one.
- Climate and Weather: This is a huge factor. Camping in a hot, dry climate will make you guzzle water. You could easily see your drinking needs double to a full gallon per person or even more just for hydration alone.
- Activity Level: Lounging in a camp chair requires a lot less water than a strenuous day of hiking or climbing. The more you sweat, the more you need to drink to replace those lost fluids. It's that simple.
- Group Size & Makeup: Don't forget that kids and pets need plenty of water, too! It's easy to underestimate how much they'll go through, so when you're planning for a group, it’s always smart to round up.
- Your Meal Plan: If you're planning on lots of dehydrated meals or dishes that need boiling water (like rice or pasta), your cooking water budget will obviously be higher than if you're just grilling hot dogs.
Here's a piece of advice I live by: It is always, always better to come home with a little extra water than to run out a day early. Running low puts a serious strain on everything from your meals to your morale.
A Simple Formula to Guide You
Let’s pull this all together into an easy formula to figure out your total water needs.
- Start with the Baseline: Begin with 1.25 gallons per person, per day.
-
Add an Activity Modifier:
- Low Activity (relaxing by the fire): Add 0 gallons.
- Moderate Activity (some light hiking): Add 0.5 gallons.
- High Activity (strenuous hiking, climbing): Add 1 gallon.
- Find Your Daily Total: Add your baseline and your activity modifier. This is your daily water need per person.
- Calculate the Trip Total: Multiply that daily total by the number of people in your group, and then multiply it all by the number of days you'll be out.
Let's run an example: You're planning a 3-day trip for 2 people doing some moderate hiking.
(1.25 gallons + 0.5 gallons) x 2 people x 3 days = 10.5 gallons total
Using this method gives you a much more reliable target for what to pack. Thoughtful planning like this is just as critical as using our family camping checklist to make sure you don't leave any other essentials behind.
Purifying Water Safely in the Backcountry
No matter how well you plan, there will likely come a time when you need to top off your camping water storage from a river, lake, or stream. Think of water purification as your personal health insurance policy out in the wild. That crystal-clear mountain spring might look pristine, but it can be teeming with microscopic pathogens like bacteria, protozoa, and viruses that can end a trip in a hurry.
Treating water before you drink it is a non-negotiable part of staying safe and healthy. Thankfully, you have a few really effective methods to choose from, each working on a different principle to make questionable water safe to drink.
Understanding Water Treatment Methods
The whole point of water treatment is to kill or remove the harmful microorganisms you can't see. For campers, it generally boils down to three main approaches: filtration, chemical purification, and UV light. Each one shines in different situations.
-
Filtration: This is the most straightforward method. Imagine an incredibly fine strainer. Water gets pushed through a filter with pores so tiny—often 0.2 microns or smaller—that they physically block nasty stuff like bacteria (think E. coli or Salmonella) and protozoa (like Giardia and Cryptosporidium).
-
Chemical Purification: This approach uses chemical agents, like iodine or chlorine dioxide, to neutralize microbes. These chemicals basically act as disinfectants, killing off bacteria, protozoa, and—this is a key difference—viruses, which are often too small for many filters to catch.
-
UV Light Purification: This is the high-tech option. It uses ultraviolet light to completely scramble the DNA of microorganisms. You stick a UV purifier, which usually looks like a small wand or pen, into your water bottle and turn it on. The light makes bacteria, viruses, and protozoa unable to reproduce, so they can't make you sick.
This push for reliable, portable systems is part of a much bigger picture. The global market for water storage systems, which includes everything from massive municipal tanks to our small-scale camping gear, was valued at USD 18.11 billion in 2023 and is expected to keep growing. It just goes to show how important safe water is everywhere, from big cities to remote campsites. You can dig into more data on the global water storage market over on fortunebusinessinsights.com.
Comparing Your Purification Options
So, which one is right for you? It really depends on your priorities. Are you an ultralight backpacker counting every ounce, or are you putting together a family emergency kit where total protection is the main goal? Let's break down how they stack up.
The best water treatment method is the one you'll actually use consistently. Think about things like speed, taste, weight, and how fiddly it is to use out in the field before you buy.
Water Filter (Squeeze or Pump)
- Effectiveness: Fantastic against bacteria and protozoa. Most don't remove viruses.
- Speed: Very fast. You can treat a liter of water in about a minute.
- Taste: It doesn't affect the taste of the water. In fact, by removing silt and other gunk, it often makes it taste better.
- Ease of Use: Pretty simple. Squeeze filters have become incredibly popular because they’re so light and easy to use.
- Best For: Backpackers, hikers, and anyone who needs to treat water quickly on the move.
Chemical Tablets (Chlorine Dioxide or Iodine)
- Effectiveness: Excellent against bacteria, protozoa, and viruses (chlorine dioxide is the better choice for all-around protection).
- Speed: Slow. You have to wait anywhere from 30 minutes to 4 hours for the chemicals to do their job. Patience is a virtue here.
- Taste: Can leave a distinct chemical aftertaste. Some kits do come with a second tablet to neutralize the flavor.
- Ease of Use: About as simple as it gets. Drop a tablet in your bottle, screw on the lid, and wait.
- Best For: Emergency kits, as a backup to your primary system, and for trips where viruses are a major concern.
UV Light Purifier
- Effectiveness: Excellent against all three: bacteria, protozoa, and viruses.
- Speed: Quick. It usually takes about 90 seconds to treat a liter.
- Taste: Zero impact on the water's taste.
- Ease of Use: Super easy, but with a couple of catches. It needs batteries, and it only works in clear water—murky water with a lot of sediment can block the UV rays.
- Best For: International travel, tech-loving campers, and treating clear water where you're worried about viruses.
In the end, many seasoned hikers and backpackers use a two-part system. They’ll carry a primary filter for daily use and stash a few chemical tablets in their first-aid kit as a lightweight, bombproof backup. That way, you’re always prepared to keep your camping water storage full of safe, clean water, no matter what the trail throws at you.
Maintaining Your Gear for Long-Lasting Use
Think of your camping water storage gear like any other critical piece of equipment. You wouldn't put your sleeping bag away wet, and you shouldn't neglect your water containers either. A little bit of care after each trip is the secret to making your gear last for years and ensuring your water always tastes clean and fresh.
This small time investment does more than just protect your gear; it protects your health.
If you just toss your containers in the garage after a trip, you're inviting trouble. That leftover moisture can lead to funky plastic tastes, or worse, a buildup of bacteria and biofilm. A simple cleaning routine is all it takes to prevent this.
Keeping Your Containers Clean and Fresh
The idea here is to sanitize everything without leaving behind any chemical aftertaste. Good news: you probably already have what you need in your kitchen. This method works great for both rigid jugs and collapsible bladders.
For a Basic Clean:
- Rinse Thoroughly: First thing when you get home, empty any leftover water and give the container a good rinse with warm, soapy water.
-
Add Your Cleaner: Pick one of these simple, effective solutions:
- Baking Soda: Drop two tablespoons of baking soda into your container, fill it with warm water, and give it a good shake.
- Diluted Bleach: Go for a very weak solution—just one teaspoon of unscented bleach per gallon of water.
- Let It Soak: Let the solution sit for at least an hour. If it's been a while or the container seems particularly grimy, you can let it soak overnight.
- Rinse Again: Dump the cleaning solution and rinse the container out several times with fresh water. Keep rinsing until there's absolutely no scent of bleach or taste of baking soda left.
Proper drying is just as important as cleaning. Store your containers with the cap off in a well-ventilated area until they are completely bone-dry inside. This step is critical for preventing mildew growth between trips.
For more complex systems, a bit more work might be needed. You can find expert advice on water tank cleaning services for caravans and boats that underscores just how crucial this kind of deep maintenance is for larger setups.
Essential Water Filter Maintenance
Your water filter is an incredible piece of technology, but it's not invincible. Over time, all the sediment, silt, and gunk it pulls from your water will start to clog its microscopic pores, slowing it down. Regular maintenance is the key to keeping it flowing freely.
The most common and important task is backflushing. This is exactly what it sounds like: you force clean water backward through the filter to push out all the trapped debris. Most modern filters include a special syringe just for this.
How to Backflush Your Filter:
- Fill the syringe with clean, already-filtered water.
- Attach the syringe to the outlet nozzle of your filter (where the clean water comes out).
- Forcefully push the plunger, sending water backward through the system. You’ll probably see some cloudy, discolored water spurt out the dirty end.
- Repeat this process 3-5 times, or until the water coming out runs clear.
After you've cleaned your filter, let it air dry completely before you pack it away. Storing a damp filter is a recipe for mold and mildew, which can ruin it for good. By keeping both your containers and your filter clean, you're setting yourself up for a successful trip with safe, great-tasting water every time.
Got Questions About Your Camping Water? We've Got Answers.
No matter how much you plan, there are always a few practical questions that pop up once you're out there. Having the right answers ready can make all the difference, turning a potential trip-ruiner into a minor inconvenience. Let's tackle some of the most common questions campers have about their water.
Think of this as your go-to FAQ for those real-world "what if" moments. From storage times to frozen water lines, we'll cover what you need to know to stay hydrated and worry-free.
How Long Can I Actually Store Water in My Jugs?
This is probably the number one question people ask. If you're using a clean, food-grade plastic container (like those trusty HDPE jugs), you can safely store properly treated water for up to six months.
The real trick, though, is starting with a squeaky-clean container and a reliable water source. If you're filling up on the go and you're not 100% sure about the quality, treat it as a short-term supply. Plan to use it within a few days, or better yet, run it through a filter or purification system before you drink it.
A great habit to get into: empty, clean, and let your water containers dry completely after every single trip. It's the best way to prevent weird tastes or nasty microbial gunk from building up between your adventures.
What's the Best Way to Keep My Water From Freezing?
Winter camping is incredible, but it comes with a major challenge: keeping your water liquid. Frozen water isn't just a hassle—it expands and can easily crack your containers, leaving you high and dry.
Here are a few tried-and-true tricks to keep your H₂O from turning into a solid block of ice:
- Insulate Everything: Got a spare jacket, an old sleeping bag, or a foam pad? Wrap it around your main water jugs. Creating that thermal barrier is your best first defense against the cold.
- Bring a Bottle to Bed: At night, stash a smaller water bottle or two inside your sleeping bag. Your own body heat is surprisingly effective at keeping it from freezing solid.
- Go with an Insulated Bottle: For sipping on the trail, a quality insulated water bottle is an absolute game-changer. It'll keep your water drinkable even when the temperature really drops.
- Have a Backup Plan: Always be prepared to melt snow. Make sure you have the stove and extra fuel needed to turn that fluffy white stuff into a reliable backup water source if your main supply freezes up.
A little bit of prep goes a long way in ensuring you've always got drinkable water, no matter how cold it gets.
Here at FindTopTrends, we live for the outdoors and love sharing the best gear and know-how for your adventures. Check out our collections to gear up for your next trip, from must-have gadgets to rock-solid travel equipment. Shop now at FindTopTrends and get ready to explore.
Leave a comment


