


No products in the cart.

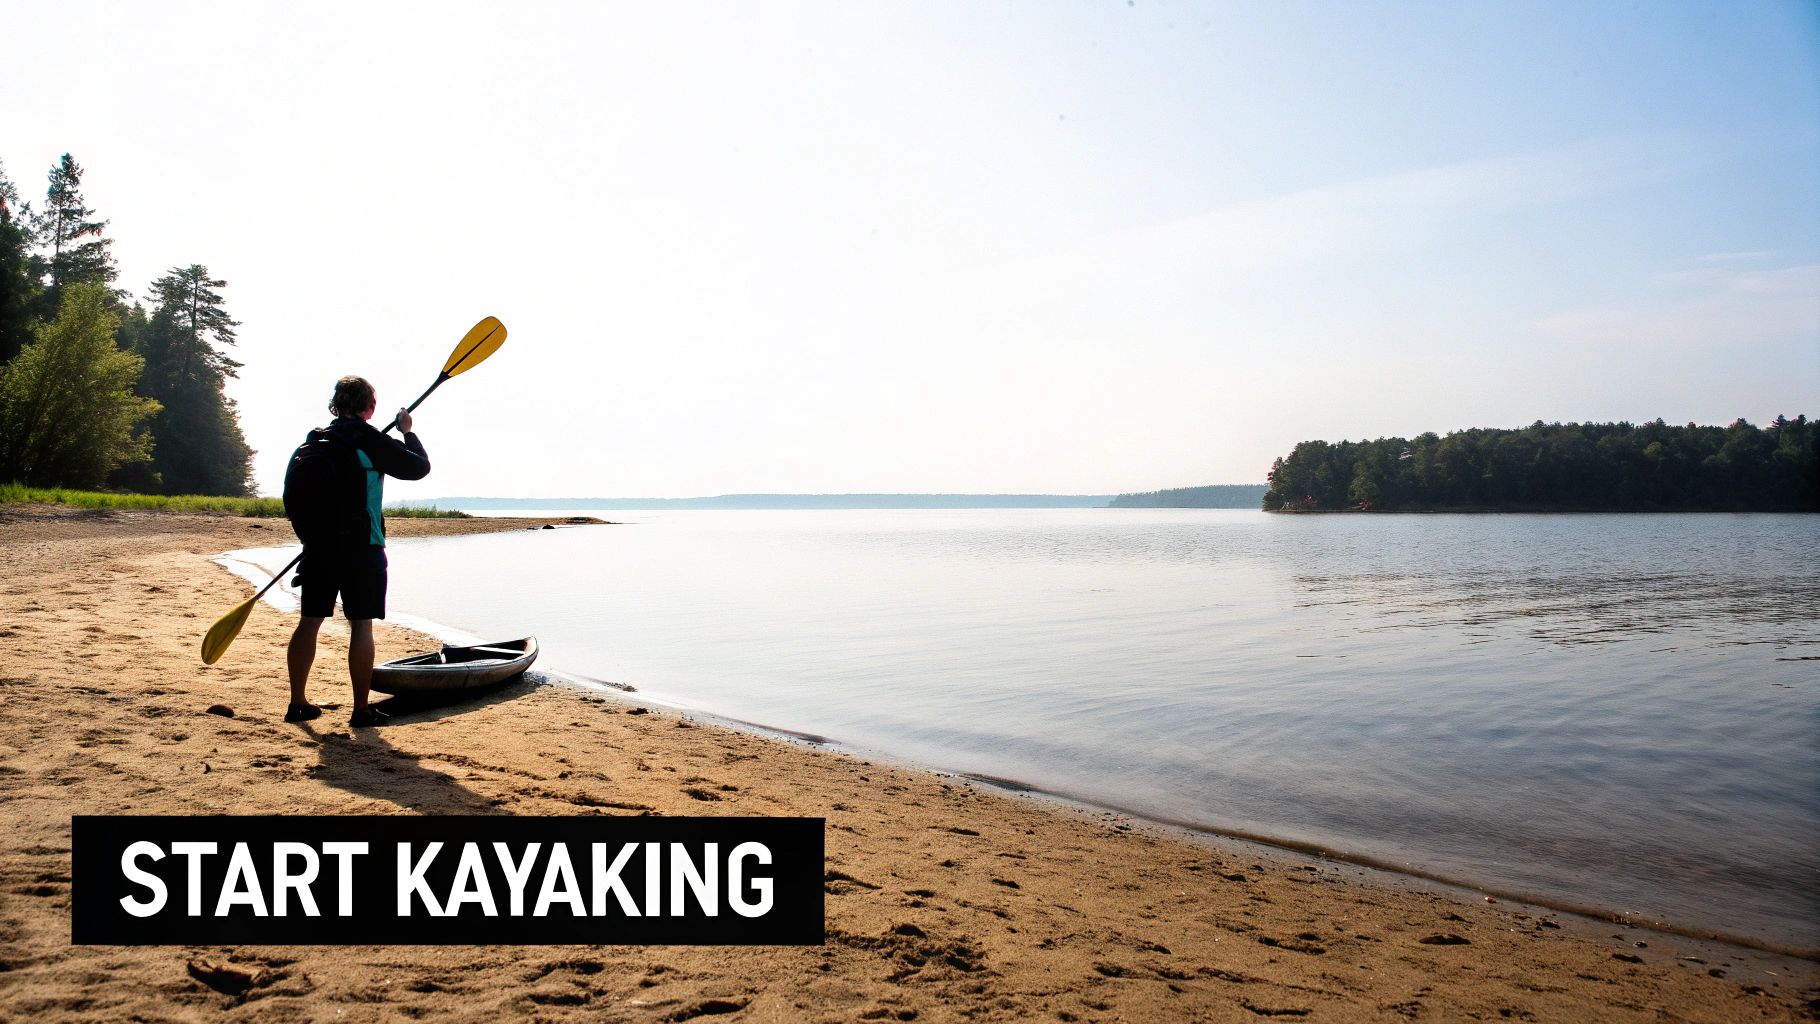
So, you're ready to get into kayaking. Good choice. It's one of the most rewarding and straightforward ways to get out on the water. With just a few basic skills, you'll go from feeling a little wobbly to confidently exploring your local lakes and rivers.
This guide is designed to get you there. We'll skip the overly technical jargon and focus on what you actually need to know for your first day out.
Your First Kayak Adventure Starts Here
There’s something special about kayaking. It’s a mix of peaceful escape and a solid workout, letting you connect with nature in a way few other activities can. Imagine gliding across a glassy lake at sunrise or paddling down a lazy, winding river—it’s that feeling of freedom and self-reliance that gets people hooked.
And it's not just a niche sport anymore. The global kayak market is expected to grow from USD 601.2 million in 2025 to USD 801.83 million by 2033. What’s really telling is that 82% of that demand comes from people like you and me—folks just looking for a fun day out, not training for the Olympics. This massive growth in casual, recreational paddling shows just how accessible it has become for families and anyone wanting an affordable adventure. You can dive deeper into these kayaking market trends if you're curious.
Think of this guide as your personal instruction manual, built on real-world experience to help you have a great first trip.
What You Will Learn In This Guide
We’ve laid everything out to build your skills and confidence logically. Forget feeling overwhelmed. Our goal is to give you clear, practical advice you can use immediately.
Here's a quick look at what we'll cover:
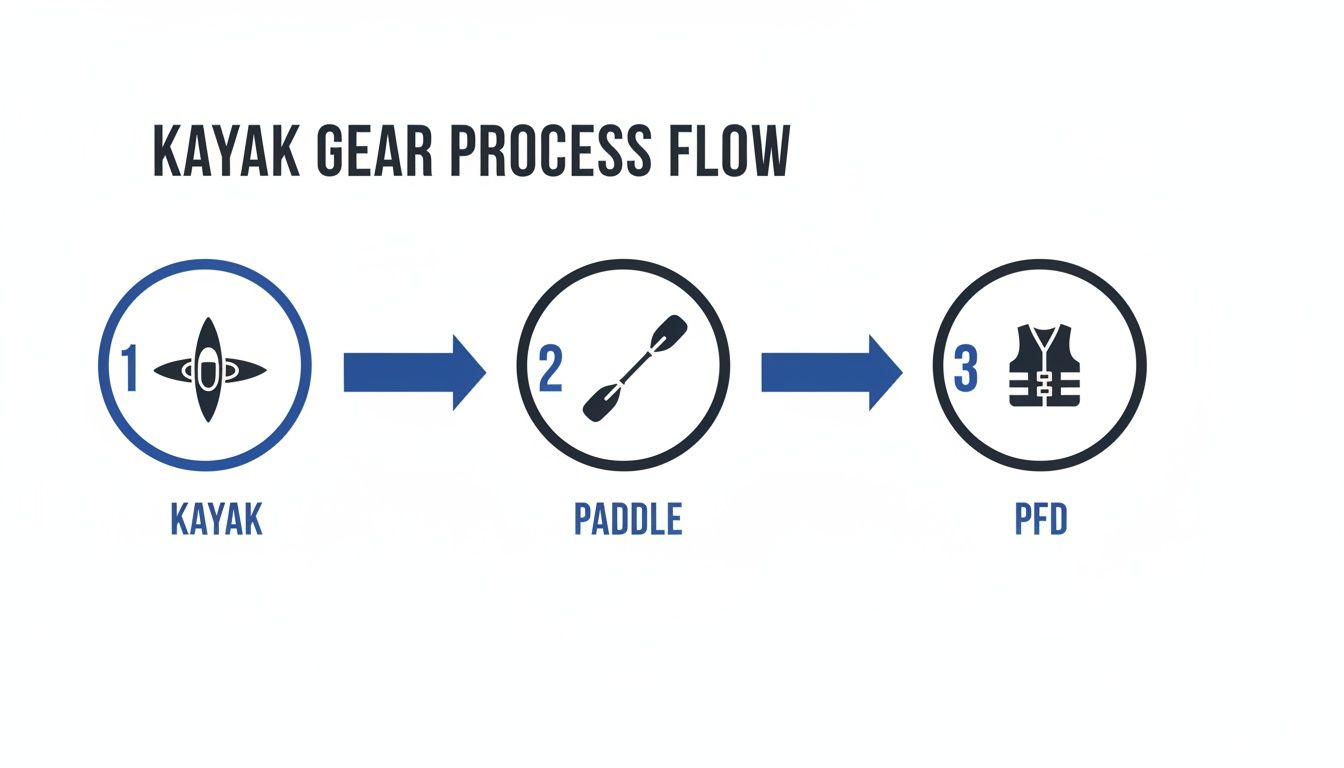
- Essential Gear Selection: How to pick the right kayak, paddle, and Personal Flotation Device (PFD) without getting lost in endless options.
- Core Paddling Strokes: We'll break down the forward, reverse, and sweep strokes. These are the building blocks for moving and turning your boat.
- Water Safety Fundamentals: From launching without falling in to knowing what to do if you do, we’ll cover the safety essentials.
- Avoiding Common Mistakes: We'll help you sidestep the frustrating habits that trip up most beginners, so you can paddle smarter from the start.
The goal isn't just to teach you how to kayak; it's to make you feel prepared, safe, and excited to get on the water. A little knowledge goes a long way in turning a good day into a great one.
Ultimately, this is about the experience—the quiet moments, the unexpected wildlife, and the pure fun of it. This guide gives you the foundation so you can get out there and start making some memories.
For those who just want the absolute basics to get going, this quick-start table boils it all down.
5-Minute Quick Start Guide to Kayaking
This table is your cheat sheet—the five most critical things to check off before your paddle ever touches the water.
| Essential Step | Key Action | Why It's Important |
|---|---|---|
| 1. Gear Check | Wear your PFD (life jacket) and make sure it's snug. Adjust your footpegs for a firm fit. | A PFD only works if you're wearing it. Proper footpeg position gives you control and power. |
| 2. Safe Launch | Put your paddle across the cockpit, behind you. Use it to brace against the shore as you get in. | This creates a stable "tripod" and dramatically reduces your chances of tipping over at the start. |
| 3. Grip & Posture | Hold the paddle with hands shoulder-width apart. Sit up straight, relax your shoulders. | A proper grip prevents fatigue. Good posture engages your core muscles, not just your arms. |
| 4. Forward Stroke | Reach forward, plant the blade in the water near your feet, and pull it back to your hip. | This is your main engine. Using your torso rotation (twisting your body) is the key to efficiency. |
| 5. Plan a Route | Know where you're going and tell someone your plan. Check the wind and weather forecast. | Conditions can change fast. A simple plan and a weather check are your biggest safety tools. |
Keep these five points in mind, and you’ll have a solid foundation for a safe and enjoyable first paddle. Now, let’s dive into the details.
Choosing Your Essential Kayaking Gear
Getting started in kayaking really comes down to three things: the boat, a paddle, and a life jacket. It’s easy to get overwhelmed by all the options, but you don't need top-of-the-line gear to have a fantastic time on the water. The real trick is matching your equipment to the kind of paddling you see yourself doing.
Think of it this way: you wouldn't take a race car off-roading. Your kayak is your vehicle for adventure, and picking the right one for the terrain is the first step.
Selecting the Right Kayak for Your Adventure
Your choice of kayak is the biggest decision you'll make, and it shapes everything about your experience—from how stable you feel to how fast you can go. For most people just starting out, the options thankfully boil down to a few simple categories.
-
Recreational Kayaks: These are your best friend when you're new to the sport. They're typically wide and on the shorter side (9-12 feet), which makes them incredibly stable on calm water like lakes, ponds, and lazy rivers. They also have big, open cockpits, so getting in and out is a breeze.
-
Touring Kayak: A little longer and sleeker, touring kayaks are built to go the distance. They cut through the water more efficiently and track in a straight line, which is great for day-long trips on bigger lakes or sheltered coastlines. You trade a bit of that initial rock-solid stability for better speed and performance.
-
Inflatable Kayaks: Forget the old pool-toy reputation. Modern inflatables are tough, durable, and surprisingly capable. Their biggest selling point is convenience. You can deflate one, toss it in a bag, and store it in a closet—a total game-changer if you live in an apartment or don't have a roof rack.
My Advice: For your first few times out, you can't go wrong with a recreational kayak. It’s forgiving and lets you focus on nailing your paddle strokes instead of constantly worrying about taking a swim.
The popularity of kayaking is booming, with the industry hitting USD 863.4 million in 2023. With e-commerce making up a huge chunk of that (35% of sales), finding a good boat online is easier than ever. Brands featured on sites like FindTopTrends often use durable polyethylene (PE), a material I love because it's lightweight but can take a beating. Most beginners start with a single-seater, which makes up about 70% of sales for a reason—they’re simple and fun. You can dig into more of these kayak market trends and insights if you're curious.
Picking Your Paddle
Your paddle is your engine. The right size makes all the difference between a smooth, powerful glide and a tired, achy back. Too short, and you'll be scraping your knuckles on the kayak. Too long, and every stroke will feel like you're lifting weights.
Here’s a quick sizing trick I've used for years: stand the paddle up straight in front of you. You should be able to curl your fingers comfortably over the top of the blade. Also, remember to account for your boat's width. Wider recreational kayaks need a slightly longer paddle so you can get a clean entry into the water on each side.
The Most Important Piece of Gear: Your PFD
Never, ever paddle without your Personal Flotation Device (PFD), or life jacket. This isn't optional. It’s the single most critical piece of safety gear you own, and it's been shown to reduce the risk of drowning by an estimated 80%.
When you're trying one on, think comfort and fit. It needs to be snug enough that it won't ride up over your head if you end up in the water, but not so tight that it restricts your breathing or arm movement. A good test is to tighten all the straps and have someone pull up on the shoulder straps—it shouldn't lift past your chin. I always recommend getting a PFD designed specifically for paddling; they have bigger armholes that give you the freedom you need to paddle all day. And please, wear it. Don't just tuck it behind your seat.
Getting the Hang of Your Kayak Strokes
Alright, you've got your gear. Now for the fun part—actually moving on the water. A common rookie mistake is trying to muscle the kayak forward using only your arms. You'll be gassed out in ten minutes.
The real secret to efficient, powerful paddling comes from your core. Your arms are just levers; the engine is your torso. Learning to twist your body with each stroke engages those bigger, stronger back and abdominal muscles. You’ll be able to paddle for hours without feeling like you just did a thousand bicep curls.
Let's break down the essential strokes you'll need to know. We’ll skip the overly technical jargon and focus on what works.
The Forward Stroke: Your Go-To Move
This is the one you'll be using 95% of the time. Get this right, and you’ll glide across the water smoothly instead of fighting it every inch of the way. Think of it as a fluid, three-part motion.
- The Catch: Sit up straight, twist from your waist, and reach forward. You want to plant the paddle blade fully into the water near your feet. Get it in there cleanly.
- The Power: This is where the magic happens. Unwind your torso. As you do, think about pushing with your top hand while your bottom arm guides the blade back. That push-and-twist is what generates all the power. Keep the paddle shaft as vertical as you can.
- The Release: Once your hand is alongside your hip, slice the blade out of the water. Pulling it any further back just creates drag and wastes your energy. The moment it’s out, you’re already twisting to set up the catch on the other side. It should be one continuous, flowing rhythm.
Pro Tip: Listen to your paddle. If you hear a lot of gurgling and splashing, your blade isn't entering or exiting the water cleanly. Aim for a quiet "swoosh" with each stroke.
The Reverse Stroke: Your Brakes and Backup
Knowing how to stop and back up is just as important as knowing how to go forward. The reverse stroke is your go-to for braking or making small adjustments, especially when you’re getting close to a dock or another kayaker. It's literally just the forward stroke in reverse.
Rotate and look over your shoulder, then plant the back of the paddle blade in the water near your hip. Now, unwind your torso by pushing the blade forward, away from you. Alternate sides to back up in a straight line.
A few quick, sharp reverse strokes are your emergency brake. Imagine you're heading for a low-hanging branch—a couple of these will stop you dead in the water so you can figure out your next move.
The Sweep Stroke: Your Steering Wheel
Forget trying to steer with a bunch of awkward little correction strokes. If you need to turn, the sweep stroke is your best friend. It’s a wide, arcing motion that gives you a ton of turning power.
To turn your kayak to the right, you'll put your paddle in the water on the left side.
- Start the stroke up near your feet, like a normal forward stroke.
- Instead of pulling straight back, sweep the paddle blade out in a big, wide arc away from the side of your boat.
- Keep that arc going all the way to the back of the kayak.
The wider you make that arc, the sharper you’ll turn. For an even quicker pivot, you can lean the kayak over on its edge a little bit as you perform the sweep.
These strokes are all made possible by your core gear. Think of it as a system: the kayak provides the platform, the paddle is your engine, and the PFD is your essential safety net.
Essential Kayak Strokes at a Glance
As you get more comfortable, you'll start blending these strokes together without even thinking about it. To help you remember the basics when you're just starting out, here’s a quick-reference table.
| Stroke Name | Primary Use | Key Technique Tip |
|---|---|---|
| Forward Stroke | Moving forward efficiently | Power comes from torso rotation, not your arms. Push with your top hand. |
| Reverse Stroke | Stopping, moving backward | Plant the back of the blade near your hip and push the water forward. |
| Sweep Stroke | Turning and pivoting the kayak | Use a wide, arcing motion from your feet to the stern of the boat. |
Keep these fundamentals in mind, and you'll build a solid foundation. Practice makes perfect, but practicing the right things makes you a better paddler, faster.
Getting these techniques down is your ticket to exploring the water with confidence. For instance, many beginners start with a 45-degree paddle angle and learn to "feather" the blade on the return; this small adjustment can cut down wind resistance by as much as 25%. With a massive 82% of kayaking being for recreational fun, these skills help you join a huge community of paddlers. You don't need to break the bank, either—plenty of starter kits under $300 will cover 80% of what you need to get going. You can learn more about the growing kayak market on dataintelo.com.
Building Your Water Safety Skills
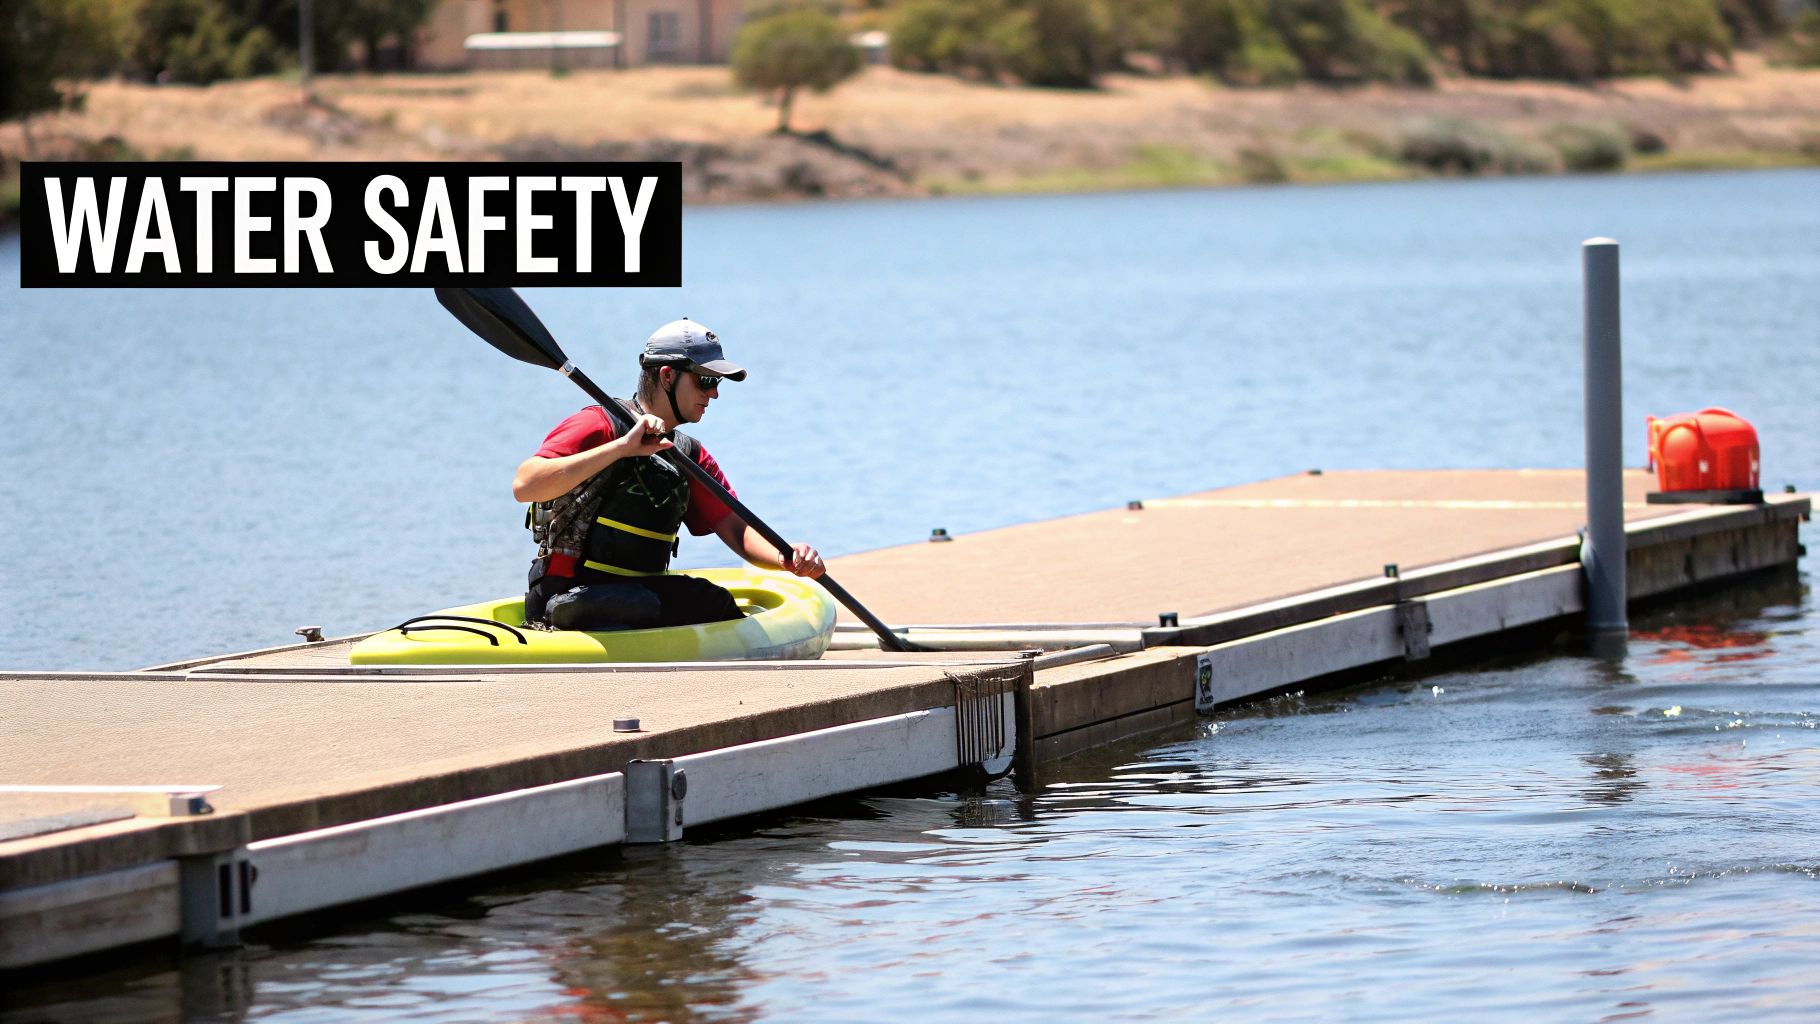
True confidence on the water isn't just about having the right gear; it’s knowing you can handle yourself when things get a little wobbly. Wearing your PFD is non-negotiable, but developing a few core skills is what will let you relax and really enjoy your time out there.
Think of safety as a mindset, not a reaction. It starts with a stable launch, continues with knowing how to prevent a capsize, and ends with a smooth landing. And if you do go over? You'll know exactly what to do.
Launching and Landing Like a Pro
Ironically, the most common time to take an unplanned swim is when you're getting in or out of your boat. The secret to staying dry is simple: always maintain three points of contact and use your paddle as an outrigger for stability.
From a Sandy Beach or Shoreline:
- Wade your kayak into the water until it's fully floating but still right next to the shore, parallel to the waterline.
- Lay your paddle across the kayak, with the shaft resting just behind the back of the cockpit.
- Straddle the cockpit and grab the paddle shaft and the back of the cockpit rim together with one hand.
- Place your other hand on the front of the cockpit rim for support. You've just created a stable tripod.
- Smoothly lower yourself into the seat, then swing your legs in one at a time. To get out, just reverse the steps.
From a Dock:
The principle is the same, but you’ll use the dock as one of your stability points. Pull your kayak right up alongside the dock. Place your paddle on the dock next to your cockpit. Put one hand on the paddle and dock, the other on your kayak, and ease yourself in.
Don't rush it. I see it all the time—people try to hop in quickly and end up off-balance. A slow, deliberate entry and exit will keep you dry every single time.
Making this a habit drastically cuts your chances of tipping over when you're most vulnerable.
Preventing a Capsize with the Low Brace
Out on the water, a surprise boat wake or a sudden shift of your weight can make you feel that heart-stopping lurch. This is where the low brace saves the day. It's a reflexive move that should become muscle memory, and it’s one of the most important skills for kayaking safely.
Picture yourself tipping to the right. Here’s the move:
- Instantly extend your paddle out to the right, keeping it low to the water's surface.
- Keep your elbows bent and held high, above the paddle shaft, almost like you're doing a push-up.
- As you feel the boat go, slap the flat back of your paddle blade down hard on the water.
- At the exact same time, use your core and hips to drive the kayak back upright underneath you. This is the famous "hip snap."
The magic is in that combination of the slap and the hip snap. The paddle gives you a split second of support on the water, just enough time to right the boat. Get in some shallow water and practice this until it feels like pure instinct.
The Wet Exit: What to Do When You Flip
Even with a solid brace, capsizes are a part of kayaking. They happen. The absolute key is to not panic. A modern kayak cockpit is designed for an easy exit; it will not trap you.
Before you ever paddle in deep water, you need to know this drill by heart:
- Tuck and Protect: The second you're upside down, lean forward and tuck your head toward the kayak's deck. This protects you from hitting rocks or other unseen hazards.
- Find the Loop: Run your hands along the sides of the cockpit to the front until you feel the grab loop on your spray skirt. It’s designed to be easy to find.
- Pull and Push: Yank the loop forward and then up to pop the skirt's seal. Now, just place your hands on the sides of the boat and push yourself out like you're getting out of a low chair.
- Hold Onto Your Gear: The moment you surface, grab your kayak and your paddle. Don't let them drift away! The boat itself is a massive floatation device, so hold on.
The single most important part of the wet exit is simply knowing you can do it. Grab a friend, head to a calm beach, and practice flipping and getting out a few times. Once you realize how straightforward it is, the fear of capsizing melts away, leaving you a much more confident and relaxed paddler.
Common Beginner Mistakes and How to Fix Them
Everyone makes a few mistakes when they're starting out. It’s just part of the process! But spotting these common slip-ups early on will save you a ton of frustration and get you paddling with confidence much faster.
Think of these as simple tweaks that make a huge difference in your comfort, power, and overall enjoyment on the water.
Paddling with Just Your Arms
I see this one all the time. New paddlers try to muscle the boat through the water using only their arms, and within minutes, their shoulders are burning and they're completely gassed. The real engine for your paddle stroke isn't your biceps; it's your core.
The secret is learning to rotate your torso. Instead of just pulling the paddle back, think about twisting from your waist as you plant the blade in the water. This engages the big, powerful muscles in your abs and back, giving you a much stronger and more sustainable stroke. Honestly, this is a total game-changer once it clicks.
Bad Posture and a Sloppy Seat
Slouching in your kayak might feel relaxed at first, but it’s a fast track to an aching back and wobbly boat control. When you hunch over, you're disconnected from the kayak, which makes you feel unstable and keeps you from using your core properly.
The fix is to sit up straight with a slight, comfortable curve in your lower back. You want to feel a solid connection with your boat at three key points: your butt in the seat, your knees braced against the sides of the cockpit, and your feet firmly on the foot pegs.
Key Takeaway: Getting your foot pegs adjusted just right is non-negotiable. Your feet should be firm against them, with your knees bent and making solid contact with the sides of the boat. This locks you in, creating a solid frame that transfers all that power from your torso rotation directly into moving the kayak forward.
This posture isn't just about preventing fatigue; it gives you a massive boost in stability and control. You'll feel like you're one with the boat.
Dressing for the Air, Not the Water
This is a huge one, and it's all about safety. It can be a beautiful, sunny day, but the water temperature might still be dangerously cold. Dressing for the air temperature alone is a recipe for disaster if you happen to capsize, putting you at risk for cold water shock.
The golden rule is to always dress for the water temperature. First things first: avoid cotton like the plague. It’s useless when wet and will actually make you colder. Stick to synthetic fabrics or wool.
- Warm Water (70°F / 21°C and up): A rash guard and board shorts will usually do the trick.
- Cool Water (60-69°F / 15-20°C): You'll want a bit more protection, like a neoprene top or a "farmer john" style wetsuit.
- Cold Water (Below 60°F / 15°C): Don't mess around. A full wetsuit or, even better, a drysuit is absolutely essential for your safety.
Remember the paddler's motto: dress for immersion. It’s a simple mindset that ensures you’re prepared for an unexpected swim, no matter how nice the weather seems.
Holding the Paddle Wrong
An awkward grip on your paddle will sabotage your efficiency and lead to sore hands and forearms. A lot of beginners use a "death grip" on the shaft, which wears you out fast. Others hold their hands too close together or too far apart, robbing their strokes of power.
Here’s an easy way to find your perfect hand position: Place the center of the paddle shaft on top of your head. Now, adjust your hands until your elbows form a clean 90-degree angle. That "paddler's box" you've just created is your sweet spot for most strokes.
Once you have the width right, make sure your knuckles are facing up. As you paddle, focus on pushing with your top hand just as much as you pull with your bottom hand. That smooth push-pull motion, combined with good torso rotation, is the mark of a skilled paddler.
Your Kayaking Questions, Answered
As you get ready to hit the water, questions are bound to bubble up. That’s perfectly normal. Getting straight answers to these common queries will give you the confidence you need to have a fantastic—and safe—first paddle.
Let's dive into some of the things beginners ask most often. Think of this as filling in the practical details that make every trip smoother from the start.
What Should I Wear Kayaking for the First Time?
This is easily one of the most important questions, and the answer is a golden rule in paddling: always dress for the water temperature, not the air temperature. Conditions on the water can shift in an instant, and an accidental swim in cold water is dangerous if you’re not wearing the right gear.
The first thing to remember? No cotton. Ever. Once it gets wet, it sucks the heat right out of your body and takes forever to dry. Stick with quick-drying synthetic fabrics like polyester or nylon instead.
Here’s a simple way to think about it:
- Warm Days & Warm Water: For a mellow paddle on a hot summer day, a rash guard or synthetic t-shirt with board shorts is usually perfect. This combo protects you from the sun and dries fast after a few splashes.
- Cooler Conditions: When the water has a bite to it, you need to think about insulation. A wetsuit is a great option. It works by trapping a thin layer of water against your skin, which your body warms up, creating a protective barrier against the cold.
- Footwear: Your feet need protection, too. Water shoes, neoprene booties, or even a pair of old sneakers will do the trick. Just leave the flip-flops at home—they offer zero protection and have a knack for floating away the second you tip.
And don't forget the essentials, no matter the weather: a wide-brimmed hat, polarized sunglasses (on a strap so you don't lose them!), and good waterproof sunscreen are non-negotiable.
How Do I Steer a Kayak Effectively?
Steering a kayak is much more about finesse than it is about muscle. While some longer boats have rudders or skegs to help, your paddle is your primary steering wheel. It's all about using the right strokes combined with subtle shifts in your body.
Your most powerful turning tool is the sweep stroke. It's a big, arcing stroke on the opposite side of where you want to go. Need to make a sharp left? Plant your paddle blade in the water near your feet on the right side, and "sweep" it in a wide arc back toward the stern. The bigger the arc, the sharper the turn.
For small, everyday corrections to keep your boat pointed straight, you can use a simple rudder stroke. Just drag your paddle blade in the water behind you on the side you want to turn toward. This creates just enough drag to gently pull your stern over, correcting your course. With a little practice, you'll learn to lean or "edge" the kayak, which helps it turn even more efficiently.
Is It Safe to Kayak Alone as a Beginner?
For anyone just starting out, the answer is a hard no. I can't stress this enough: always go with a partner or a group while you're still getting the hang of things, especially basic strokes and self-rescue techniques.
Paddling with others is your best safety net. If someone capsizes, gets exhausted, or has an equipment problem, help is right there. Honestly, it's also a fantastic way to learn by watching how more experienced paddlers handle their boats.
Later on, if you absolutely must go solo, be smart about it. Stick to calm, familiar water where other people are around. Hug the shoreline, always wear your PFD, and leave a detailed "float plan" with someone you trust. Tell them where you're launching, your planned route, and when you expect to be back. Safety first, always.
What Is the Best Way to Transport a Kayak?
Getting your boat from your home to the water is often the last puzzle piece. How you do it really depends on what kind of kayak you have.
For classic hard-shell kayaks, a dedicated roof rack system on your car is the gold standard for security. Systems with J-cradles or stackers hold the boat snugly. Always use strong cam straps to tie it down—never bungee cords, which can stretch and fail. For any driving at highway speeds, you also need to use bow and stern lines tied down to your car's bumper or tow hooks to keep the wind from lifting the boat.
Inflatable and folding kayaks, on the other hand, are built for portability. They pack down into a large duffel-style bag that you can toss in your trunk or back seat. This makes them a fantastic choice if you have a smaller car or not a lot of storage space at home.
Ready to gear up for your first adventure? At FindTopTrends, we curate the best deals on outdoor and recreational equipment to get you on the water without breaking the bank. Explore our collection of kayaking essentials and trending gear today.
Leave a comment


