


No products in the cart.
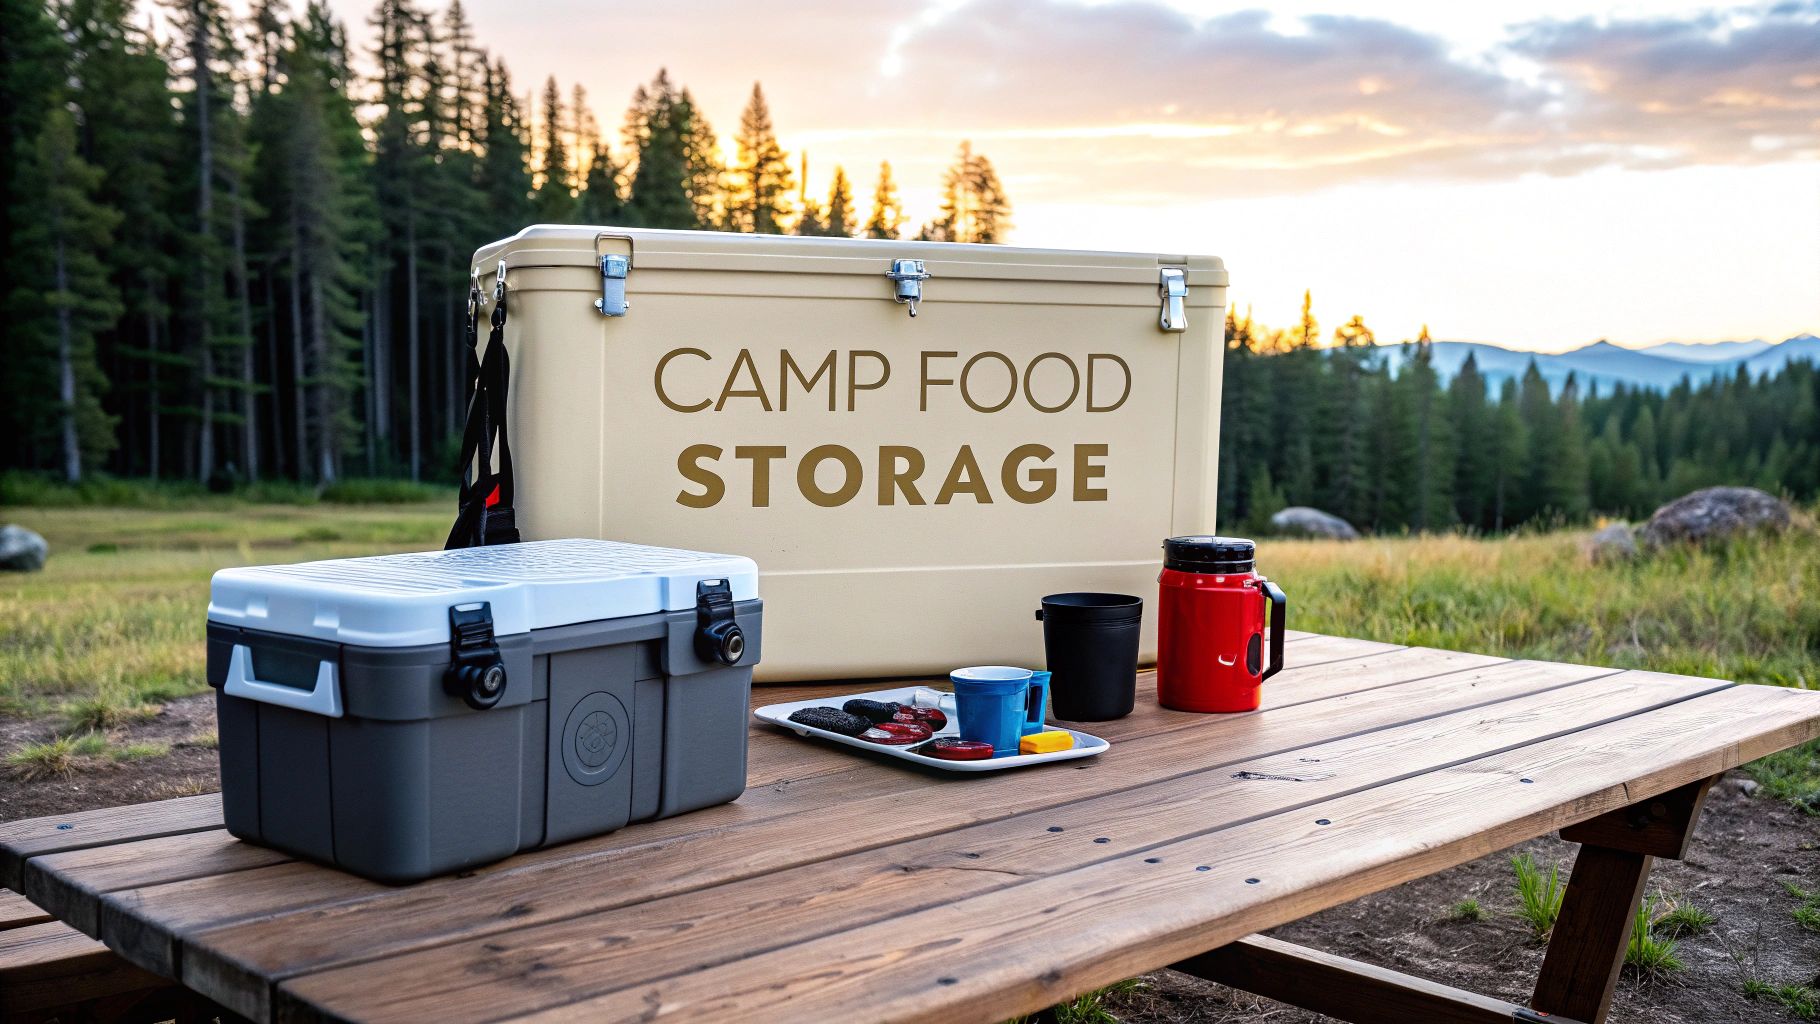
Figuring out your camping food situation is about so much more than just keeping the sodas cold. It’s the backbone of a successful trip, keeping your meals safe to eat, protecting local wildlife, and making sure your campsite doesn't turn into a free-for-all buffet. Get this right, and you'll avoid spoiled food, unwelcome animal guests, and a whole lot of frustration.
Why Proper Food Storage Is Crucial for Any Campsite

Think of your camp kitchen as mission control. If it's a mess, everything else starts to feel a little chaotic. Sure, soggy hot dog buns and warm drinks are annoying, but the real problems with bad food storage run much deeper. For anyone who spends time outdoors, mastering how to store your food is a non-negotiable skill built on three key ideas.
The Three Pillars of Campsite Food Safety
At the end of the day, a smart food storage plan is all about control—controlling the temperature, controlling who (or what) can access it, and controlling your impact on the environment. These three pieces work together to keep your outdoor kitchen running smoothly and safely. If you drop the ball on even one, you're opening the door to issues that range from inconvenient to genuinely dangerous.
Here’s why you need to take food storage seriously:
- Preventing Foodborne Illness: This is a big one. Perishable foods like raw meat, dairy, and even last night's leftovers can become a playground for bacteria when they hit the temperature "danger zone" (between 40°F and 140°F). A good cooler and proper ice management keep your food chilled and safe, dramatically lowering the risk of food poisoning wrecking your trip.
- Protecting Wildlife and Yourself: A bear can smell food from miles away, and a raccoon can sniff out an open bag of chips from the next campsite over. Unsecured food and trash are like a dinner bell for animals. When they get a taste of human food, it can make them bold and dependent, which is unhealthy for them and can lead to dangerous situations for you.
- Upholding Leave No Trace Principles: A core part of being a responsible camper is leaving a place just as you found it, if not better. Proper food storage is key to this. It stops food scraps and packaging from littering the site and prevents animals from tearing into your supplies and scattering trash everywhere.
A well-managed campsite is a safe campsite. Proper food storage is the first line of defense against both microscopic threats like bacteria and larger visitors like raccoons or bears.
From Frustration to Function
We've all been there. That sinking feeling as you dig through a sloshing, icy swamp in the cooler just to find the cheese. Or that jolt in the middle of the night when you hear something rummaging around your supplies. These are classic signs of a system that isn't working.
This guide is here to give you practical, field-tested solutions to get your camp kitchen in order. Once you understand these core principles, you can build a reliable system that makes every meal safe and easy to prepare. It's time to stop crossing your fingers and start using strategies that actually work.
Choosing the Right Gear for Your Camping Style
Picking the right container for your food when you're camping is a lot like choosing a backpack for a hike. You wouldn't lug a massive expedition pack on a short day trip, and you certainly wouldn't try to cram a week's worth of supplies into a tiny hydration pack. The best choice always comes down to matching your gear to your adventure.
Your main container is the foundation of your camp kitchen. It’s what determines how long your burgers stay fresh, how your chips avoid getting crushed, and how quickly you can find the ketchup when you need it. Nail this choice, and everything else about cooking and eating outdoors gets a whole lot easier.
Think of this as your personal buyer's guide. We'll walk through the essential types of gear to help you confidently pick the perfect setup for how you camp.
Hard-Sided Coolers for Car Camping
When you're camping out of your car, weight and bulk aren't your biggest worries. This opens the door to the absolute workhorse of camp food storage: the hard-sided cooler.
These things are basically portable refrigerators, built tough and designed for one thing above all else: keeping ice frozen for as long as possible. They’re perfect for anything from a weekend trip to a week-long family vacation where you need to keep meat, dairy, and drinks chilled and safe.
Many of the best coolers today are made using rotational molding (or rotomolding). This process creates a single, seamless piece of super-durable plastic with incredibly thick, insulated walls. That's the secret sauce behind why a good rotomolded cooler, when packed right, can keep ice solid for 5-7 days or even longer.
With more people getting outdoors, the demand for quality gear has exploded. The global camping cooler market was valued at around USD 857.79 million in 2022 and is expected to rocket past USD 1.5 billion by 2030. That growth shows just how much campers rely on good equipment to keep their food fresh. You can find out more about this trend at https://letsparty-au.myshopify.com/blogs/news/the-ultimate-family-camping-gear-list-for-2025.
This infographic gives a great visual breakdown of which gear to choose based on your camping style.
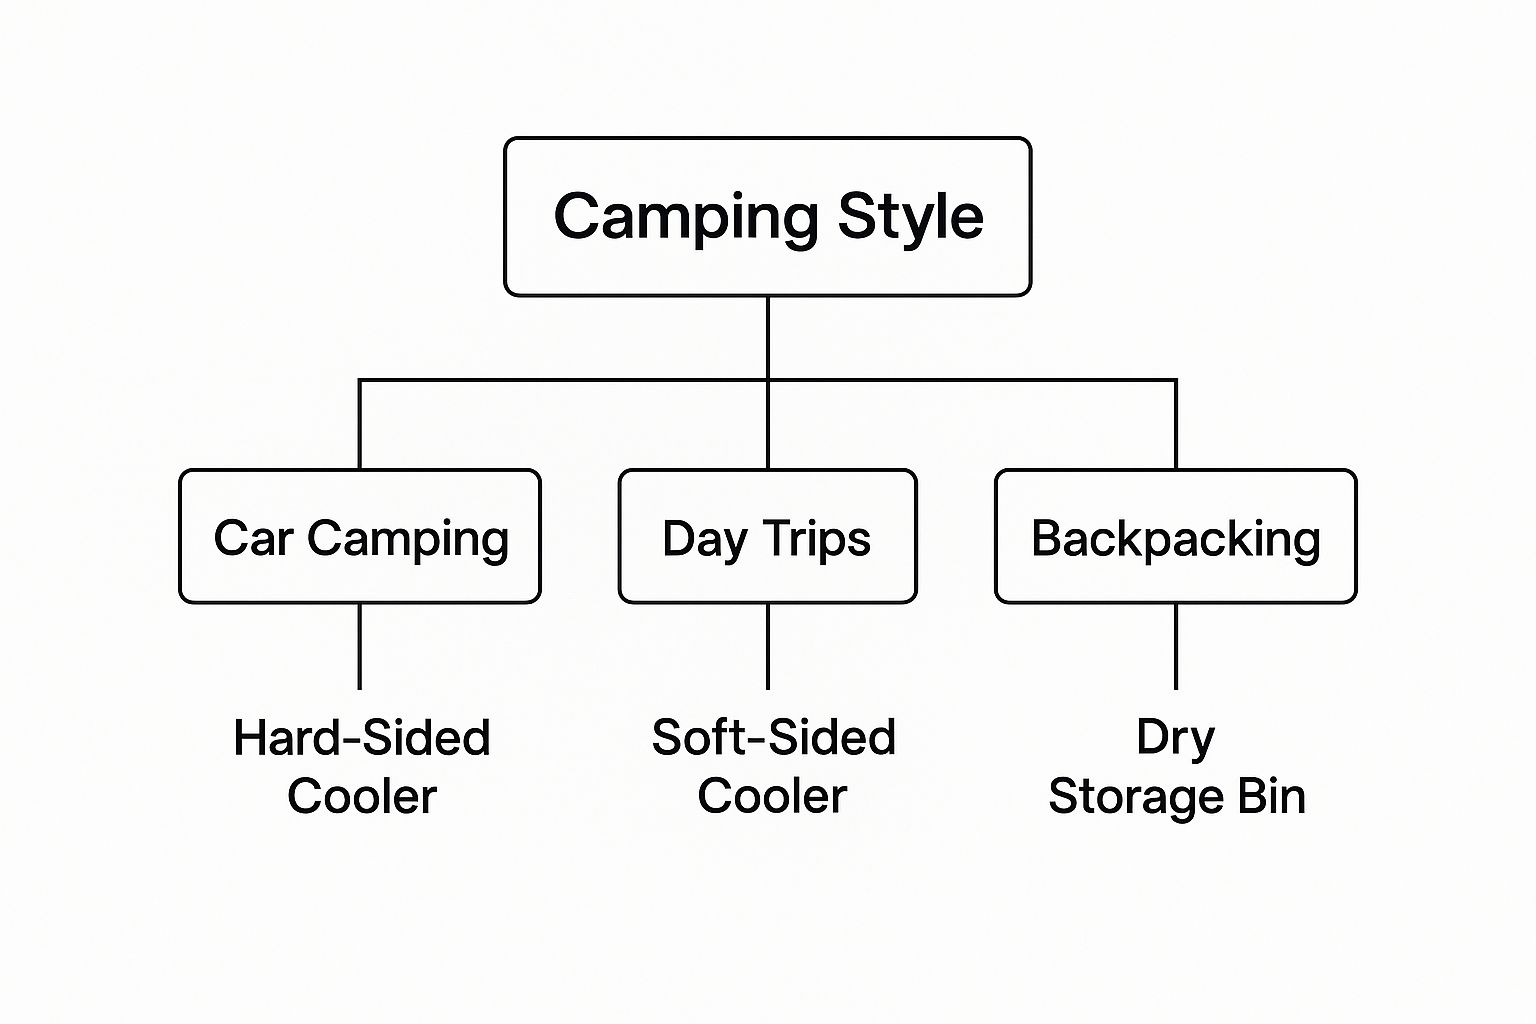
As you can see, the longer and more intense your trip, the more robust your food storage needs to be.
Soft-Sided Coolers for Portability
For day trips, picnics, or quick overnighters where you just need to keep a few things cold, a soft-sided cooler is a fantastic option. Think of these as the sprinters of the cooler world—light, flexible, and super easy to carry.
They won't give you the multi-day ice retention of their hard-sided cousins, but they make up for it in pure convenience. You can sling one over your shoulder for a hike to a scenic lunch spot or just tuck it behind the seat of your car. They’re perfect for:
- Keeping drinks and sandwiches cold for a day at the lake.
- Hauling just enough food for one night's dinner and breakfast the next day.
- Acting as a dedicated drink cooler so you aren't constantly opening your main food supply.
Dry Storage Bins for Non-Perishables
Not everything you bring camping needs to be kept on ice. Your pasta, bread, canned goods, chips, and coffee all need a home where they’ll stay organized, dry, and safe from curious critters (and from getting squashed). That's where a simple, sturdy plastic bin with a lid shines.
A good dry box saves you from digging through a pile of grocery bags every time you need the salt. By keeping all your pantry items in one lidded bin, you create a mobile cupboard that keeps everything neat and in one place. It's a non-negotiable part of a well-run camp kitchen. Even small details, like understanding why proper seasoning packaging matters, can make a huge difference in keeping your ingredients fresh and ready to use.
Your camping food storage system is a team of specialists. The hard cooler is your fridge, the soft cooler is your lunchbox, and the dry bin is your pantry. Each has a specific job, and together they create a fully functional outdoor kitchen.
Comparing Your Camping Food Storage Options
Feeling a bit overwhelmed by the choices? Don't be. Most campers end up using a combination of these systems. This table breaks down the strengths and weaknesses of each to help you decide what you need for your next trip.
| Storage Type | Best For | Pros | Cons |
|---|---|---|---|
| Hard-Sided Cooler | Car camping, multi-day trips, keeping perishables safe | Unbeatable ice retention, extremely durable, can double as a seat | Heavy, bulky, and can be expensive |
| Soft-Sided Cooler | Day trips, picnics, short overnight adventures | Lightweight, portable, easy to store when not in use | Limited cooling time, smaller capacity, not crush-proof |
| Dry Storage Bin | Organizing all non-perishable foods and pantry items | Keeps food organized and protected, stackable, affordable | Not insulated, not always waterproof unless specified |
Ultimately, the best setup is the one that fits your needs. A weekend car camper might just need a good hard-sided cooler and a dry bin, while someone who enjoys day-long fishing trips might get more use out of a portable soft cooler. Mix and match to build your perfect mobile kitchen.
How to Pack a Cooler for Maximum Ice Retention
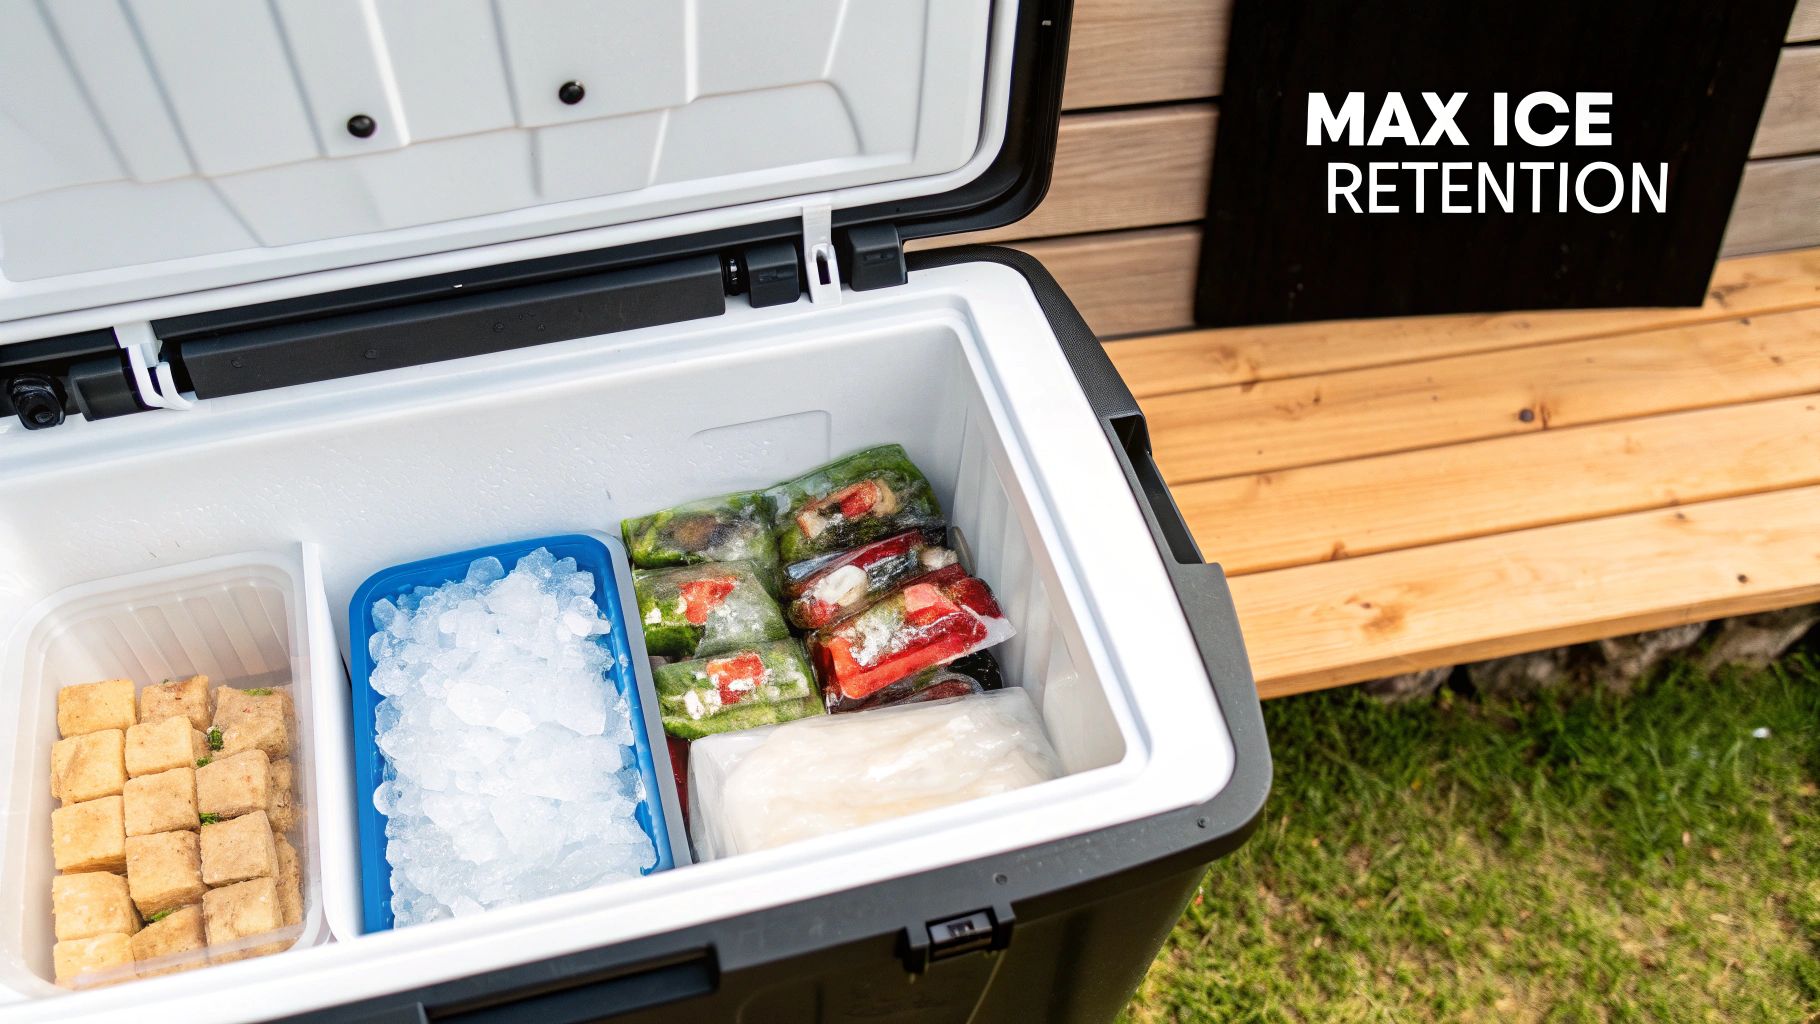
Turning your cooler from a chaotic, watery mess into a high-performance portable fridge is way easier than you might think. The real secret isn't just buying a fancy cooler; it's mastering the art of packing it. With a few proven techniques, you can stretch your ice for days, not hours, keeping your food safe and your drinks refreshingly cold.
This isn't about guesswork. It’s about applying a little science to your camping food storage strategy to defeat the number one enemy of ice: heat. Every single step, from what you do before leaving the house to how you layer your food, plays a huge role in how long that ice will last.
Start Cold to Stay Cold
The most important thing you can do actually happens 24 hours before you even start packing. Think of your cooler as a battery that stores "cold." If you toss ice into a warm cooler, a massive amount of that ice's energy is immediately wasted just cooling down the insulated walls.
You’ve got to pre-chill your cooler. The day before your trip, bring it inside from the hot garage or shed and fill it with some sacrificial ice or a few frozen water bottles. This simple step drops the cooler's internal temperature to freezing, creating the perfect cold environment for your food and fresh ice.
The same rule applies to everything you plan to put inside.
- Refrigerate or freeze all food and drinks beforehand. Never, ever put room-temperature or warm items directly into your camping cooler.
- Freeze what you can. Things like meats, water bottles, and juices can be frozen solid. They'll act like extra ice blocks, thawing out slowly over your trip. Our guide to camping water storage has more tips on managing your water supply.
Build a Foundation with Block Ice
Not all ice is created equal. While cubed ice is great for filling in gaps, its massive surface area means it melts incredibly fast. The foundation of any long-lasting cooler setup is block ice.
A big, solid block of ice melts far more slowly than the same amount of cubes. You can buy block ice at the store or just make your own by freezing water in Tupperware or clean, empty milk jugs. Place these solid blocks at the very bottom of your pre-chilled cooler to create a stable, long-lasting cold base for everything else.
Think of block ice as the slow-burning logs in a fire, providing steady, long-lasting cold. Cubed ice is like kindling—it cools things down fast but burns out just as quickly. Use both strategically.
Once your block ice foundation is in, you can pour cubed ice over the top. Let it fill in all the nooks and crannies. The goal is to get rid of as much empty air space as possible, since air is what transfers heat and melts your ice.
Master the Art of Layering and Zoning
A well-organized cooler is a more efficient cooler. Every time you open that lid, you let cold air out and warm air in, which just makes your ice melt faster. A smart layering system means less rummaging and more time with the lid shut.
Here’s a simple, effective way to layer your cooler:
- Bottom Layer (Last In, First Out): Start with frozen meats and the meals you plan to eat on the last days of your trip. Put them right on top of your block ice.
- Middle Layer (Daily Meals): Next, add ingredients for the middle of your trip. This is the perfect spot for produce, cheese, and other dairy.
- Top Layer (Quick Access): Reserve the top for things you'll be grabbing often—snacks, drinks, and condiments. This stops you from digging through everything just for a soda.
Take your organization a step further with food zoning. Group all the ingredients for a specific meal into a large, sealed plastic bag. A "Taco Night" bag, for instance, could hold your pre-cooked ground meat, cheese, and salsa. This turns meal prep into a quick grab-and-go. For more tips that you can adapt for your cooler, check out these healthy lunch packing ideas.
By putting these methods into practice, you’ll spend less time digging for ingredients and more time enjoying your trip, confident that your food is fresh, safe, and perfectly chilled.
Keeping Wildlife Away from Your Food
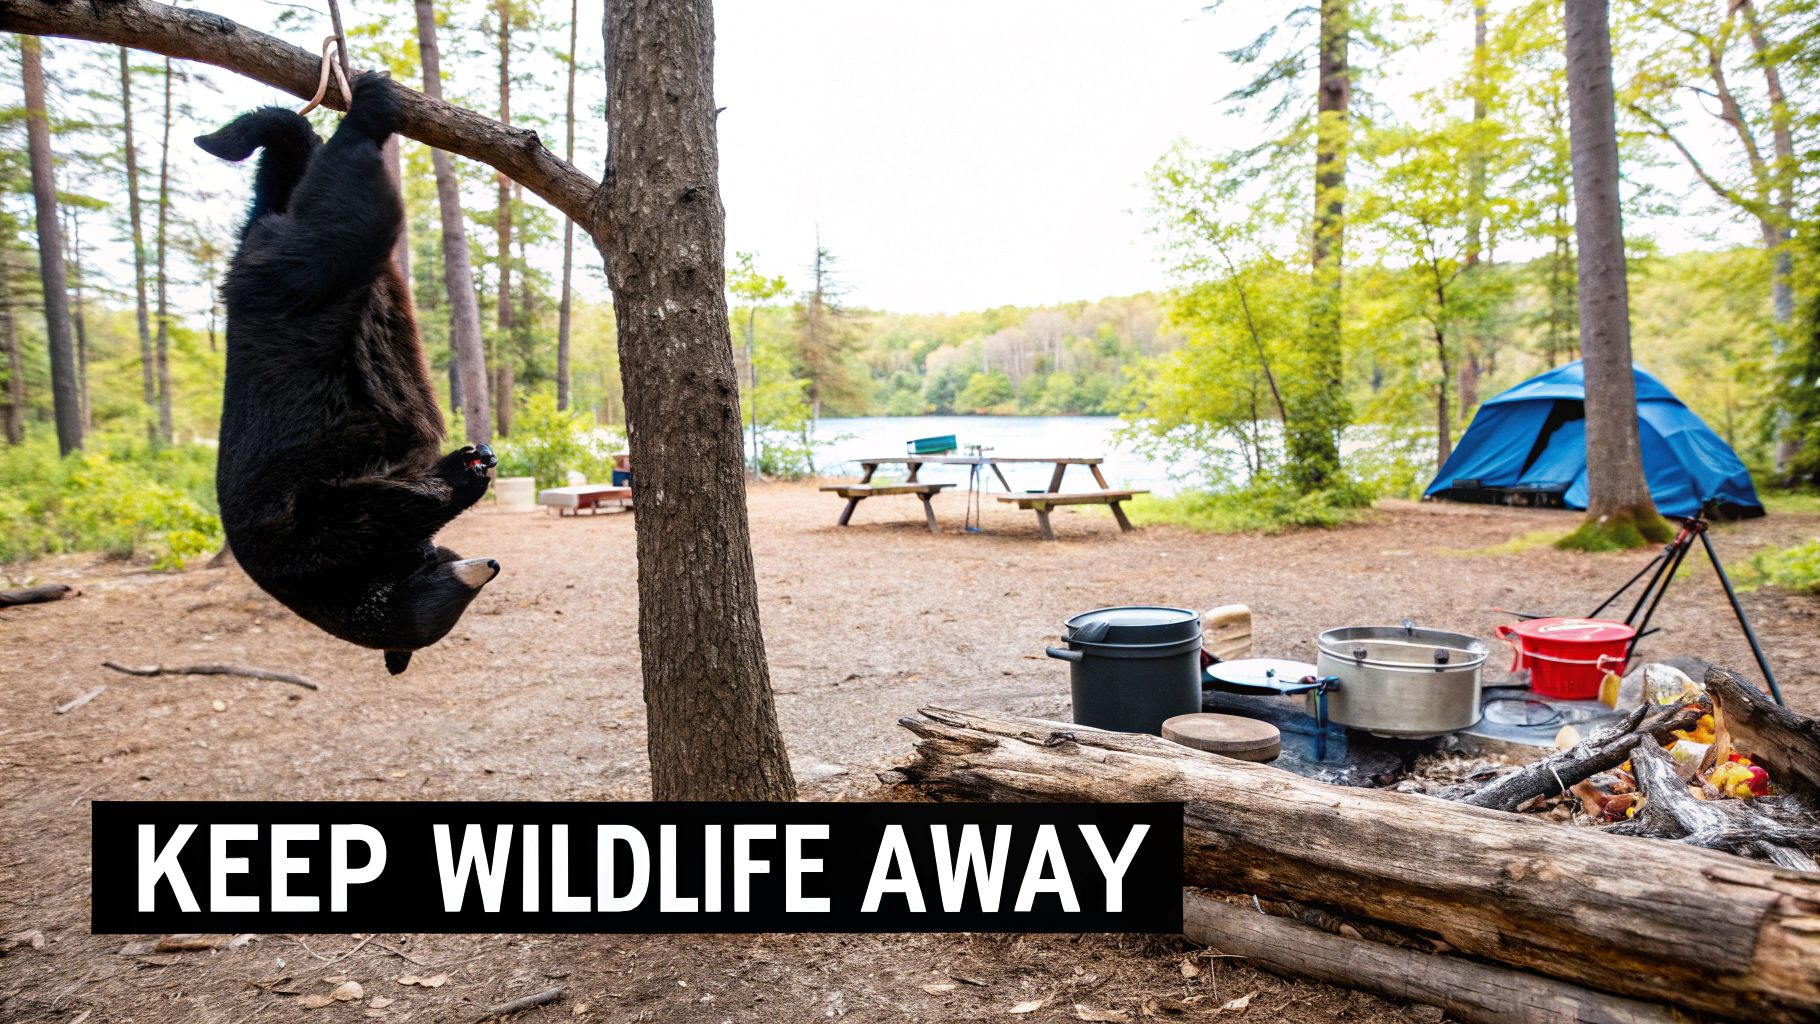
When you're out in the wild, the golden rule is simple: a clean campsite is a safe campsite. The whole idea is to make your camp completely uninteresting to animals. This isn't just about stopping a raccoon from running off with your marshmallows; it’s about protecting yourself and the incredible wildlife that calls the forest home.
This goes way beyond just the food itself. Animals are curious, and they follow their noses. Anything with a scent can turn your peaceful campsite into a 24/7 buffet if you aren't careful. Proper camping food storage means creating a scent-free zone so animals have zero reason to pay you a visit.
Understanding the Bear Triangle
The first thing to think about is your campsite's layout. A smart setup can make all the difference. Imagine three points of a triangle: where you sleep, where you cook, and where you store your food. This is what experienced campers call the "Bear Triangle."
The goal is to keep these three areas far apart so the smell of your delicious camp dinner doesn't drift into your tent. Each point of the triangle should be at least 100 yards apart—that's about 70 big steps. You’ll also want to position them so the wind blows scents away from your sleeping area.
- Your Tent (Sleeping Zone): This is a no-food zone. Period. Don't bring anything scented inside, not even the clothes you wore while cooking.
- Your Kitchen (Cooking Zone): This is where all the cooking and eating happens. Clean it up right after every meal. We're talking every last crumb and spill.
- Your Food Storage (Storage Zone): This is the designated spot for every single "smellable" item. Ideally, it should be downwind from your tent.
Think of it this way: You wouldn't have a picnic next to a beehive, right? It's the same logic. You shouldn't sleep next to the very things that attract wildlife. The Bear Triangle creates a buffer that keeps you safe if an animal comes sniffing around for your food.
Primary Methods for Securing Food
Once your camp is laid out, you need a bulletproof way to lock down your supplies. There are three main, time-tested methods for this. The best one for you will depend on where you are and the local park rules.
1. Certified Bear-Resistant Containers
These are the gold standard for a reason. We're talking about hard-sided coolers with special locking systems or tough-as-nails bear canisters for backpacking. These things have been seriously put to the test by groups like the Interagency Grizzly Bear Committee (IGBC) to prove they can stand up to a bear's strength and smarts. In many national parks, they aren't just recommended—they're required.
2. Hanging a Bear Bag
This is the classic backcountry technique. You put all your scented gear into a tough sack and hoist it up into a tree, well out of reach. The best way to do this is called the PCT Method, which uses a carabiner and rope to hang the bag far from the tree trunk and high off the ground.
A properly hung bear bag needs to be:
- At least 12 feet off the ground.
- At least 6 feet away from the tree trunk.
- At least 6 feet below the branch it's hanging from.
It takes a bit of practice and finding the right tree, but it's a fantastic, lightweight option when done right.
3. Using a Hard-Sided Vehicle
In some car-camping spots, you can store your food inside a locked, hard-sided vehicle. The key here is "hard-sided"—no soft-top Jeeps or trucks with canvas covers. A determined bear can rip right through those. Make sure the windows are rolled up tight and all your food and coolers are covered up and out of sight. Always check the local regulations first, as this isn't allowed everywhere.
What Counts as a Smellable
Here's where a lot of people mess up. They think only food attracts animals. But the truth is, wildlife is drawn to anything with an interesting scent. Your storage plan has to cover all of it.
Think beyond the trail mix. Here’s a quick checklist of "smellables" that need to be secured:
- All Food: Obvious, but this includes everything from sealed packages to fresh ingredients.
- All Trash: Every wrapper, leftover, and bit of packaging.
- Cookware: Used pots, pans, and utensils still smell like food.
- Toiletries: Toothpaste, soap, deodorant, sunscreen—you name it. If it smells good to you, it smells interesting to a bear.
- Pet Food: Don't forget Fido's kibble!
By making sure every single scented item is locked down tight, you’re doing your part to respect wildlife and guarantee yourself a safe, peaceful night under the stars.
Smarter Food Strategies for Backpackers
https://www.youtube.com/embed/fZUit-fJYH4
When you’re carrying everything you need on your back, the whole game of camping food storage changes. You can forget about those heavy coolers and clunky dry bins. For a backpacker, every single ounce counts. This forces a shift to a lean, efficient, and lightweight system where your food is simply fuel. Nothing more.
The real challenge isn't just what you eat, but how you pack it. A solid backpacking food strategy is a masterclass in minimalism. You have to be ruthless about cutting weight and eliminating bulk, all without sacrificing the critical calories you need to power through long days on the trail.
Embrace Dehydrated and Freeze-Dried Meals
The absolute cornerstone of modern lightweight backpacking is food that’s had nearly all its water removed. Just think of water as dead weight—it’s heavy, and you can usually find it on the trail. By carrying dehydrated or freeze-dried meals, you're essentially just carrying the nutrients and calories you need to refuel.
This simple concept is a total game-changer for shrinking your pack weight. A freeze-dried meal for two can weigh as little as 6 ounces but pack a punch with over 700 calories once you add hot water. Their popularity isn't just anecdotal, either. The global market for dehydrated camping food was valued at around USD 3.5 billion in 2023 and is expected to nearly double by 2033. This boom is fueled by hikers who rely on these lightweight, high-calorie options. You can dive deeper into the dehydrated food market here.
Plus, these meals are incredibly easy to make, usually just requiring boiling water. That means you can carry a smaller, lighter stove and less fuel, which creates a ripple effect of weight savings across your entire setup.
Ditch the Commercial Packaging
Let's be honest, the packaging you find at the grocery store is designed for shelves, not for the backcountry. It’s bulky, adds unnecessary weight, and creates extra trash you have to pack out. One of the single most effective ways to save space and weight is to repackage absolutely everything.
- Get rid of the original box. Transfer things like pasta, oatmeal, and trail mix into durable, lightweight plastic bags.
- Portion everything out. Pre-measure your ingredients for each meal into individual bags. A simple label like "Day 1 Dinner" makes cooking on the trail quick and painless.
- Consider a vacuum sealer. For longer trips, a vacuum sealer can be a backpacker’s best friend. It compresses food like rice or pasta into dense, hard bricks that take up minimal space and stay perfectly fresh.
This meticulous approach means there's no wasted space in your pack. Learning these packing techniques is a fundamental skill, especially for those just starting out. If you're new to the trail, our guide on backpacking for beginners is a great place to build that foundation.
Think of your food bag like a game of Tetris. The goal is to eliminate all the air and empty gaps. Repackaging your food into uniform shapes is how you win.
Choosing the Right Backcountry Container
Once your food is packed efficiently, you need to protect it—and the local wildlife. Out in the backcountry, your two main options are specialized soft-sided bags or the classic hard-sided canisters.
Ursacks vs. Bear Canisters
| Feature | Ursack (Flexible Bag) | Bear Canister (Hard-Sided) |
|---|---|---|
| Material | Woven from ultra-high-performance polyethylene (Spectra fabric) | Rigid plastic or carbon fiber |
| Weight | Significantly lighter (around 8 oz) | Heavier (2-3 lbs) |
| Flexibility | Molds to fit inside your pack; can be compressed when empty | Bulky and rigid; takes up the same space whether full or empty |
| Protection | Critter-proof and highly bear-resistant when tied correctly | Approved in all areas requiring bear-resistant storage |
| Best For | Experienced backpackers in areas where canisters aren't mandatory | National Parks and regions with strict bear canister regulations |
Ultimately, your choice often comes down to local regulations. Many National Parks, like Yosemite and Glacier, have strict rules requiring certified hard-sided bear canisters. But where they're permitted, an Ursack offers incredible weight savings and much better packing flexibility.
How to Clean and Maintain Your Storage Gear
The campfire’s out and the car is unpacked, but the adventure isn’t quite over. Taking a few minutes to clean your gear now is the single best way to make sure it’s ready for your next trip. Think of it as an investment in your future self—you’ll be thankful you did it when you’re not hit with a funky smell the next time you open your cooler.
Proper care prevents mildew, keeps pests away, and extends the life of your equipment. It's a simple habit that separates seasoned campers from rookies.
Your Post-Trip Gear Checklist
Before you shove everything back into the garage, run through this quick cleaning routine. A little effort now saves you from bigger headaches (and smells) later.
-
Coolers: Give the inside a good scrub with warm, soapy water. If you’ve got a stubborn odor from last weekend’s fish fry, a diluted bleach solution or a paste made from baking soda and water will do the trick. Just let it sit for a bit before rinsing it out completely.
-
Bear Canisters: These need a serious wash, inside and out. You want to eliminate every last food scent so you don't accidentally attract curious critters to your empty canister at the next campsite. Pay special attention to the lid's threads and any locking parts.
-
Dry Bags: The easiest of the bunch. Just turn them inside out, shake out the crumbs, and wipe them down. The most important step? Let them air out until they are 100% dry before you roll them up for storage. This is non-negotiable if you want to avoid a mildew surprise.
Here’s a pro tip: always store your coolers with the lid cracked open. It lets the air circulate and stops that musty, closed-up smell from taking hold.
Inspect for Wear and Tear
While you’re cleaning, it’s the perfect time to give your gear a quick physical. Check the rubber seals on your cooler—if they're cracked or brittle, your ice retention is going to suffer.
Look for any cracks in your hard-sided containers and run your hands along your bear bag ropes to feel for any frayed spots. Catching a small problem now can prevent a catastrophic failure when you’re miles from anywhere.
The world of camping food storage is constantly improving, which is one reason the global food storage container market was valued at a whopping USD 163.5 billion in 2024. You can learn more about these developments in food storage solutions. A little maintenance ensures you get every bit of performance out of the gear you've invested in.
Answering Your Top Camping Food Storage Questions
Even the most seasoned camper runs into questions out on the trail. Getting a handle on these common food storage dilemmas before you're miles from civilization can make all the difference between a great trip and a frustrating one.
Think of this as your go-to FAQ for those little "what-if" moments that pop up around the campfire.
How Long Can I Expect Ice to Last in My Cooler?
This is the million-dollar question, and the answer really depends on your cooler, how you pack it, and the weather. If you've invested in a high-end, roto-molded cooler and you pre-chill it, you can realistically expect that ice to last 5-7 days. For a more standard, budget-friendly cooler, you’re probably looking at just 1-3 days.
To stretch every last bit of chill out of your ice:
- Park your cooler in the shade. Direct sunlight is the enemy.
- Stop opening it so much! Every time you peek inside, you let cold air out.
- Fill every nook and cranny. Empty air space warms up fast, so use towels or extra water bottles to pack it tight.
Is It Really Safe to Store Food in My Car in Bear Country?
Sometimes, yes, but this is a big one you have to get right. Many national parks and forests allow you to store food in a hard-sided vehicle with the windows rolled up tight. It's often considered a solid alternative to a bear canister. But—and this is a big but—it’s not a universal rule and is strictly prohibited in some areas.
A soft-top Jeep or convertible is never a safe bet against a determined bear. Also, don't leave food or coolers visible. Bears are smarter than we give them credit for and have been known to break into cars just to investigate a promising shape. Always, always check with the local ranger station for their specific rules.
What Are the Biggest Food Storage Mistakes People Make?
Honestly, it’s usually the small, simple things that cause the biggest problems. The number one mistake is keeping any scented items in your tent. That doesn't just mean food; we're talking about toothpaste, deodorant, and even that cherry-scented lip balm.
Another classic blunder is getting lazy about securing coolers and trash at night. Even if you're not worried about bears, smaller critters like raccoons, mice, and squirrels can cause a surprising amount of damage. They'll chew right through a backpack for a few crumbs. A clean, crumb-free campsite is a happy campsite, so make sure every last "smellable" is locked up tight.
At FindTopTrends, we're all about finding the gear that makes getting outside easier and way more fun. From tough-as-nails coolers to the campsite accessories you didn't know you needed, we've got your back. Explore our collection of outdoor and travel gear today!
Leave a comment


