


No products in the cart.

Before you even start looking at backpacks, you need to get brutally honest about what you'll actually be doing with it. Are you hauling a laptop and a lunch to the office, or are you planning a multi-day trek through the mountains? This one decision is the most important you'll make, because it instantly cuts through the noise and points you in the right direction.
The goal isn't to find a bag that can do everything, but to find the one that does what you need it to do, perfectly.
Matching Your Backpack to Your Mission
The secret to finding the right backpack is simple: function first. A sleek, minimalist pack built for a bike commute is going to be miserable on a weekend camping trip. Likewise, a massive expedition pack is total overkill for carrying your gym clothes.
Think about your most common scenario. Where will this bag spend 80% of its life? On your back as you navigate airport security? Bouncing around in the trunk of your car on the way to the trailhead? Getting shoved under a desk in a lecture hall? Be realistic. Pinpointing your primary activity helps you focus on the features that genuinely matter and avoid paying for extras you'll never use.
Define Your Primary Use Case
Let's get specific. Even if you want a versatile bag, there’s always one activity that will be its main job. Is it for:
- Daily Commuting & School: Carrying a laptop, books, chargers, and maybe a water bottle.
- Day Hiking: Holding water, snacks, a rain jacket, and the ten essentials for a few hours on the trail.
- Weekend Travel: Packing a couple of changes of clothes, toiletries, and electronics for a short trip.
- Multi-Day Backpacking: Hauling a tent, sleeping bag, food, and all your gear for several nights in the backcountry.
Knowing the specific demands of an adventure, like the recommended packing essentials for a Cradle Mountain tour, is a perfect example of how the mission dictates the gear.
This handy visual breaks down how your activity connects directly to the backpack size and features you should be looking for.
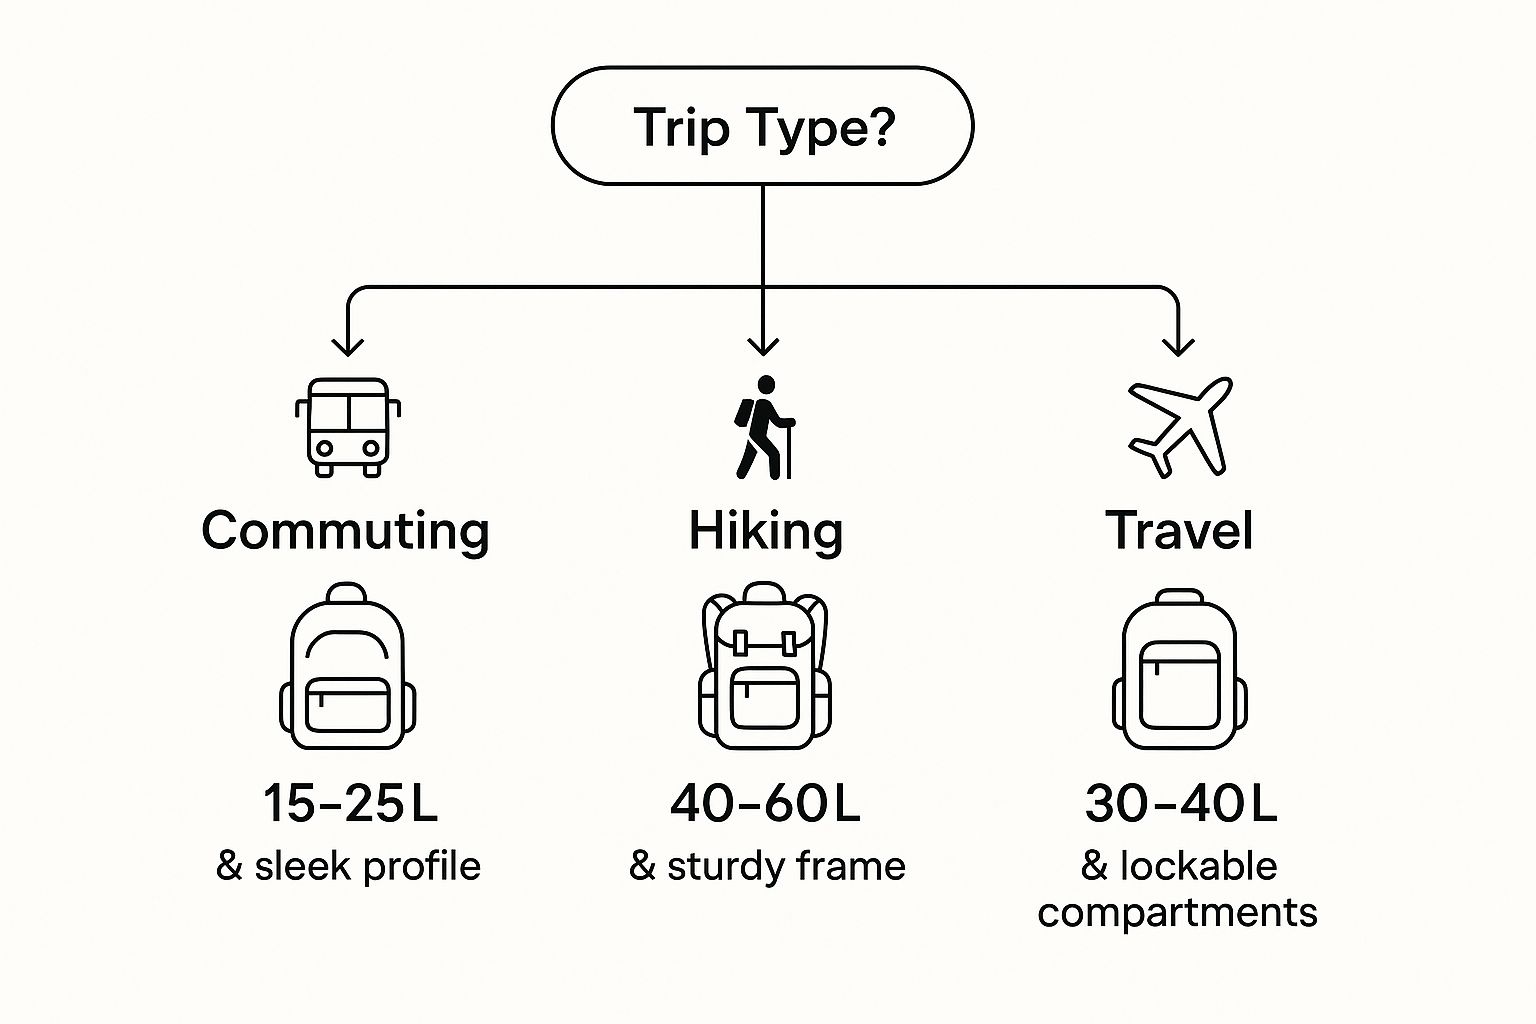
As you can see, a day-tripper's needs are worlds away from a serious backpacker's. The commuter needs organization in a 15-25L pack, while the hiker needs a robust, supportive frame in a 40-60L pack to carry heavy loads comfortably.
The good news is that the market has exploded with specialized options. The global backpack market was valued at around $21.28 billion and is only getting bigger, thanks to more people getting outdoors and traveling. This means there's a pack out there that's practically custom-made for your needs.
Key Takeaway: Stop looking for a "one-size-fits-all" solution. It doesn't exist. Instead, identify your most frequent activity and choose a backpack that excels at that. A pack designed for a specific purpose will always outperform a generic one.
To help you connect the dots, I've put together this quick-reference table. Use it to see which pack type, capacity, and key features line up with your intended adventures.
Find Your Backpack Match by Activity
| Primary Activity | Best Backpack Type | Typical Capacity | Essential Features |
|---|---|---|---|
| Daily Commute/School | Daypack / Laptop Backpack | 15–30 Liters | Padded laptop sleeve, multiple organizer pockets, water bottle holder. |
| Day Hiking | Hiking Daypack | 20–35 Liters | Hydration reservoir compatibility, sternum strap, hip belt, breathable back panel. |
| Weekend Travel | Travel Backpack | 30–50 Liters | Clamshell (suitcase-style) opening, lockable zippers, stowaway straps, carry-on size. |
| Multi-Day Backpacking | Internal Frame Pack | 50–80+ Liters | Adjustable suspension system, load-lifter straps, sleeping bag compartment, gear loops. |
This chart is a great starting point. Once you've identified your category, you can dig deeper into the specific models that fit your style and budget.
If you’re just getting into overnight trips, our guide on https://findtoptrends.com/blogs/news/backpacking-for-beginners is a fantastic resource. But remember, it all starts with matching the pack to your primary mission. Get that right, and you're well on your way to finding the perfect backpack.
Getting Capacity Right: The Liter Game
After you've pinned down what you'll be doing, it's time to figure out the how much—as in, how much gear you can carry. Backpack capacity is measured in liters (L), but let's be honest, those numbers can feel a bit abstract. What does a 30L pack really hold compared to a 60L one?
Nailing this is one of the most important parts of your decision. Too small, and you'll find yourself making painful choices on the trail about what to leave behind. Too big, and you're just hauling around a floppy, half-empty sack that throws off your balance.
As a reference point, your average school or commuter backpack is probably in the 20-25L range. It’s built for the daily grind: a laptop, a few notebooks, a water bottle, maybe a light jacket. It's compact and straightforward.
The growing demand for purpose-built packs is a global trend. For instance, the Asia-Pacific region recently accounted for about 18.92% of the worldwide backpack market share. This boom reflects how more people are getting outdoors and need gear that’s just right for their adventures, making capacity a key factor in their buying decision.
Translating Liters to Real-World Trips
Let's make these numbers mean something. A 25-35L pack is the gold standard for most day hikes. It gives you plenty of room for water, snacks, a first-aid kit, and an extra layer without feeling bulky. You can see exactly what fits into a pack this size by checking out our day hike packing list.
When your plans stretch beyond a single day, you’ll need to scale up.
-
The Weekend Warrior (1-3 nights): 40-55L
This is your go-to size for short backpacking trips. It can handle a compact tent, a sleeping bag, some clothes, and food for a few days. It's a fantastic, versatile option. -
The Multi-Day Adventurer (3-5+ nights): 55-70L+
For longer expeditions, you simply need more space. More food, more fuel, and potentially more specialized gear for changing weather conditions, like a warmer sleeping bag or serious rain gear, all add up.
Pro Tip: If you're stuck between two sizes, I almost always recommend going with the slightly larger one. A good pack has compression straps that do a fantastic job of cinching down unused space, making it far more adaptable than a smaller pack that you’re constantly struggling to close.
Don't Forget Your Packing Style
Finally, you have to be honest with yourself. Are you an ultralight minimalist who obsesses over every gram, or are you a "comfort" packer who can't imagine a night in the woods without a camp pillow and a good book?
Your personal philosophy completely changes the equation. A comfort-focused hiker might easily fill a 65L pack for a two-night trip, while a minimalist could happily fit everything they need for the same adventure into a 45L pack.
There’s no right or wrong approach here. The key is to know your own style. It’s the final piece of the puzzle that will lead you to a pack that feels like it was made just for you.
Nailing the Perfect Fit for a Pain-Free Journey
Let’s be honest: more than any other feature, the fit of your backpack will make or break your trip. A pack that doesn't fit right, no matter how cool it looks or how much it cost, will quickly become your worst enemy out on the trail. We're talking sore shoulders, an aching back, and just an all-around miserable time. Comfort is everything, and it all starts with matching the pack to your body.
The single most important measurement here is your torso length. Don't confuse this with your overall height! It's the specific distance from that bony bump at the base of your neck (the C7 vertebra) down to an imaginary line running across your back, level with the top of your hip bones. Getting this measurement right is the key to letting the pack's frame and suspension system work their magic.
How to Measure Your Torso Length
You don't need to go to a store to get this done. Just grab a soft measuring tape and ask a friend for a hand.
- Find Your Starting Point: Tip your head forward and feel for the most prominent bone at the base of your neck. That's your C7 vertebra, and it's where you'll start measuring.
- Locate Your Hips: Place your hands on your hips, with your thumbs pointing towards your spine. The line that runs between your thumbs is the top of your iliac crest—that's your endpoint.
- Take the Measurement: Have your friend run the tape measure straight down your spine between those two points. That number is your torso length.
With that measurement in hand, you can look at the sizing charts from different backpack brands with confidence. Most companies size their packs in Small, Medium, and Large, and each size corresponds to a specific range of torso lengths.
This picture gives you a great visual of what a well-fitted pack looks like. The hip belt should be sitting squarely on your hips, taking the brunt of the load.
See how the weight is clearly resting on the hips, not hanging off the shoulders? That's exactly what you're aiming for.
Dialing in the Straps
Once you have the right-sized pack, it's time to fine-tune the adjustments. The whole point is to transfer about 80% of the weight from your shoulders to your hips, letting your strong leg muscles do the real work.
- Hip Belt: This is the most important strap. Position the padded sections right over your hip bones and cinch it down. It should be snug and secure, but you should still be able to breathe comfortably.
- Shoulder Straps: Pull down on these until they wrap smoothly over your shoulders. There shouldn't be any gaps. Remember, their job is to stabilize the pack, not carry the weight.
- Load Lifters: These are the smaller straps that run from the top of your shoulder straps to the main pack body. A gentle tug should bring them to about a 45-degree angle, pulling the top of the pack in closer to your back.
- Sternum Strap: Finally, buckle the chest strap. It just needs to be tight enough to prevent the shoulder straps from slipping outwards.
A properly fitted backpack feels like it's a part of you. It moves with you, not against you. Achieving that balance is just as vital as picking the right footwear, which is why checking out our guide on how to choose hiking boots is a great next step. Take a few extra minutes to get the fit just right—your back will thank you for it, mile after mile.
Features That Actually Matter
It’s easy to get distracted by a backpack covered in zippers, straps, and clips. It might look impressive, but honestly, most of that stuff is just for show. When you're trying to find the right pack, the trick is to cut through the noise and zero in on the features that will genuinely make your life easier. It's not about having the most features; it's about having the right ones for you.
Take pack access, for instance. A top-loading design, which you’ll see on a lot of classic hiking packs, basically functions like a giant, durable stuff sack. They're simple and great at keeping the weather out, but digging for something at the bottom can feel like a full-on archaeological expedition. On the flip side, a clamshell (or panel-loading) design unzips all the way around like a suitcase. This gives you amazing access and makes organizing a breeze, which is why it's a go-to for city travelers who need to grab one specific thing without pulling everything else out.
Access and Organization for Your Real Life
Let’s think about this in a real-world context. A photographer out for a day shoot needs to get to their lenses and spare batteries in a flash. For them, a bag with side-access zippers or customizable internal dividers isn't a "nice-to-have"—it's an absolute necessity for capturing that perfect shot. A business traveler, however, would probably care more about a lie-flat laptop compartment that lets them glide through airport security without any hassle.
Good organization is more than just a bunch of pockets. It’s about smart placement.
- Padded Laptop/Tablet Sleeve: If you're commuting or traveling, this is a dealbreaker. I always look for one that's suspended, meaning it doesn't touch the bottom of the bag. This little detail protects your expensive gear from inevitable drops and bumps.
- Quick-Access Stash Pocket: That small, soft-lined pocket usually found on the top or front of the bag is a lifesaver. It’s the perfect spot for things you grab all the time, like your phone, sunglasses, or keys.
- Hip Belt Pockets: When you’re out on the trail, these are pure gold. You can stash snacks, a small GPS, or your lip balm right where you can reach them without having to stop and shrug your pack off.
This demand for practical, well-designed features is a huge driver in the industry. The global backpack market is on track to hit $27.85 billion, and a big reason for that growth is that we, as consumers, want gear that fits our lives. This means everything from sustainable materials to clever additions like built-in charging ports. You can dive deeper into these backpack market trends and statistics to see where things are headed.
The Underrated Workhorses
Beyond pockets and access, some features are downright critical for performance and even safety, depending on what you're doing. Don't gloss over these functional powerhouses.
My Two Cents: The best features are often the ones you don't even think about... until you desperately need them. A hydration sleeve seems unimportant until you're gasping for water on a steep climb. Compression straps seem like clutter until your half-empty pack is sloshing around, throwing off your balance.
Think about compression straps—those webbing straps on the sides of many packs. Their main job is to cinch the load down and pull it closer to your back, which massively improves your balance and keeps your gear from shifting. As a bonus, they're also great for strapping on trekking poles or a rain jacket you just took off.
And for anyone hitting the trails, hydration reservoir compatibility is a must. This means having a dedicated internal sleeve for a water bladder and a little port for the drinking tube to pass through. It lets you sip on the go without breaking stride. These features might not be flashy, but they fundamentally change how the pack performs when you need it most.
Decoding Materials and Durability
The fabric of your backpack is its first line of defense out in the wild. It’s what’s up against sharp rocks, scrapes on the trail, and those sudden downpours. If you really want to know how to judge a pack’s toughness before you even buy it, you’ve got to learn the language of its materials.
When you're trying to figure out how to choose a backpack that will actually last, that little tag describing the fabric is your best friend. You'll see words like nylon, polyester, and specialty names like Cordura thrown around, and each one brings something different to the table. For example, ripstop nylon is incredibly popular because it's lightweight and has a special grid pattern woven in to stop tiny punctures from turning into massive, gear-spilling tears.
Polyester, on the other hand, is a champ at resisting UV damage. If you do a lot of hiking in exposed, sunny places, a polyester pack won't break down or fade as fast. Then you have the real heavyweights like Cordura, which is a type of ultra-tough nylon famous for its incredible resistance to abrasion and tearing. You'll often find it reinforcing high-wear areas, like the bottom of a pack.
Understanding Fabric Weight and Strength
Ever see a number followed by a "D" on a backpack's spec sheet, like "420D Ripstop Nylon"? That "D" stands for denier, and it's basically a measurement of how thick each fiber in the fabric is. Generally speaking, a higher denier means a thicker, heavier, and tougher fabric.
- 100D - 300D: This is ultralight territory. You'll find these fabrics on packs where shaving every possible ounce is the main goal.
- 400D - 600D: Here's the sweet spot for most daypacks and all-around hiking backpacks. It’s a fantastic balance between solid durability and a manageable weight.
- 800D+: These are the fabrics used for bombproof travel bags and expedition packs designed to be thrown around and survive just about anything.
Keep in mind, denier isn't the whole story. The type of fiber matters a lot (nylon is typically stronger than polyester), and so does the weave. A well-designed 450D pack with a ripstop weave can easily outlive a poorly constructed 600D one.
The Small Details That Signal Quality
A backpack is only as tough as its weakest part. It's not always the main fabric that fails first; more often, it's the little things—the zippers, buckles, and stitching—that give out on a cheap pack.
Take a hard look at the zippers. I always look for the tiny "YKK" stamp. It's the industry gold standard, and it means you're getting a reliable zipper that won't jam or break when you're wrestling it closed. Next, check out the stitching, especially where the shoulder straps and hip belt join the pack body. The best packs use double-stitching or bar-tack stitching (a tight, dense zig-zag pattern) to reinforce these critical stress points. These are the tell-tale signs of a backpack built to go the distance.
Still Have a Few Questions?
It's completely normal to have a few last-minute questions circling in your head before pulling the trigger on a new backpack. Even after you've narrowed it down, those "what if" moments can creep in.
Let's tackle some of the most common questions I hear. Think of this as a final sanity check to make sure you're walking away with a pack you'll be happy with for years to come.
Is It Worth Paying More for a Backpack?
Honestly, most of the time, yes. It's tempting to save a few bucks, I get it. But with backpacks, a higher price tag almost always means better materials, smarter construction, and a much more comfortable carry. For just knocking around town or a rare day trip, a budget pack might be fine.
But if you're planning any serious travel or regular hiking, investing in a quality pack is one of the smartest moves you can make. You're not just paying for a logo. You're paying for:
- Tougher fabrics: Think high-denier Cordura or ripstop nylons that won't shred the first time you scrape against a rock.
- Better hardware: We're talking beefy, reliable YKK zippers that don't split open and reinforced seams that won't pop under a heavy load.
- A real suspension system: This is the big one. A good harness and hip belt will transfer the weight off your shoulders and onto your hips, which makes a world of difference after a few hours on the trail.
- A solid warranty: Reputable brands stand behind their gear, which gives you peace of mind.
A well-made pack is an investment that can easily last a decade, saving you money and frustration in the long run.
Do I Need a Truly Waterproof Backpack?
This one trips a lot of people up. The short answer is almost certainly no. Most quality backpacks are water-resistant, not truly waterproof. This means the fabric has a DWR (Durable Water Repellent) coating that makes water bead up and roll off in a light shower.
But in a real, sustained downpour, that fabric will eventually get saturated, and water will find its way through zippers and seams.
A truly waterproof pack—the kind with welded seams and watertight zippers—is overkill for most people. They're heavy, expensive, and don't breathe well. A much better solution is to use a simple, lightweight rain cover with your water-resistant pack. It provides bombproof protection when you need it and stays stuffed in a pocket the rest of the time.
What Is the Single Most Important Factor?
If you forget everything else, remember this: fit is king. It’s everything. You could have the most expensive, feature-packed backpack in the world, but if it doesn't fit your body properly, you're going to be miserable.
The key is getting the torso length right. When a pack fits correctly, the hip belt can comfortably wrap around your hip bones, taking 80% or more of the load off your fragile shoulders. Always, always prioritize a pack that fits your body over any specific brand or cool feature.
Should I Get a Backpack with Wheels?
A rolling backpack seems like the perfect hybrid, but it comes with some serious trade-offs. They're a dream when you're gliding through a polished airport terminal or down a smooth city sidewalk. Your back will thank you.
The problem starts the second you run out of smooth surfaces. The wheel and handle assembly adds a ton of weight and eats up a surprising amount of packing space. Try lugging one up a long flight of stairs or dragging it over a cobblestone street, and you'll see what I mean. If your travels are strictly urban from one smooth floor to the next, it's a great convenience. But for any kind of mixed-terrain travel, a traditional backpack is way more versatile.
Ready to find the perfect pack for your next adventure? At FindTopTrends, we've curated a collection of high-quality backpacks designed for every mission, from daily commutes to epic journeys. Explore our selection and get geared up today.
Leave a comment


