


No products in the cart.

The dream of every backpacker is to float down the trail, unburdened by a monstrous pack, and feel fully immersed in the wilderness. Moving from a heavy, traditional load to an efficient, feather-light setup isn't about sacrificing comfort or safety; it's about making smarter, more intentional choices with every single item you carry. It’s a philosophy that prioritizes efficiency and freedom, allowing you to cover more ground with less effort and enjoy your surroundings more deeply.
This guide provides a comprehensive collection of actionable ultralight backpacking tips that go beyond the obvious "cut your toothbrush in half" advice. We will dive into the specific strategies, gear philosophies, and trail-tested techniques used by seasoned thru-hikers and weekend warriors to achieve a sub-10-pound base weight. You will learn how to conduct a meticulous gear audit, optimize your shelter and sleep system for maximum warmth-to-weight ratio, and rethink your entire approach to food, water, and clothing.
Prepare to fundamentally change how you pack, plan, and experience the outdoors. Our goal is to provide you with the practical knowledge to transform grueling treks into graceful journeys. Forget the aching shoulders and exhausted legs; the path to ultralight freedom begins with a single, well-informed decision. These detailed tips will guide you through every choice, from selecting the right minimalist pack to creating an ultralight cooking system that actually works. Let's get started on lightening your load and maximizing your adventure.
1. Base Weight Optimization and Gear Audit
The foundational principle of ultralight backpacking is ruthlessly minimizing your base weight. This is the total weight of your gear, excluding consumables like food, water, and fuel. Seasoned ultralight backpackers aim for a base weight under 10 pounds, a stark contrast to the 30-50 pound packs many traditional hikers carry. This dramatic weight reduction is achieved through a meticulous process: the gear audit.
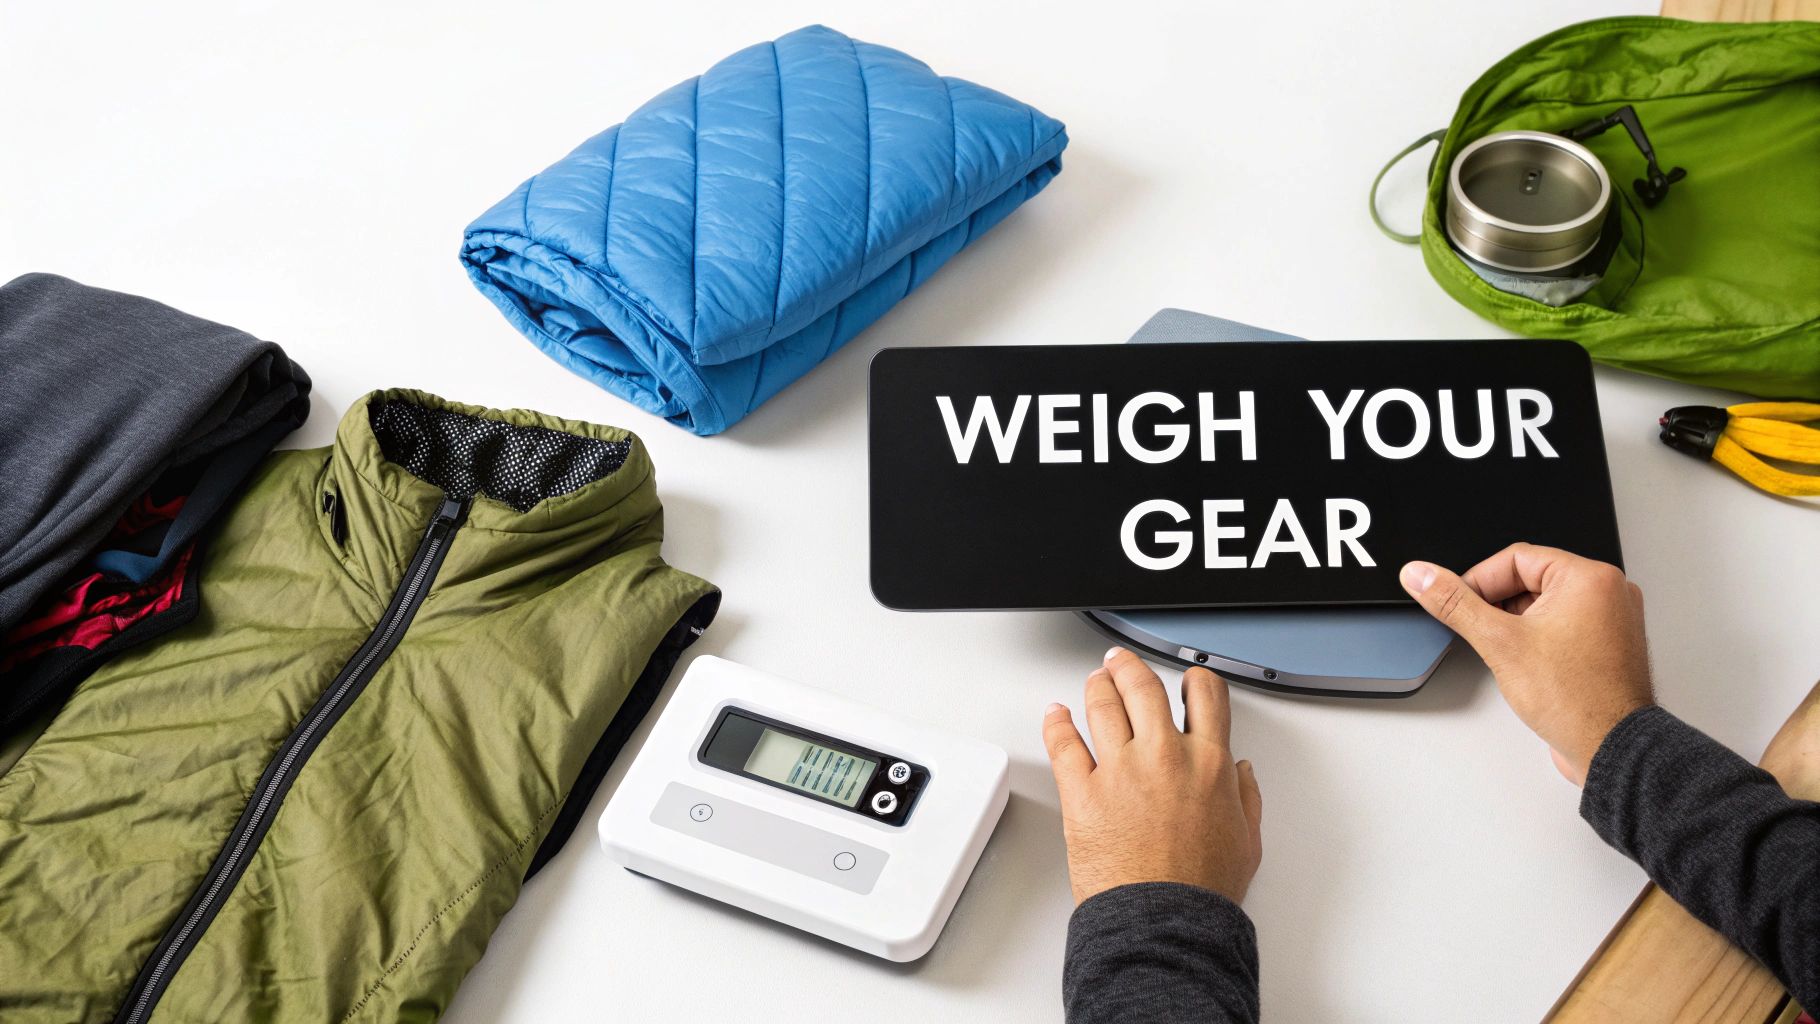
Pioneered by legends like Ray Jardine, the gear audit is a systematic evaluation of every single item you carry. It’s a data-driven approach that replaces guesswork with precision, allowing you to make informed decisions about what truly earns a place in your pack. The benefits are significant: a lighter pack reduces physical strain, increases daily mileage, and enhances overall enjoyment on the trail.
How to Conduct a Gear Audit
Getting started is simple but requires diligence. Follow these steps to implement one of the most effective ultralight backpacking tips available.
- Weigh Everything: Purchase a digital scale accurate to 0.1 ounces or a single gram. Weigh each piece of gear individually, from your tent and sleeping bag down to your toothbrush and spoon.
- Create a Gear Spreadsheet: Log every item and its weight in a spreadsheet. This visual database, a favorite tool of Pacific Crest Trail thru-hikers, will reveal surprising sources of weight and highlight your heaviest items, often called the "Big Four" (pack, shelter, sleeping bag, and sleeping pad).
- Analyze and Eliminate: Scrutinize your list. Ask yourself critical questions for each item: Is it essential for safety? Have I used this on my last three trips? Does it serve more than one purpose? Remove redundant items, "just-in-case" luxuries, and anything that consistently goes unused.
Pro Tip: Focus on multi-functional gear. A buff can be a hat, neck gaiter, and towel. Trekking poles can double as tent poles for specific ultralight shelters, eliminating the need to carry dedicated poles.
By transforming your pack from a collection of items into a finely-tuned system, you can slash pounds from your load. This audit is not a one-time task but an ongoing process of refinement. For a detailed look at what a finished gear list might look like, explore this ultimate lightweight backpacking gear list for 2025 to see how individual choices contribute to a low base weight.
2. Minimalist Clothing Layers and Synthetic/Merino Wool Fabrics
Rethinking your clothing system is a cornerstone of ultralight backpacking, moving away from a bulky wardrobe to a highly efficient, multi-functional layering system. Instead of packing for every possible weather scenario with distinct outfits, the goal is to use 3-4 versatile pieces that work together. This minimalist approach relies heavily on advanced fabrics like merino wool and synthetics, which offer superior performance-to-weight ratios.
This refined strategy, championed by brands like SmartWool and Icebreaker, eliminates redundancy and the "just-in-case" items that add pounds to a pack. For thru-hikers on the Pacific Crest Trail, it's common to see a single merino wool shirt last the entire 2,650-mile journey. The benefits are clear: a lighter, less-cluttered pack, simplified daily routines, and clothing that performs reliably in a wide range of conditions, from sun-scorched deserts to snowy mountain passes.
How to Build a Minimalist Layering System
Adopting this clothing philosophy requires a shift in mindset and a focus on fabric performance. Follow these steps to build a system that keeps you comfortable without weighing you down.
- Choose the Right Fabrics: Select merino wool for base layers due to its natural odor resistance, moisture-wicking properties, and ability to insulate even when damp. Use synthetic materials like polyester or nylon for mid-layers and outer shells, as they are durable, highly breathable, and dry exceptionally fast.
- Embrace the "One of Each" Rule: Pack only one hiking shirt, one pair of hiking shorts or pants, one extra pair of socks, and one extra pair of underwear. Your sleep clothes can double as camp clothes or even a clean layer to wear in town.
- Create a Cohesive System: Ensure each layer works with the others. A typical three-piece system for three-season hiking includes a merino or synthetic t-shirt (base layer), a fleece or lightweight puffy jacket (mid-layer), and a waterproof/windproof rain jacket (shell). Add hiking pants/shorts and rain pants to complete the setup.
Pro Tip: Your sleep clothes are part of your layering system. On unexpectedly cold mornings, you can start hiking in your base layer leggings and top under your primary hiking clothes, removing them as you warm up. This is a common ultralight backpacking tip for maximizing warmth without adding dedicated "cold weather" items.
By selecting versatile, high-performance pieces that function as a cohesive unit, you can dramatically reduce clothing weight and bulk. This systematic approach ensures you have exactly what you need for safety and comfort, and absolutely nothing more.
3. Shelter and Sleep System Optimization
Your shelter and sleep system often represent the heaviest components in your pack after its frame. Optimizing these items offers one of the most significant weight-saving opportunities available. Instead of a traditional 4-5 pound tent, ultralight backpackers often use minimalist systems weighing just 1-2 pounds. When combined with a lightweight sleeping bag and pad, this strategic choice can slash your total sleep system weight from over 8 pounds down to a mere 3-4 pounds.
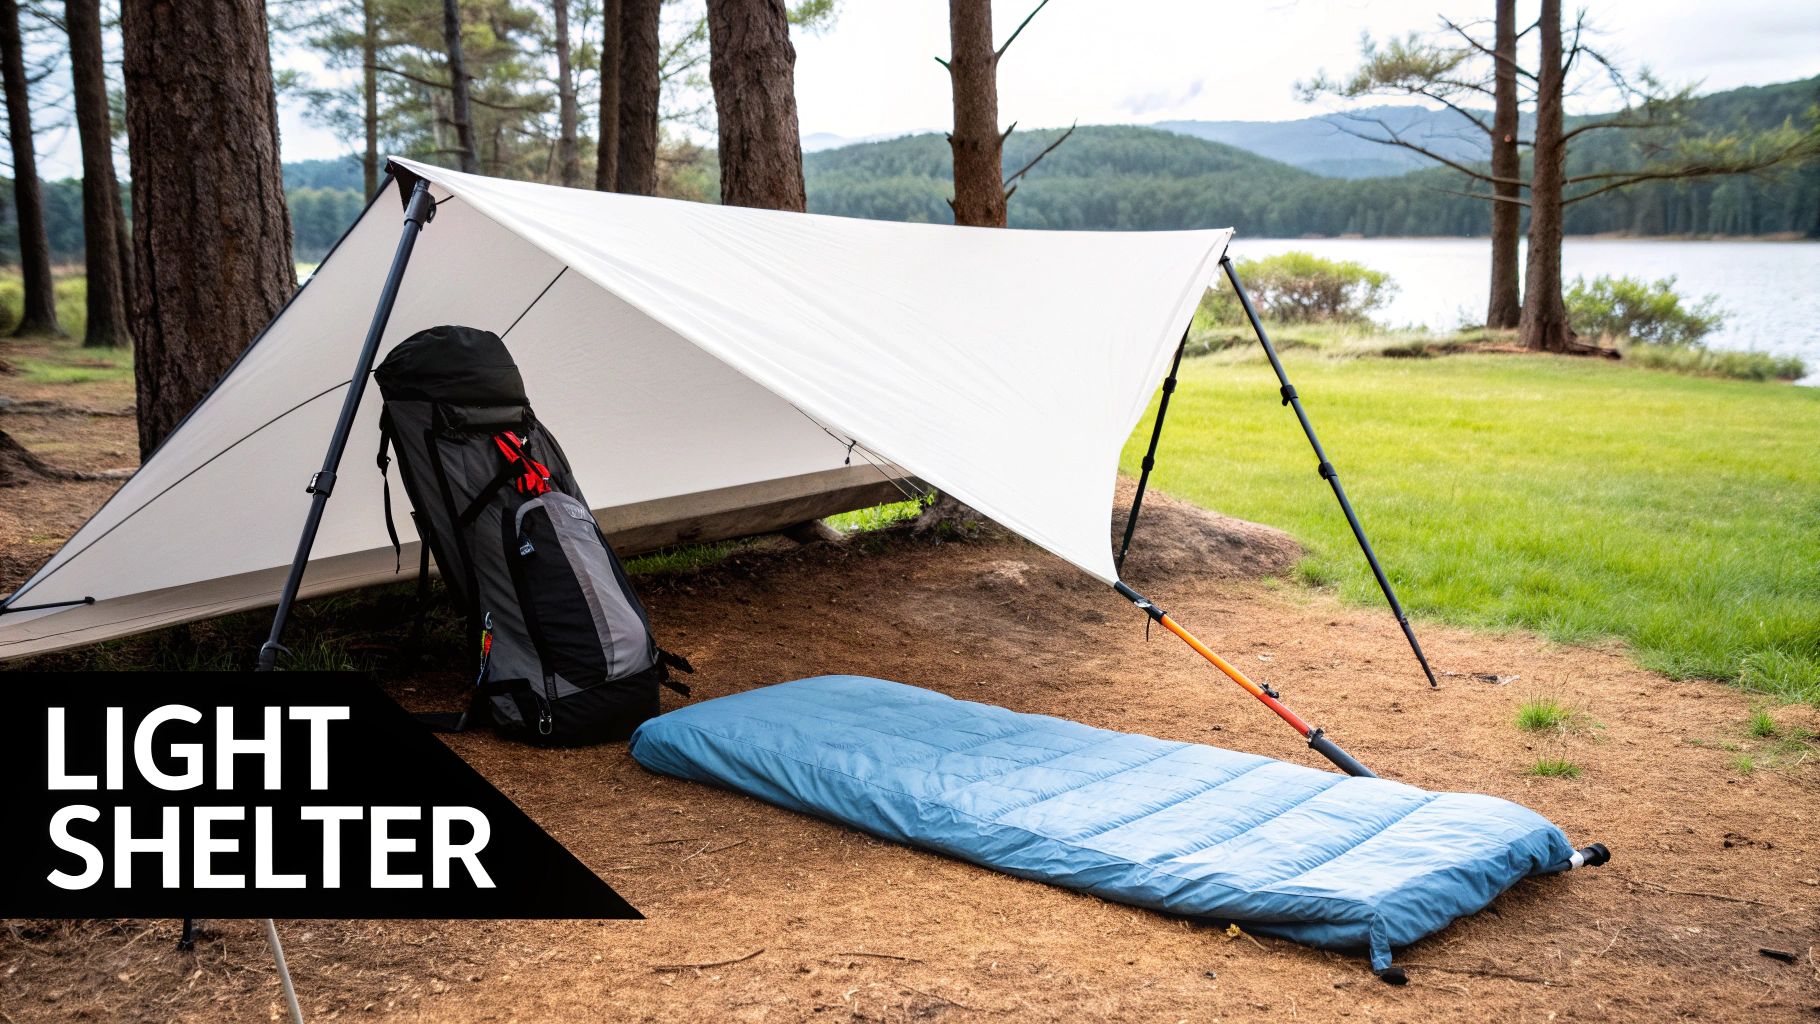
This philosophy was advanced by pioneers like Ray Jardine, who championed the tarp and bivy sack system. Modern manufacturers like Zpacks and Hyperlite Mountain Gear have since innovated with materials like Dyneema Composite Fabric to produce single-wall tents that weigh less than 1.5 pounds. The benefit is a dramatic reduction in pack weight, leading to less fatigue, greater agility, and the ability to cover more ground comfortably.
How to Optimize Your Shelter and Sleep System
Transitioning to a lighter setup requires careful consideration of your comfort, skill level, and the conditions you expect to face. Here’s how to implement these ultralight backpacking tips effectively.
- Select the Right Shelter: For those new to ultralight, start with a sub-2-pound tent from a brand like Six Moon Designs before moving to a more advanced tarp or pyramid shelter. Tarps offer the lowest weight but require more skill to pitch effectively.
- Choose a High-Performance Sleeping Bag: Down insulation offers the best warmth-to-weight ratio. Select a bag or quilt rated 10-20°F colder than the lowest temperature you anticipate to ensure a comfortable night's sleep.
- Pick a Lightweight Sleeping Pad: While closed-cell foam pads are durable, modern inflatable pads typically provide a better combination of comfort, insulation (R-value), and low weight for three-season backpacking.
- Practice and Prepare: Never take a new shelter, especially a tarp, into the backcountry without practicing its setup at home first. Understanding how to pitch it in various configurations for wind and rain is a critical safety skill.
Pro Tip: Your trekking poles can serve double duty as shelter supports for many ultralight tarps and tents, eliminating the weight of dedicated tent poles. Always check if your chosen shelter is designed for this feature.
This video provides a great overview of setting up a minimalist tarp shelter, a cornerstone skill for advanced ultralight hikers.
By thoughtfully selecting each component, you create a cohesive, lightweight system that provides necessary protection without unnecessary bulk. This methodical approach is fundamental to shedding pounds and embracing the freedom of ultralight travel.
4. Embrace Minimalist Pack Design
Transitioning to an ultralight backpack is a pivotal step that fundamentally changes how you pack. Traditional internal-frame packs, often weighing 3-5 pounds empty, are built to haul heavy loads. Ultralight philosophy inverts this, advocating for a minimalist pack weighing between one and two pounds, which in turn necessitates a lighter overall load. This forces discipline and reinforces smart packing habits, making it one of the most impactful ultralight backpacking tips you can adopt.
Pioneered by innovators like Ray Jardine and commercialized by brands such as Zpacks and Hyperlite Mountain Gear, these packs are typically frameless or feature a simple, removable frame. They are constructed from advanced, featherlight materials like Dyneema Composite Fabric (DCF). The direct benefit is a significant reduction in your base weight before you even put anything inside the pack.
How to Select an Ultralight Pack
Choosing a minimalist pack requires a different mindset. Since the pack itself provides less structure, your gear and packing technique must create the support.
- Match Volume to Your Base Weight: Your pack's capacity should closely match your gear volume. A common guideline is that your base weight in pounds should roughly equal the minimum required pack volume in liters (e.g., a 12 lb base weight fits well in a 25-40 liter pack). This prevents you from carrying an oversized, half-empty bag.
- Test for Fit and Comfort: Even minimalist packs need to fit correctly. Ensure the hip belt, if it has one, sits properly on your iliac crest to transfer the load. Load the pack with your actual gear weight at a retailer or during a trial period to test for comfort and balance on your back.
- Prioritize Essential Features: Look for function over frills. Key features include large external mesh pockets for wet gear or snacks, well-placed compression straps to stabilize the load, and simple attachment points for trekking poles or an ice axe.
- Consider a Frameless Design: For the ultimate weight savings, consider a frameless pack. This requires you to use a folded sleeping pad, like a Z Lite Sol, against your back to create a virtual frame, providing structure and cushioning.
Pro Tip: Your ultralight pack is the last major piece of gear you should buy. Finalize your shelter, sleep system, and other core items first. Only then will you know the precise volume and weight capacity you require from your pack.
Leading options like the Hyperlite Southwest or the Zpacks Arc Haul exemplify this category, offering durability and function at a fraction of the weight of conventional packs. By choosing a smaller, lighter pack, you commit to the ultralight ethos and make carrying a heavy load a thing of the past.
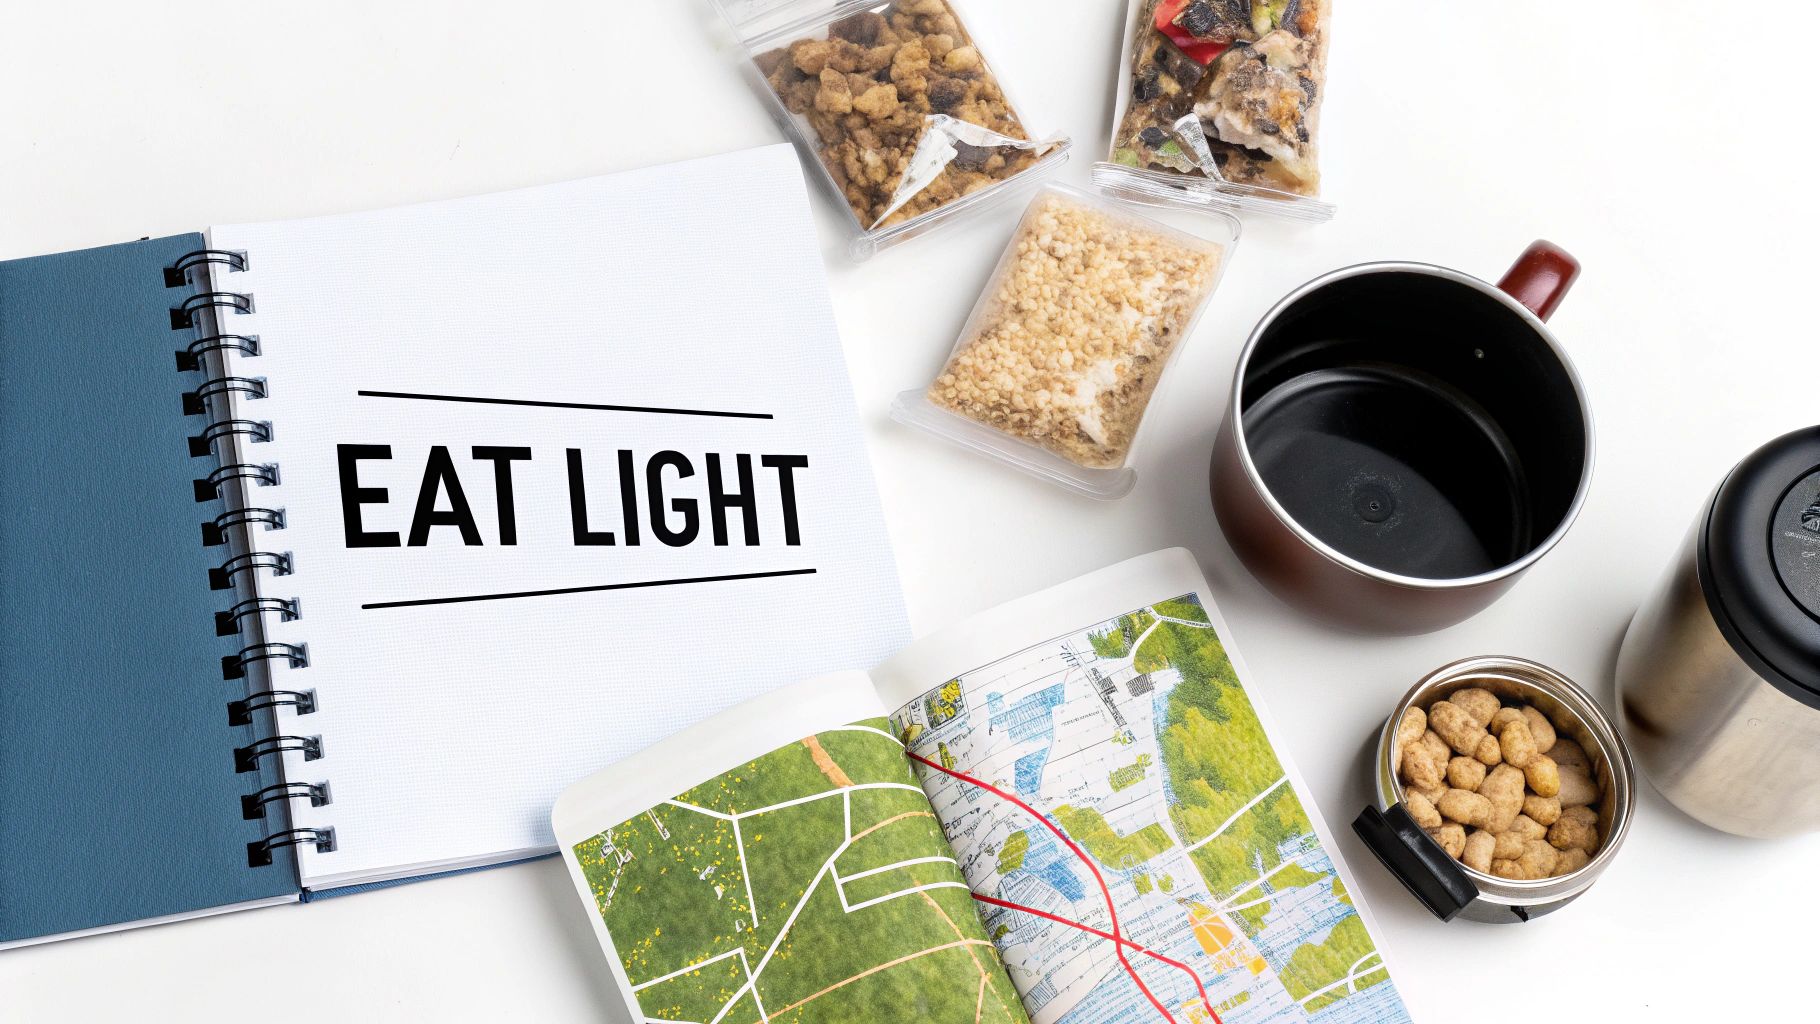
5. Smart Food and Water Strategy (Dehydration and Resupply Planning)
Consumables like food and water are the heaviest items in your pack, so optimizing their weight is a cornerstone of any effective ultralight backpacking strategy. Instead of carrying excessive supplies or heavy fresh foods, ultralight hikers reduce weight through precise caloric planning, using dehydrated meals, and leveraging strategic resupply points. This approach minimizes pack weight between towns, allowing for greater comfort and increased daily mileage.
Pioneered by thru-hiking experts like Andrew Skurka, this food and water philosophy is about carrying only what you need until your next reliable source. For example, Pacific Crest Trail hikers often plan food carries for just 3-4 days between trail towns, drastically reducing weight compared to carrying a week's worth of food. This method replaces the "just-in-case" mentality with data-driven planning and on-trail efficiency.
How to Implement a Smart Food and Water Strategy
Applying this tip requires a shift from packing by volume to packing by caloric need and logistical planning. Follow these steps to master one of the most impactful ultralight backpacking tips.
- Calculate Your Needs: Determine your daily caloric needs, which can range from 3,000 to over 4,500 calories depending on the terrain and your exertion level. Plan to carry about 1.5 to 2.5 pounds of food per person per day.
- Prioritize Caloric Density: Choose foods that offer the most calories per ounce. Excellent choices include nuts, olive oil (carried in a small, secure bottle), nut butters, and dehydrated meals. Avoid foods with high water content. For detailed ideas on what to eat on your trip, consider this article on Backpacking Food and Meals.
- Plan Your Resupply: Before your trip, identify towns, trail-side stores, or mail-drop locations on your map. Plan your food carries to last until the next resupply point, plus a small buffer for one extra day. This is a common practice for Appalachian Trail thru-hikers.
- Dehydrate or Buy Dehydrated: Dehydrating your own meals gives you control over nutrition and flavor while saving money. Alternatively, pre-packaged meals from brands like Mountain House are convenient, lightweight options.
Pro Tip: Pack food "cold-soak" style to go stoveless. Many meals, like couscous, ramen, and instant mashed potatoes, can be rehydrated in a sealed container (like a Talenti jar) with cold water over an hour or two, saving the weight of a stove, pot, and fuel canister.
By treating food and water as a logistical puzzle rather than a guessing game, you can significantly lighten your load. This strategic approach ensures you are well-fueled for the trail without being weighed down by unnecessary consumables, a key skill for any aspiring ultralight backpacker.
6. Navigation Systems and Minimal First Aid Kits
Safely navigating the backcountry and handling minor injuries are non-negotiable, but traditional methods often add unnecessary weight. Heavy guidebooks and bulky, pre-packaged first aid kits are prime targets for ultralight optimization. This approach replaces them with streamlined digital tools and highly personalized, minimalist medical kits that prioritize function over volume, ensuring safety without the weight penalty.
This philosophy champions preparedness rooted in skill and specificity rather than carrying an excess of "just-in-case" items. Ultralight backpackers leverage modern technology like GPS apps on their smartphones, which weigh significantly less than physical guidebooks. Similarly, they build their own first aid kits, containing only what’s essential for their specific needs and anticipated trail conditions, often weighing just 2-3 ounces.
How to Streamline Safety Gear
Adopting this strategy requires a shift in mindset from pre-packaged solutions to a customized, skill-based approach. Follow these steps to significantly reduce weight in these two critical areas.
- Go Digital with Navigation: Utilize powerful smartphone apps like Gaia GPS or AllTrails. Download offline maps for your entire route before you leave home, eliminating reliance on cell service. A lightweight power bank (2-3 oz) is essential to keep your device charged.
- Print Smarter: If you prefer a physical backup, print only the relevant map sections or data pages from a guidebook. Avoid carrying the entire book for a trail that only uses a fraction of its pages.
- Build a Custom First Aid Kit: Ditch the bulky plastic case of a store-bought kit. Start with a small Ziploc bag or a tiny pouch. Include items based on your personal history, like specific blister prevention if you're prone to them, or your preferred pain reliever.
- Focus on High-Impact Items: Your kit should include essentials like a few adhesive bandages, antiseptic wipes, small portions of antibiotic ointment, pain relief medication, and supplies for blister care. Every item should have a high probability of use.
Pro Tip: Always carry a small, lightweight physical map and a compass as a failsafe backup for your digital navigation tools. Technology can fail, but a map and compass are reliable, skill-based tools that weigh next to nothing.
This tailored approach to safety gear is a hallmark of efficient ultralight backpacking. By building a kit that’s right for you, you not only save weight but also ensure you have the most effective supplies for your needs. For guidance on assembling your own, see this detailed breakdown of a Wilderness First Aid Kit that balances weight and preparedness.
7. Ultralight Cooking Systems and Alcohol Stoves
One of the biggest areas for weight savings after the "Big Four" is your kitchen. Ultralight backpacking tips often center on ditching heavy canister stoves and fuel for minimalist systems. An ultralight cooking setup, often weighing just 4-8 ounces total, prioritizes boiling water efficiently for rehydrating meals over complex gourmet cooking, saving significant weight and space compared to traditional setups that can exceed two pounds.
Popularized by the DIY community and brands like Trangia, these systems typically revolve around an alcohol stove, often made from a simple soda can. The fuel, denatured alcohol, is cheap, readily available, and can be carried in precise amounts for your trip's exact needs. This eliminates the guesswork and waste associated with partially used isobutane canisters, giving you complete control over your pack weight.
How to Implement an Ultralight Cooking System
Adopting an alcohol stove or solid fuel system is a rite of passage for many ultralight hikers. It requires a bit more skill but rewards you with a dramatically lighter pack.
- Choose Your Stove: You can build a DIY "penny stove" from two aluminum cans for virtually no cost or purchase a commercial model like a Caldera Cone or a simple Trangia burner. Solid fuel tablets (like Esbit) are another excellent, nearly weightless option.
- Select Your Cookware: A small titanium pot (around 550-750ml) is the standard choice due to its incredible strength-to-weight ratio. For those prioritizing weight and efficiency in their cooking setup, a detailed titanium camping cookware guide can help you choose the best ultralight options.
- Master Your Fuel: Use denatured alcohol, found in hardware store paint sections. Carry only what you need (typically 1-2 oz per day for boiling water) in a small, leak-proof plastic bottle. A windscreen is essential to maximize heat and fuel efficiency.
Pro Tip: Practice using your alcohol stove at home before your trip. Learn how long it takes to bloom (reach optimal temperature), how to light it safely, and how much fuel is needed to boil your specific volume of water. This practice prevents frustration and wasted fuel on the trail.
By rethinking your on-trail kitchen, you embrace a core ultralight principle: simplicity breeds efficiency. To explore the full spectrum of minimalist cooking solutions, you can find a comprehensive breakdown of the best backpacking stoves and see how they compare.
8. Strategic Route Planning and Off-Season Hiking
The most overlooked ultralight backpacking tips often have nothing to do with gear, but with when and where you hike. Strategic route planning involves intentionally selecting trails and timing trips to minimize the need for heavy, specialized equipment. By choosing lower-elevation routes, avoiding extreme weather seasons, and planning around reliable water sources, you can significantly reduce your pack weight before you even buy a single piece of gear.
This proactive approach, championed by adventurers like Andrew Skurka, shifts the focus from enduring harsh conditions with heavy gear to avoiding them altogether. A trip planned for a temperate shoulder season with plentiful water requires far less gear than a high-alpine traverse in early spring or a desert trek in mid-summer. The result is a lighter pack, less physical stress, and a more enjoyable experience in nature.
How to Implement Strategic Planning
Applying this strategy requires more pre-trip research but pays massive dividends on the trail. Here’s how to plan your hikes with weight savings in mind.
- Analyze Route Topography: Use mapping tools like Gaia GPS or Caltopo to view a trail’s elevation profile. Aim for routes with manageable elevation gain, perhaps under 500 feet per mile, to reduce physical exertion and the need for extra food calories.
- Map Your Water Sources: Meticulously research the location and reliability of water sources along your intended path. Knowing you can refill every 5-10 miles allows you to carry just one or two liters of water at a time, saving 4-6 pounds compared to carrying a full day’s supply.
- Hike in the Shoulder Seasons: Plan your trips for off-peak times like spring (April-May) and fall (September-October) in many temperate regions. The milder weather often means you can leave behind heavy winter layers, a sub-zero sleeping bag, and a four-season tent.
- Leverage Local Knowledge: Connect with local hiking clubs or online forums for your target destination. Experienced locals can provide invaluable insights on current trail conditions, seasonal weather patterns, and lesser-known routes that are ideal for lightweight travel.
Pro Tip: A classic example of this strategy is a Pacific Crest Trail thru-hiker's timing. They start in the Southern California desert in the spring to avoid the intense summer heat, and they aim to clear the high-elevation Sierra Nevada before the first heavy snows of fall, perfectly aligning their gear needs with the environment.
By making smart choices during the planning phase, you essentially offload weight from your back before your trip even begins. This is one of the most powerful ultralight backpacking tips because it optimizes your entire system, not just a single piece of gear.
8-Point Ultralight Backpacking Comparison
| Item | Implementation Complexity 🔄 | Resource Requirements ⚡ | Expected Outcomes ⭐📊 | Ideal Use Cases 💡 | Key Advantages ⭐ |
|---|---|---|---|---|---|
| Base Weight Optimization and Gear Audit | 🔄 Moderate — systematic weighing, research, ongoing audits | ⚡ Low–Moderate — digital scale, time, budget for lighter gear | ⭐📊 High — significant pack weight reduction; increased mileage; lower injury risk | 💡 Thru-hikes, long-distance trips, frequent backpackers | ⭐ Measurable weight savings; customizable; repeatable |
| Minimalist Clothing Layers and Synthetic/Merino Wool Fabrics | 🔄 Low–Moderate — select fabrics and practice discipline | ⚡ Moderate — higher-cost merino items but fewer pieces needed | ⭐📊 Moderate — ~2–3 lb reduction; better odor control and drying | 💡 Multi-day trips, temperate climates, endurance hikes | ⭐ Odor resistance; versatile warmth-to-weight; fewer changes |
| Shelter and Sleep System Optimization | 🔄 Moderate–High — requires shelter skills and weather judgment | ⚡ Moderate — ultralight shelter + down sleeping system cost | ⭐📊 High — 40–50% sleep system weight savings; trade-offs in protection | 💡 Fair-weather summer trips, experienced ultralighters | ⭐ Large weight reduction; compact packed size |
| Lightweight Backpack Selection (10–20 lb capacity) | 🔄 Low — choosing fit and learning load technique | ⚡ Low–Moderate — purchase cost; proper fit important | ⭐📊 Moderate — saves ~2–3 lb; enforces minimalist packing | 💡 Short to mid-length trips; hikers prioritizing low base weight | ⭐ Encourages minimalism; better maneuverability |
| Smart Food and Water Strategy (Dehydration & Resupply) | 🔄 Moderate — meal planning, dehydration, resupply logistics | ⚡ Moderate — dehydrator or pre-made meals; mapping tools | ⭐📊 High — 60–70% food weight reduction; predictable calories | 💡 Long-distance hikes, thru-hikes, remote sections | ⭐ Major weight savings; reliable nutrition planning |
| Navigation Systems and Minimal First Aid Kits | 🔄 Low–Moderate — learn digital tools and customize kit | ⚡ Low — smartphone/GPS, small power bank, compact medical supplies | ⭐📊 Moderate — reduced navigation/first-aid weight while retaining safety | 💡 Well-trailed routes, tech-reliant hikers, minimalist safety setups | ⭐ Lightweight safety solutions; multifunctional devices |
| Ultralight Cooking Systems and Alcohol Stoves | 🔄 Low — simple systems; practice improves efficiency | ⚡ Low — tiny stove, titanium pot, small fuel canister | ⭐📊 High — cooking system down to 4–8 oz; slower boil times | 💡 Short reheats, minimalist cooks, budget ultralighters | ⭐ Extremely light and inexpensive; DIY repairable |
| Strategic Route Planning and Off-Season Hiking | 🔄 Moderate — research elevation, water, and seasonal risks | ⚡ Low — maps/apps and planning time | ⭐📊 Moderate–High — reduces need for heavy weather gear and strain | 💡 Season-flexible hikes, routes with resupply options, shoulder seasons | ⭐ Lowers gear needs; improves efficiency and comfort |
Your Next Steps on the Ultralight Path
You've just navigated a comprehensive roadmap of ultralight backpacking tips, from auditing your base weight to mastering minimalist cooking systems. The journey from traditional backpacking to an ultralight philosophy is not a single leap but a series of intentional, well-informed steps. It's less about buying expensive, feather-light gear and more about cultivating a mindset of efficiency, multi-functionality, and thoughtful reduction.
Remember, the ultimate goal isn't just a lower number on the scale; it's a higher quality of experience on the trail. A lighter pack translates directly into more energy, less strain on your body, and greater freedom to cover more ground or simply enjoy your surroundings. You can hike longer, feel stronger, and focus on the immersive beauty of the wilderness rather than the burden on your back.
Consolidating Your Ultralight Knowledge
Let's distill the core principles we've covered into actionable takeaways. The foundation of your ultralight journey begins with a meticulous gear audit. Lay everything out, weigh each item, and ask the tough questions: "Is this essential? Can another item serve this purpose?" This single exercise is the most powerful first step you can take.
From there, we explored the "big three": your backpack, shelter, and sleep system. Optimizing these items provides the most significant weight savings. Moving to a frameless or minimalist-frame pack, a trekking-pole tent or tarp, and a quilt instead of a traditional sleeping bag can shed pounds instantly. These changes are investments that pay dividends in comfort and mileage on every future trip.
We also delved into the nuanced, yet critical, areas of clothing, food, and safety. Choosing high-performance synthetic or merino wool layers, planning dehydrated meals around resupply points, and carrying a minimalist first-aid kit are all key ultralight backpacking tips that require skill and planning over expensive purchases.
Putting Theory into Practice: Your Action Plan
Feeling overwhelmed? Don't be. True mastery comes from iterative learning and real-world application. Here is a simple, step-by-step plan to begin your transformation:
- Conduct Your Gear Audit: Before your next trip, use a kitchen scale and a spreadsheet. Record the weight of every single item. This is your baseline, your starting point for every decision that follows.
- Identify Low-Hanging Fruit: Don't start with your tent or backpack. Look for easy wins. Are you carrying a heavy Nalgene bottle? Swap it for a lightweight Smartwater bottle. Is your camp knife oversized? Replace it with a mini utility blade. These small changes add up quickly and build momentum.
- Embrace Multi-Use Items: Think creatively. Your trekking poles can support your shelter. A buff can be a hat, a towel, and a pot holder. Your cooking pot can double as your bowl and mug. Each item that serves multiple functions eliminates the weight of others.
- Test on Shorter Trips: Before committing to a week-long trek with a new, pared-down system, test it on an overnighter or a weekend trip close to home. This low-stakes environment is the perfect place to learn what you truly need and what you can live without. You might discover that you miss your camp chair, or you might realize you never even used half the items you brought.
This process is a personal journey of discovery. The ideal base weight for a thru-hiker in the Sierra Nevada will be different from that of a weekend warrior in the Appalachian Mountains. The ultralight backpacking tips outlined in this guide are not rigid rules but a flexible framework. Adapt them, experiment with them, and find the perfect balance of weight, comfort, and safety that unlocks your ideal outdoor experience.
As you begin to refine your gear list and seek out the best in lightweight and innovative equipment, let FindTopTrends be your guide. We curate and review the latest in outdoor and travel essentials, helping you find top-performing gear that won't weigh you down. Explore our selections to make your next ultralight purchase an informed one at FindTopTrends.
Leave a comment


