


No products in the cart.

A good layering system for hiking is the secret to staying comfortable on the trail, no matter what the mountain throws at you. It’s your personal climate control system, allowing you to react to shifting weather or your own effort level simply by adding or taking off a piece of clothing.
Forget about one big, bulky jacket. The real trick is using three distinct layers—a base layer, a mid layer, and a shell layer—that work together. Each one has a specific job: managing sweat, holding onto heat, and blocking out the elements. Get this right, and you'll stay comfortable and safe out there.
Why a Smart Layering System for Hiking Changes Everything

Picture two hikers tackling the same trail. One is getting clammy and cold inside their single heavy coat, while the other seems perfectly happy, peeling off a layer for a steep climb and putting it back on at the breezy summit. The difference isn't about having the most expensive gear; it's about having a smart strategy. Honestly, mastering layering is probably the most important skill you can learn for trail safety and comfort.
This whole approach is a huge leap from the old way of thinking, which was just to "wear a warm coat." Before the 1970s, many hikers just wore thick cotton or wool garments. We now know this was incredibly risky. When cotton gets wet, it can make you lose body heat up to 25 times faster than modern synthetics. This "get wet, get cold" cycle was a major factor in a startling number of mountaineering accidents back then.
Your Personal Climate Control System
Think of your layers less like an outfit and more like a versatile toolkit. Every piece serves a purpose, and knowing how to combine them gives you total command over your own personal microclimate.
- The Base Layer: This is your second skin. Its one and only job is to pull sweat away from your body to keep you from getting damp and chilled.
- The Mid Layer: This is your furnace. It’s the insulation that traps your body heat, keeping you warm when temperatures drop.
- The Shell Layer: This is your armor. It protects you from everything the weather can throw at you, like wind, rain, and snow.
By simply adding or removing these pieces, you can fine-tune your comfort as you move. This is how you avoid that classic, miserable cycle of sweating buckets on the uphill climbs, only to start shivering the moment you stop for a break. For a deeper dive, it’s worth understanding the proactive systems for staying warm outdoors.
The core principle is simple but incredibly effective: Stay dry from the inside out and protected from the outside in. This dynamic approach means you're ready for a sunny start, a windy ridge, and a sudden downpour—all in the same day.
Let's break down each of these layers. Once you get the hang of managing moisture and heat, you'll be able to focus on what really matters: enjoying your time outside.
The Three Core Layers at a Glance
To make it even clearer, here’s a quick rundown of how each layer functions in your system. Think of this table as your cheat sheet for building the perfect hiking outfit every time.
| Layer | Primary Function | Best Materials | Key Purpose |
|---|---|---|---|
| Base Layer | Moisture Wicking | Merino Wool, Synthetics (Polyester) | Pulls sweat off your skin to keep you dry. |
| Mid Layer | Insulation | Fleece, Down, Synthetic Insulation | Traps body heat to keep you warm. |
| Shell Layer | Weather Protection | Waterproof/Breathable Fabrics (e.g., Gore-Tex) | Blocks wind, rain, and snow from the outside. |
With these three pieces in your pack, you're equipped to handle almost any condition the trail throws your way. The art is in knowing which one to wear, and when.
Building Your Foundation with the Right Base Layer

Let’s start right next to your skin. Think of your base layer as your personal climate control system. It's the first thing you put on, and it has one incredibly important job: to pull sweat away from your body. Staying dry is the absolute key to staying comfortable—and warm—out on the trail.
When you’re working hard climbing a hill, you sweat. That’s just a fact. If that sweat sits on your skin, you’ll feel clammy while you’re moving and then dangerously chilled the second you stop for a break. A good base layer acts like a wick, pulling that moisture off your skin and moving it outward where it can evaporate.
Choosing Your Base Layer Material
You’ve got two main players in the base layer game: Merino wool and modern synthetics. Forget cotton entirely. It’s a classic mistake because it acts like a sponge, soaking up sweat and losing all its insulating power, which is a recipe for disaster in the backcountry.
- Merino Wool: There's a reason so many hikers swear by this stuff. It's soft, breathes exceptionally well, and has an almost magical ability to resist odor, even after a few days of hard trekking. Crucially, it continues to insulate even when it gets a little damp.
- Synthetics (Polyester/Nylon): These are the workhorses of moisture management. They are champions at wicking sweat and dry incredibly fast. On top of that, they’re super durable and usually more budget-friendly than wool, making them a fantastic choice for high-effort, sweaty days.
The modern layering system for hiking really came into its own with the invention of synthetic base layers back in the 1970s. For the first time, fabrics like polypropylene could move sweat 3-5 times faster than old-school cotton, a massive leap forward in comfort and safety. You can learn more about how these fabrics revolutionized outdoor clothing.
Matching Weight to Your Adventure
Base layers aren't one-size-fits-all; they come in different "weights," which is just a term for the fabric's thickness. The right one for you depends entirely on the temperature and how much you expect to sweat.
Lightweight: Your go-to for warm weather or intense activities like trail running. Their main job is to breathe and wick sweat as efficiently as possible, with very little focus on warmth.
Midweight: This is the sweet spot and the most versatile option for most people. It strikes a perfect balance between wicking moisture and providing a bit of insulation, making it ideal for the vast majority of three-season hiking. Our guide on how to dress for cold weather explores versatile options like this in more detail.
Heavyweight: Break these out for the truly cold days. They provide serious insulation and are best for lower-intensity activities in frigid temperatures, like a slow-paced snowshoe hike or setting up camp in the winter when your priority is simply staying warm.
Your Warmth Engine: The Insulating Mid Layer
If your base layer is the moisture manager, think of your mid layer as the furnace. Its entire job is to trap the heat your body is already producing, creating a pocket of warm air that keeps you comfortable when the temperature drops. This is the piece you'll be zipping up, taking off, and stuffing in your pack most often as you move through changing terrain and effort levels.
But not all insulation is created equal. The material you choose for this crucial layer will have a huge impact on your warmth, your comfort, and how heavy your pack feels. The three main players in the game are fleece, down, and synthetic insulation, and knowing which one to grab is key.
Choosing Your Insulation
Picking the right insulation really boils down to the conditions you expect to face. Are you heading into the cold and dry Rockies, or the damp and misty Appalachians? How hard will you be working? Let's break down the options.
- Fleece: This is the tried-and-true workhorse. It's wonderfully breathable, meaning it keeps you warm without trapping all your sweat when you're working hard. Fleece also keeps insulating even when it gets a little damp and dries out remarkably fast.
- Down: Nothing beats down when it comes to the best warmth-to-weight ratio. It's incredibly light and packs down to almost nothing, making it perfect for serious warmth when you're not moving—think summit lunches or cold evenings at camp. The big catch? Down is useless when wet. Moisture makes it clump up and lose all its magical insulating power.
- Synthetic: This is the modern answer to down's moisture problem. Synthetic fill is designed to mimic the heat-trapping structure of down, but it keeps on working even when it's soaked. It’s a bit heavier and bulkier than down for the same amount of warmth, but its wet-weather performance is a lifesaver.
Need a deeper dive into picking the right puffy? Our guide on the best lightweight winter jacket has you covered.
Insulation Material Comparison
To make the choice a little easier, here's a head-to-head look at how these materials stack up.
| Material | Pros | Cons | Best For |
|---|---|---|---|
| Fleece | Highly breathable, insulates when damp, dries quickly, durable. | Can be bulky, lower warmth-to-weight ratio than down. | High-output activities like steep ascents; versatile all-around use. |
| Down | Unbeatable warmth-to-weight, extremely compressible, lightweight. | Loses all insulation when wet, takes a long time to dry. | Cold, dry conditions; moments when you're stopped and need maximum warmth. |
| Synthetic | Insulates even when wet, dries faster than down, more affordable. | Heavier and bulkier than down, slightly less compressible. | Damp, cold, or unpredictable weather; all-purpose wet-weather security. |
Ultimately, the "best" material depends entirely on your adventure. For a damp coastal hike, synthetic is a safe bet. For a cold, high-altitude desert trek, nothing beats the packable warmth of down.
Active vs. Static Insulation
Here’s a concept that separates seasoned hikers from beginners: understanding the difference between "active" and "static" insulation. It's all about packing for the moments you're moving versus the moments you're standing still.
A breathable fleece is the perfect active insulation—it keeps you warm on a tough climb but lets enough heat escape so you don't turn into a sweaty mess. That big, puffy down jacket? That's your static insulation. You'd overheat in minutes hiking in it, but it's pure gold for trapping heat the second you stop for a break.
This simple idea prevents that classic mistake of sweating through your layers on the way up, only to find yourself shivering and freezing the moment you stop.
Back in 1985, the introduction of Polartec fleece was a game-changer. It gave hikers insulation-to-weight ratios 2-3 times better than wool and could dry 70% faster, fundamentally changing what was possible in the backcountry.
Mastering your mid layer is all about mastering on-the-go temperature control. It's what keeps you in that perfect "not too hot, not too cold" zone all day long.
Your Shell Layer: The Final Defense Against the Elements
Think of your shell layer as your personal fortress against whatever the weather throws at you. You've already got your base layer managing sweat and your mid layer trapping heat, but the shell is what holds it all together. Its entire job is to shield those inner layers from wind and rain, which can completely sabotage your warmth and comfort.
Without this critical barrier, a sudden downpour can soak your insulation, rendering it useless. A biting wind can cut right through your mid layer, stealing all that precious body heat you've worked so hard to generate. But a good shell is much smarter than a simple raincoat. It has to pull off a neat trick: block water from getting in while letting all the sweat vapor you're producing get out.
Choosing Your Shield
You wouldn't bring a battle axe to a knife fight, and the same logic applies here. Matching your shell to the conditions you expect is key. Not every hike demands a bombproof suit of armor; sometimes, a lighter, more agile defense is exactly what you need.
-
Hard Shells: This is your full-on storm armor. Made with advanced waterproof and breathable membranes, a hard shell is what you grab for serious, sustained rain, heavy snow, or high-wind environments. It's completely windproof and waterproof, built for the worst weather you can imagine.
-
Soft Shells: These jackets lean into breathability and stretch, trading a bit of ultimate waterproofness for comfort during activity. A soft shell is perfect for shedding light rain or snow and blocking most wind. It truly shines during high-effort adventures in cool, drier weather where a hard shell would just feel clammy and restrictive. Think scrambles or fast-paced hikes on a blustery day.
-
Wind Shells: These are the ultralight specialists. A wind shell has one mission: to stop the wind. They offer very little water resistance, but they're so incredibly breathable and packable that they're an essential piece for fending off a chilly breeze on a day that’s otherwise pretty dry.
The real magic of a hard shell is its "one-way gate" technology. It's designed to stop liquid water (rain) from getting in, while allowing water vapor (your sweat) to escape from the inside. This is what keeps you from feeling like you're hiking in a personal sauna.
The Tech Behind Staying Dry
This whole waterproof-breathable thing is a genuine marvel of fabric engineering. Materials like Gore-Tex, which first hit the scene back in 1976, completely changed the game with membranes that could fend off serious water pressure while still letting sweat out. Modern shells throw around some impressive numbers, with some boasting water resistance ratings (hydrostatic head) over 20,000mm and breathability ratings (MVTR) exceeding 15,000g/m²/24hrs. These advancements have dramatically cut down on rain penetration and that dreaded "clammy" feeling. You can dive deeper into the science behind this innovative hiking gear if you're curious.
When you're comparing jackets, a few features make a world of difference out on the trail. Taped or sealed seams are non-negotiable for true waterproofing—that's what stops water from leaking through the stitching. Pit zips, those zippers under the armpits, are a lifesaver for dumping heat quickly without having to take off your whole jacket. And finally, never underestimate a well-designed, adjustable hood that can be cinched down securely in a storm. It’s small details like these that separate a decent shell from a great one.
Bringing Your Layering System to Life on the Trail
Alright, so you know what the layers are. That’s the easy part. The real skill is learning how to use them on the fly during a hike. This is where all that gear theory turns into trail-tested wisdom, and it’s what makes the difference between a great day out and a miserable slog.
The name of the game is staying ahead of the curve. You want to make adjustments before you're drenched in sweat or shivering from the cold.
So many hikers make the same classic mistake: they start a big climb feeling warm and cozy, only to overheat and soak their base layer within ten minutes. To get around this, you have to embrace a simple but powerful trail mantra: “Be bold, start cold.” It feels wrong standing at the trailhead, but you'll thank yourself when you're not a sweaty mess a few hundred feet up the trail.
Real-World Layer Adjustments
Let's walk through a typical scenario. You’re starting out on a cool, crisp morning. Here’s how you might actually use your layering system for hiking:
- The Uphill Climb: You're working hard and generating a ton of heat. Strip down to just your base layer. This lets all that warmth and moisture escape so you don't get clammy.
- The Windy Ridge: You pop out of the trees onto an exposed ridgeline, and the wind hits you. That's your cue to grab your wind shell or softshell. It’ll block the chill without making you overheat.
- The Lunch Break: The second you stop moving, your internal furnace shuts off. This is the most important time to act fast. Throw on your puffy insulating jacket immediately to trap the heat you’ve built up.
This flowchart can help you figure out which shell layer makes the most sense when the weather really starts to turn.
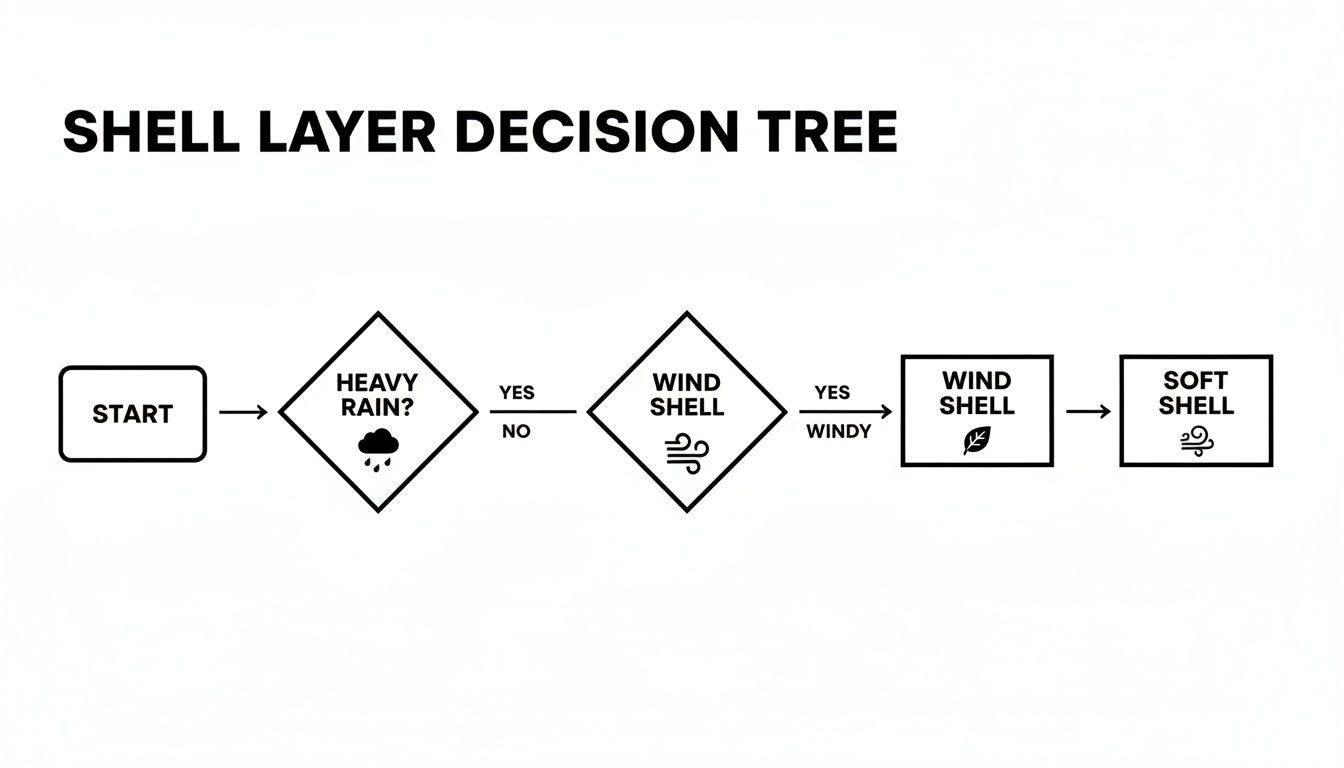
As you can see, a hard shell is non-negotiable in heavy rain. For wind and lighter drizzle, a softshell or dedicated wind jacket gives you much better breathability while you're still on the move.
Extending the System Head to Toe
Keeping your core warm is priority one, but don't forget about everything else. A smart layering strategy covers you from head to toe.
Think of your hands, feet, and head as your body's radiators—they shed heat like crazy. A simple hat or a pair of gloves can make a massive difference in your overall warmth and comfort.
This means always having a good pair of moisture-wicking hiking socks (cotton is a definite no-go), and stashing a warm beanie and gloves in your pack. Even on a pleasant day, a light pair of liner gloves can be a lifesaver when the wind picks up unexpectedly. For your legs, a solid pair of hiking pants is your everyday layer, with a pair of rain pants packed away to serve as your waterproof shell when the skies open up.
Our full day hike packing list goes into more detail on these must-have accessories.
It’s also smart to understand how altitude affects hiking conditions, since temperatures can drop and weather can get ugly fast the higher you climb. The more you get out there, the more all of this becomes second nature. You'll soon be dialing in your personal climate control system without even thinking about it.
Got Questions About Layering? We've Got Answers.
Even after you get the hang of base layers, mid-layers, and shells, real-world questions always pop up on the trail. Let's dig into some of the most common head-scratchers to help you dial in your personal system and make smarter choices with your gear.
Getting these details right can be the difference between a great day out and a miserable one.
How Should I Layer for Summer Hiking?
Layering isn't just a cold-weather game. Even on a sweltering day, a smart system is your best friend for managing sweat and being ready for those sudden weather shifts, especially when you gain elevation and the temperature drops.
Here’s what your summer setup should look like:
- A Lightweight Base Layer: Think a simple moisture-wicking synthetic or merino wool t-shirt. Its only job is to get sweat off your skin to keep you cool and stop uncomfortable chafing.
- A Light Mid or Wind Layer: Always, always have a light fleece or a minimalist wind jacket in your pack. It adds almost no weight but is an absolute lifesaver when you stop for a break or a cool breeze kicks up on an exposed ridgeline.
- A Packable Rain Shell: Summer afternoon thunderstorms are a classic feature in many mountain ranges. A lightweight, waterproof shell isn't optional—it's essential for staying dry and safe when the sky opens up.
The whole point is to be prepared without getting bogged down and overheated. It’s all about breathability and moisture control.
Is Cotton Really That Bad for Hiking?
In a word: yes. The old trail wisdom "cotton kills" isn't an exaggeration. While a cotton t-shirt feels great around the house, it becomes a liability the second it gets wet, whether from sweat or rain.
Cotton is like a sponge. Once soaked, it loses all its insulating ability and takes forever to dry. As it dries, it actively sucks heat away from your body, which can seriously increase your risk of hypothermia, even in conditions you'd consider mild. Just stick to wool or synthetics for every piece of your hiking outfit.
The only time cotton gets a pass is maybe for a bandana you intentionally soak to cool your neck on a blazing hot day. For anything worn against your skin or for warmth, it’s a hard no.
What Is the Difference Between Soft and Hard Shells?
This trips a lot of people up, but it’s pretty straightforward once you understand what each jacket is designed to do. Think of it as a balance between total protection and on-the-move comfort.
A hard shell is your bombproof fortress. It’s completely waterproof and windproof, built with materials like Gore-Tex to seal you off from heavy, sustained rain and nasty winds. This is the jacket you grab when the weather is genuinely bad.
A soft shell, on the other hand, is all about breathability and stretch. While it’s highly water-resistant and wind-resistant, it’s not fully proofed. This makes it the perfect choice for high-effort activities in cool, drizzly, or windy weather where a hard shell would just turn into a personal sauna.
How Many Layers Should I Actually Wear?
There's no magic number here. A great layering system isn't about how many pieces you're wearing at once; it's about having the right options in your pack to choose from.
For a typical three-season day hike, a three-piece system is the sweet spot:
- Wear: Start the hike wearing just your base layer.
- Pack: Have a versatile mid-layer (like a grid fleece) and your protective shell layer ready to go in your pack.
You’ll likely only ever wear one or two of these at a time, but carrying all three gives you the power to adapt to almost anything the trail throws at you.
At FindTopTrends, we curate the best gear to keep you comfortable on every adventure. Explore our collection of outdoor essentials and build the perfect layering system for your next hike at https://findtoptrends.com.
Leave a comment


