


No products in the cart.

When you're figuring out what to pack for a hike, the "Ten Essentials" should be your guiding star. This isn't just a random list of ten items; it's a framework of ten interconnected systems: navigation, sun protection, insulation, illumination, first-aid, fire, tools, nutrition, hydration, and shelter.
Think of it as your personal safety net on the trail. It’s what prepares you for the unexpected, turning a potential crisis—like a wrong turn or a sudden storm—into a manageable inconvenience.
Building Your Hiking Safety Net with the Ten Essentials
Heading out into the wilderness is an amazing feeling, but nature is famously unpredictable. That’s where good preparation makes all the difference. The Ten Essentials is a classic, time-tested system designed to get you ready for those curveballs. It's less about ten specific things and more about ten categories of gear that work together to keep you safe.
Let's play out a common scenario. You’re on a day hike you thought would be quick, but a wrong turn adds a couple of hours to your trip. Suddenly, the sun is dipping below the horizon. This is where your safety net catches you. Your headlamp (Illumination) lights the way, your extra fleece layer (Insulation) keeps you warm as the air chills, and that extra granola bar (Nutrition) gives you the fuel to push through. See? These "essentials" aren't just for life-or-death emergencies; they're for the very real, common hiccups that happen on the trail.
The Core Systems of Trail Preparedness
Each of the Ten Essentials is there to counter a specific risk. When you understand the why behind each system, you can pack smarter, not just heavier.
- Navigation: A map and compass are old-school cool for a reason—they don't run out of batteries. A GPS or phone app is great, but always have a non-electronic backup. Getting lost is the fastest way to turn a fun day into a dangerous one.
- Sun Protection: Sunburn and heatstroke can happen even on overcast days. Sunscreen, a good pair of sunglasses, and a wide-brimmed hat are your first line of defense against UV rays.
- Insulation: The weather in the mountains can flip on a dime. An extra layer, like a rain shell or a down vest, is absolutely critical for staying warm and dry if a storm rolls in or the temperature plummets.
- Illumination: Never, ever go on a hike without a headlamp or flashlight—even if you plan to be back by lunch. It’s your most important piece of gear if you find yourself on the trail after dark.
This simple idea shows how a few key systems—Navigation, Hydration, and Shelter—are the pillars holding up your entire safety net.
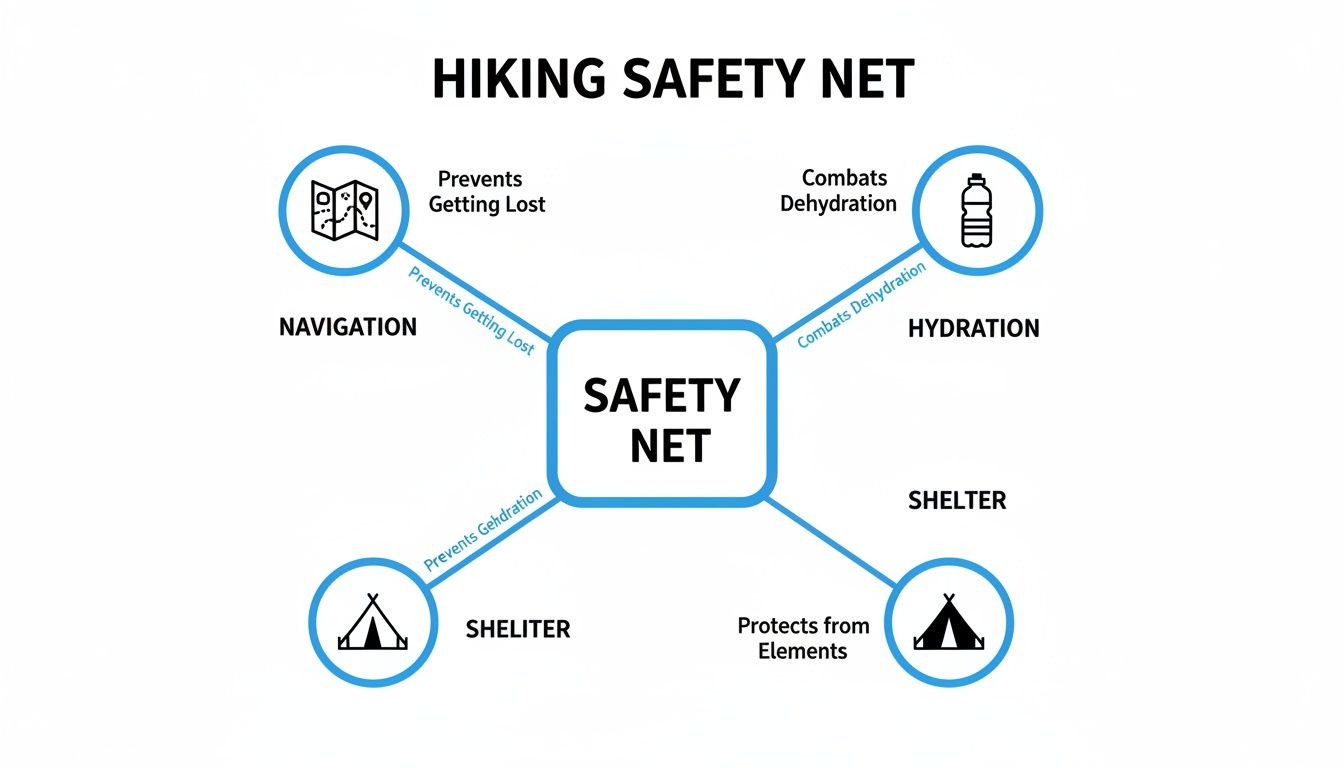
It's a great reminder that your safety relies on these systems working together, not just on one or two pieces of gear.
Completing Your Safety Net
Beyond those first four, the remaining systems prepare you for everything else, from small annoyances to serious problems.
- First-Aid Supplies: A well-stocked first-aid kit isn't optional. Whether you buy one or build your own, make sure it has supplies for blisters, cuts, and scrapes, plus any personal meds you need. To get it right, check out our guide on how to build a proper https://letsparty-au.myshopify.com/blogs/news/wilderness-first-aid-kit.
- Fire: In a true emergency, fire means warmth, light, and a signal for help. Always carry waterproof matches, a lighter, or a fire starter. They weigh almost nothing and could save your life.
- Repair Kit and Tools: A simple multi-tool and a bit of duct tape can fix just about anything—a broken trekking pole, a ripped tent, a loose strap on your pack. You’ll be glad you have it.
- Nutrition: This is a golden rule: pack more food than you think you'll need. An extra day's worth of non-perishable food is a smart buffer. To keep your energy up, focus on high-protein hiking snacks that provide lasting fuel.
- Hydration: Always carry plenty of water and a way to treat more, like a filter or purification tablets. Dehydration is a real danger that can sneak up on you, messing with your judgment and strength.
- Emergency Shelter: Even on day hikes, a tiny, lightweight emergency bivy or space blanket can be a lifesaver if you're unexpectedly stranded overnight. It provides crucial protection from wind and rain.
The Ten Essential Hiking Systems at a Glance
To make it even clearer, here’s a quick breakdown of the ten systems. Think of this table as your cheat sheet for building a reliable kit every time you head out.
| System Category | Core Purpose | Essential Gear Examples | Optional Upgrades |
|---|---|---|---|
| Navigation | Knowing where you are and where you're going | Map, Compass, GPS/Phone App | Altimeter, Satellite Messenger |
| Illumination | Seeing in the dark | Headlamp or Flashlight, Extra Batteries | Lantern for camp |
| Sun Protection | Shielding from UV radiation | Sunscreen, Sunglasses, Hat, SPF Lip Balm | Sun-protective clothing (UPF) |
| First Aid | Treating injuries and illnesses | Pre-made kit, Blister care, Bandages | Suture kit, SAM splint |
| Repair & Tools | Fixing broken gear on the fly | Multi-tool or Knife, Duct Tape | Gear-specific repair patches |
| Fire | Creating warmth, light, and signals | Lighter, Waterproof Matches, Fire Starter | Tinder, Small stove |
| Insulation | Staying warm when it gets cold or wet | Extra layer (fleece, down), Rain jacket | Insulated pants, extra socks |
| Nutrition | Fueling your body | Extra day's worth of food, Salty snacks | Dehydrated meals, energy gels |
| Hydration | Staying hydrated | Water bottles or reservoir, Water filter/tablets | Electrolyte powders |
| Shelter | Protection from the elements in an emergency | Emergency blanket or bivy, Tarp | Ultralight tent |
This isn't about packing for doomsday; it's about being self-reliant. Having these systems in your pack means you're ready to handle whatever the trail throws your way.
Dressing for the Trail: Your Guide to Layering and Footwear

When you're figuring out what to bring on a hike, the clothes you pack are so much more than fashion. They’re your personal climate control system. The right gear keeps you comfortable, safe, and dialed in on the incredible views, while the wrong stuff can turn a great day into a miserable—or even dangerous—one. Getting your trail wardrobe right is one of the most fundamental skills any hiker can learn.
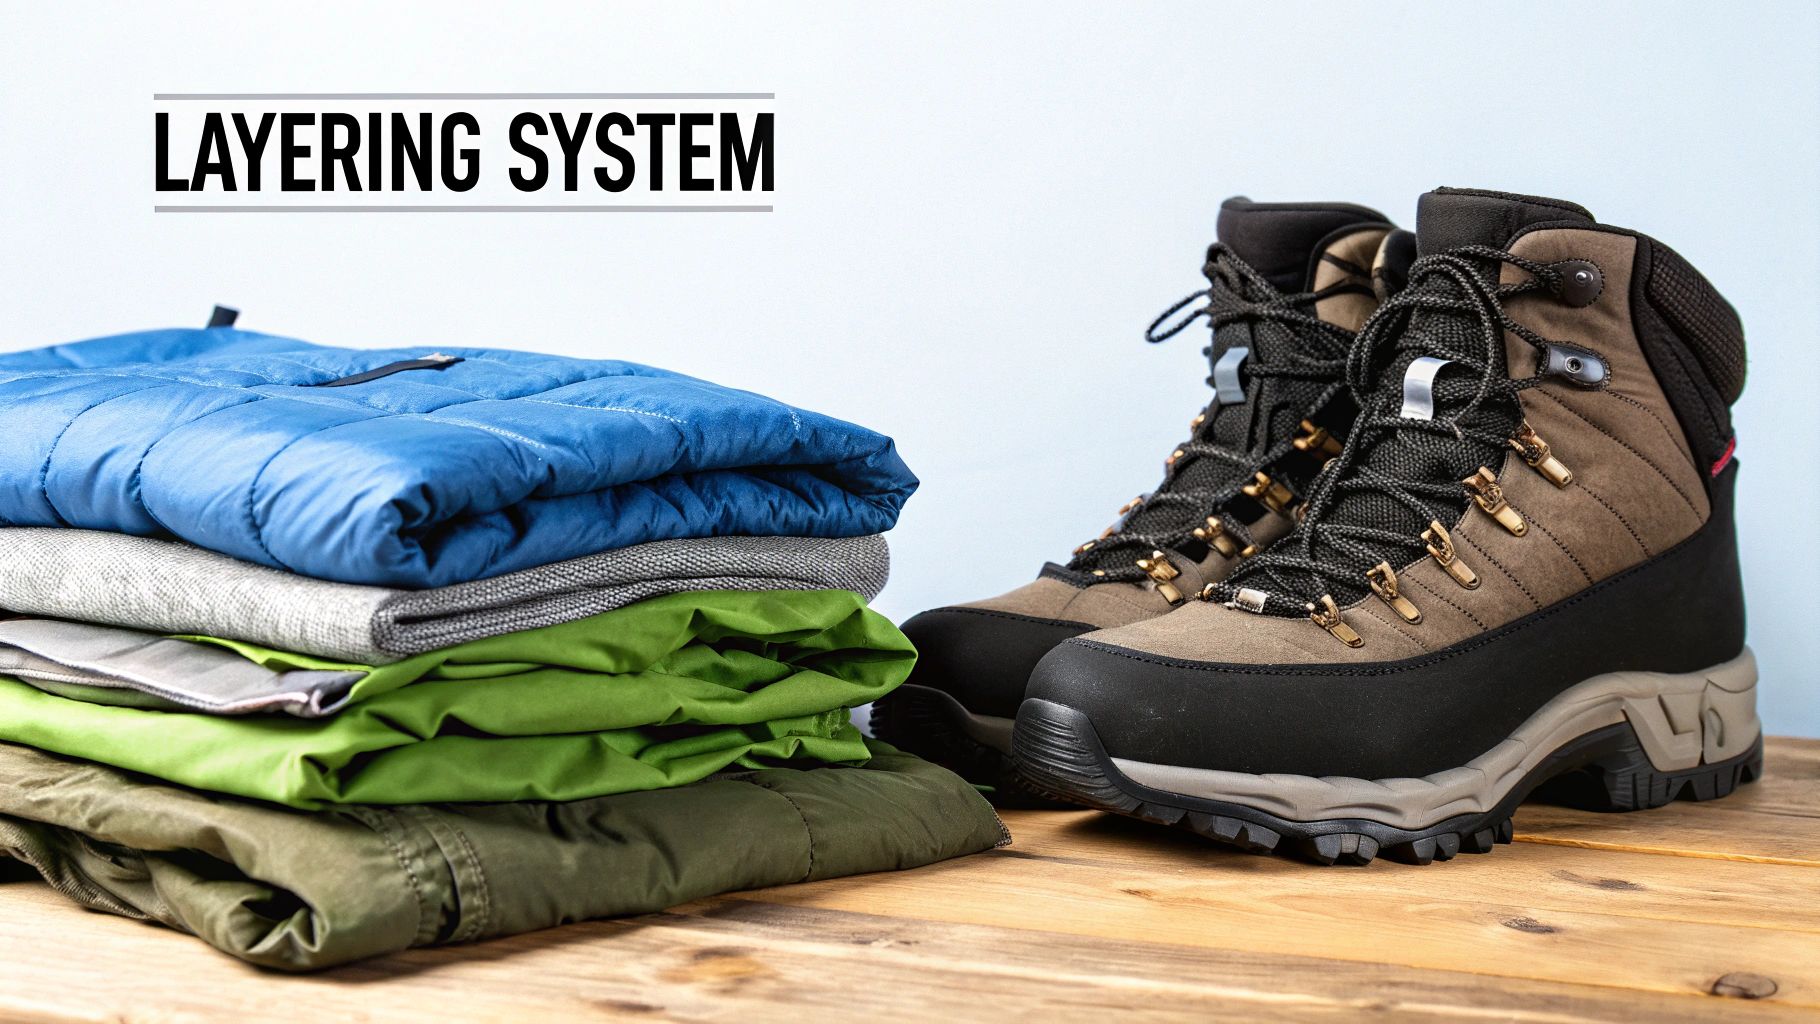
At the heart of it all is the layering system. Don't just think of it as throwing on a few pieces of clothing. It's a strategic, three-part toolkit you can fine-tune on the move to match the weather and how hard you're working.
Understanding the Three-Layer System
The beauty of the layering system is its simplicity and effectiveness. It breaks down into a base layer, a mid-layer, and an outer layer (or shell), with each piece having a specific job. The real magic happens when they work together, letting you add or shed layers to perfectly manage your body temperature. You’ll never have to be "that person" who is shivering or sweating through their clothes.
To really get into the nitty-gritty, you can check out our complete guide on the https://letsparty-au.myshopify.com/blogs/news/layering-system-for-hiking.
- Base Layer (Wicking): This is what you wear right against your skin. Its whole purpose is to pull sweat away from your body so you stay dry. Merino wool and synthetic fabrics like polyester are champions here. The one thing to avoid? Cotton. It soaks up moisture like a sponge and stays wet, which is a fast track to getting cold.
- Mid-Layer (Insulation): This is your warmth. Its job is to trap the heat your body naturally produces. Think fleece jackets, down vests, or those puffy synthetic jackets. How thick of a mid-layer you need really just depends on the forecast.
- Outer Layer (Protection): This is your shield against the elements, often called a shell. A good waterproof and breathable jacket is the goal—it keeps rain and wind out while letting your sweat vapor escape. The principles are similar across outdoor activities; many of the same concepts in these cold weather running tips apply directly to hiking, especially when it comes to managing moisture and insulation.
The golden rule of hiking apparel is simple: Cotton is rotten. When cotton gets wet, it loses all its insulating power and takes forever to dry, which can seriously increase your risk of hypothermia.
Choosing Your Foundation: Footwear
What you put on your feet is just as critical as the clothes on your back. Your footwear connects you to the trail, and getting it right is an investment in preventing blisters, sore feet, and twisted ankles. The big debate usually boils down to two options: classic hiking boots or modern trail runners.
The best choice really depends on the trail and what feels right to you.
- Hiking Boots: These are the traditional workhorses. They give you fantastic ankle support and are built tough, making them a great pick for rocky, uneven terrain or when you’re carrying a heavy pack. Their stiff soles are a lifesaver on sharp rocks.
- Trail Runners: Lightweight, flexible, and super breathable, trail runners are amazing for well-maintained trails or if you like to move a bit faster. Many experienced hikers swear by them for long-distance comfort, as the weight savings really add up over a full day.
The Right Investment in Comfort and Safety
Your clothing and footwear are the unsung heroes of a successful hike. It's no surprise the hiking gear market hit USD 5.97 billion in 2024 and is expected to climb to USD 9.56 billion by 2030. This growth is largely fueled by functional gear for a new generation of hikers—42% of whom are millennials. For savvy adventurers, this means finding great value on gear like high-tech trail runners, especially since proper footwear is known to prevent as many as one in four trail injuries.
No matter which style you land on, look for features like great traction (think deep, grippy lugs on the bottom), a fit that gives your toes some wiggle room, and the right amount of cushioning. And please, don't forget the socks! Just like your base layer, hiking socks should be made of wool or synthetics to keep your feet dry and stop blisters before they can even think about starting.
Customizing Your Pack for Different Hiking Adventures
The real secret to a great hike isn't just owning the right gear; it's knowing exactly what to bring for the specific trail you're tackling. Packing for a quick three-hour loop and gearing up for a weekend-long trek are two completely different ballgames. The goal is always to match your gear to the duration, difficulty, and unique demands of your adventure.
A classic rookie mistake is overpacking "just in case." A much better approach is to think of your gear in modules—adding or subtracting entire systems based on how long you’ll be out. This keeps your pack light and nimble, letting you focus on the trail ahead instead of the dead weight on your back.
Let's break down how to scale your pack for three common types of hikes.
What to Bring on a Day Hike
For a day hike, the name of the game is moving light and fast while still being ready for the usual bumps in the road. You aren’t planning to sleep out there, but you absolutely still need the Ten Essentials as your safety net. Think of this as your core kit: everything you need for a few hours on the trail, plus a buffer for the unexpected.
Your pack will probably be on the smaller side, somewhere between 15-30 liters. That’s just enough room for layers, water, snacks, and safety items without tempting you to bring the kitchen sink.
- Hydration: Bring at least two liters of water, even on a short hike. "I wish I'd brought less water" is something no hiker has ever said.
- Nutrition: Pack more snacks than you think you need. High-energy foods like trail mix, granola bars, and fruit are perfect for keeping you going.
- Emergency Shelter: This isn't a tent. It's an ultralight emergency bivy or space blanket that weighs a few ounces but could literally save your life if you get stuck out longer than planned.
The core idea for a day pack is to cover your immediate needs while acknowledging that things can go wrong. It’s about being prepared for a long day, not an overnight stay.
Gearing Up for an Overnight Trip
Stepping up to an overnight trip introduces two big new systems: a sleep system (tent, sleeping bag, pad) and a cooking system (stove, fuel, pot). This is where your pack size will jump significantly, usually into the 40-60 liter range. You'll carry everything from your day hike list, plus all the gear needed to spend a safe and comfortable night in the wild.
The added weight of a tent, sleeping bag, and extra food makes your choice of backpack even more critical. A pack with a solid frame and a supportive hip belt is no longer a luxury—it’s a necessity for carrying that heavier load comfortably. If you're looking for the right fit, check out our guide on how to choose the right backpack for your adventures.
It’s no surprise that the global hiking gear market has swelled to an incredible USD 25.62 billion in 2024. This boom means there's a ton of fantastic, innovative gear out there. A good backpack is a huge part of that market because it's the foundation for carrying the food, water, and shelter you need for longer trips.
Packing for a Multi-Day Expedition
When your trip stretches beyond a single night, your mindset has to shift to sustainability, resupply, and durability. A multi-day expedition demands meticulous planning around food and fuel, as these are your biggest consumables. Your pack will likely be in the 60+ liter category to handle all the extra provisions.
The key additions for a multi-day trek usually include:
- More Food: This is your biggest challenge. You have to carry multiple days' worth of meals, which adds serious weight and bulk. Calorie-dense, lightweight foods are your best friends here.
- More Fuel: If you're cooking hot meals, you'll need to calculate exactly how much fuel you need for the entire trip—plus a little extra as a backup.
- Water Filtration/Purification: You simply can't carry a week's worth of water on your back. A reliable water filter or purification system is mandatory for safely refilling from streams, rivers, and lakes.
- Power Source: On longer trips, a portable power bank or a small solar charger becomes essential for keeping your phone, GPS device, or headlamp running.
Packing for a multi-day trip is a masterclass in efficiency. Every single item must justify its weight. This is where you really start scrutinizing your gear, cutting away excess food packaging, and finding items that can pull double duty to save precious space and ounces.
Hiking Trip Type Gear Comparison
To help you visualize how your pack evolves, here’s a quick comparison of what you’ll need for each type of hike. Notice how each level builds upon the previous one.
| Gear Category | Day Hike Essentials | Overnight Trip Additions | Multi-Day Expedition Additions |
|---|---|---|---|
| Backpack | 15–30 Liters | 40–60 Liters | 60+ Liters |
| Shelter | Emergency Bivy/Blanket | Tent, Tarp, or Hammock | 4-Season Tent (if needed) |
| Sleep System | None | Sleeping Bag & Pad | Warmer/Lighter Bag & Pad |
| Cooking | No-cook Snacks | Stove, Fuel, Pot, Utensils | More Fuel, Larger Pot |
| Food & Water | 2-3L Water, Snacks | 1 Day of Meals, Water Filter | Multiple Days of Food |
| Safety | The Ten Essentials | Full First-Aid Kit | Satellite Messenger, Power Bank |
| Clothing | Extra Layer, Rain Jacket | Extra Socks, Base Layers | Multiple Sets of Socks |
As you can see, the core principles remain the same, but the quantity and type of gear scale up significantly with the length and complexity of your trip. By understanding these distinct needs from the start, you can build the perfect kit for any adventure that comes your way.
How to Pack Your Backpack for Comfort and Efficiency
Figuring out what to bring on a hike is only half the battle. The real secret to a comfortable trek lies in how you pack it all. A poorly packed backpack is a nightmare—it feels heavier than it is, sways with every step, and can throw you completely off balance. The goal is to build a dense, stable load that moves with you, not against you.
Think of it like building a pyramid with blocks. You'd never put the heaviest stones at the top, right? You’d place them at the bottom, centered, to create a solid foundation. The same logic applies to your backpack. You want your heaviest gear centered and close to your spine. This one simple trick keeps the pack from pulling you backward and lets you walk with a much more natural stride.
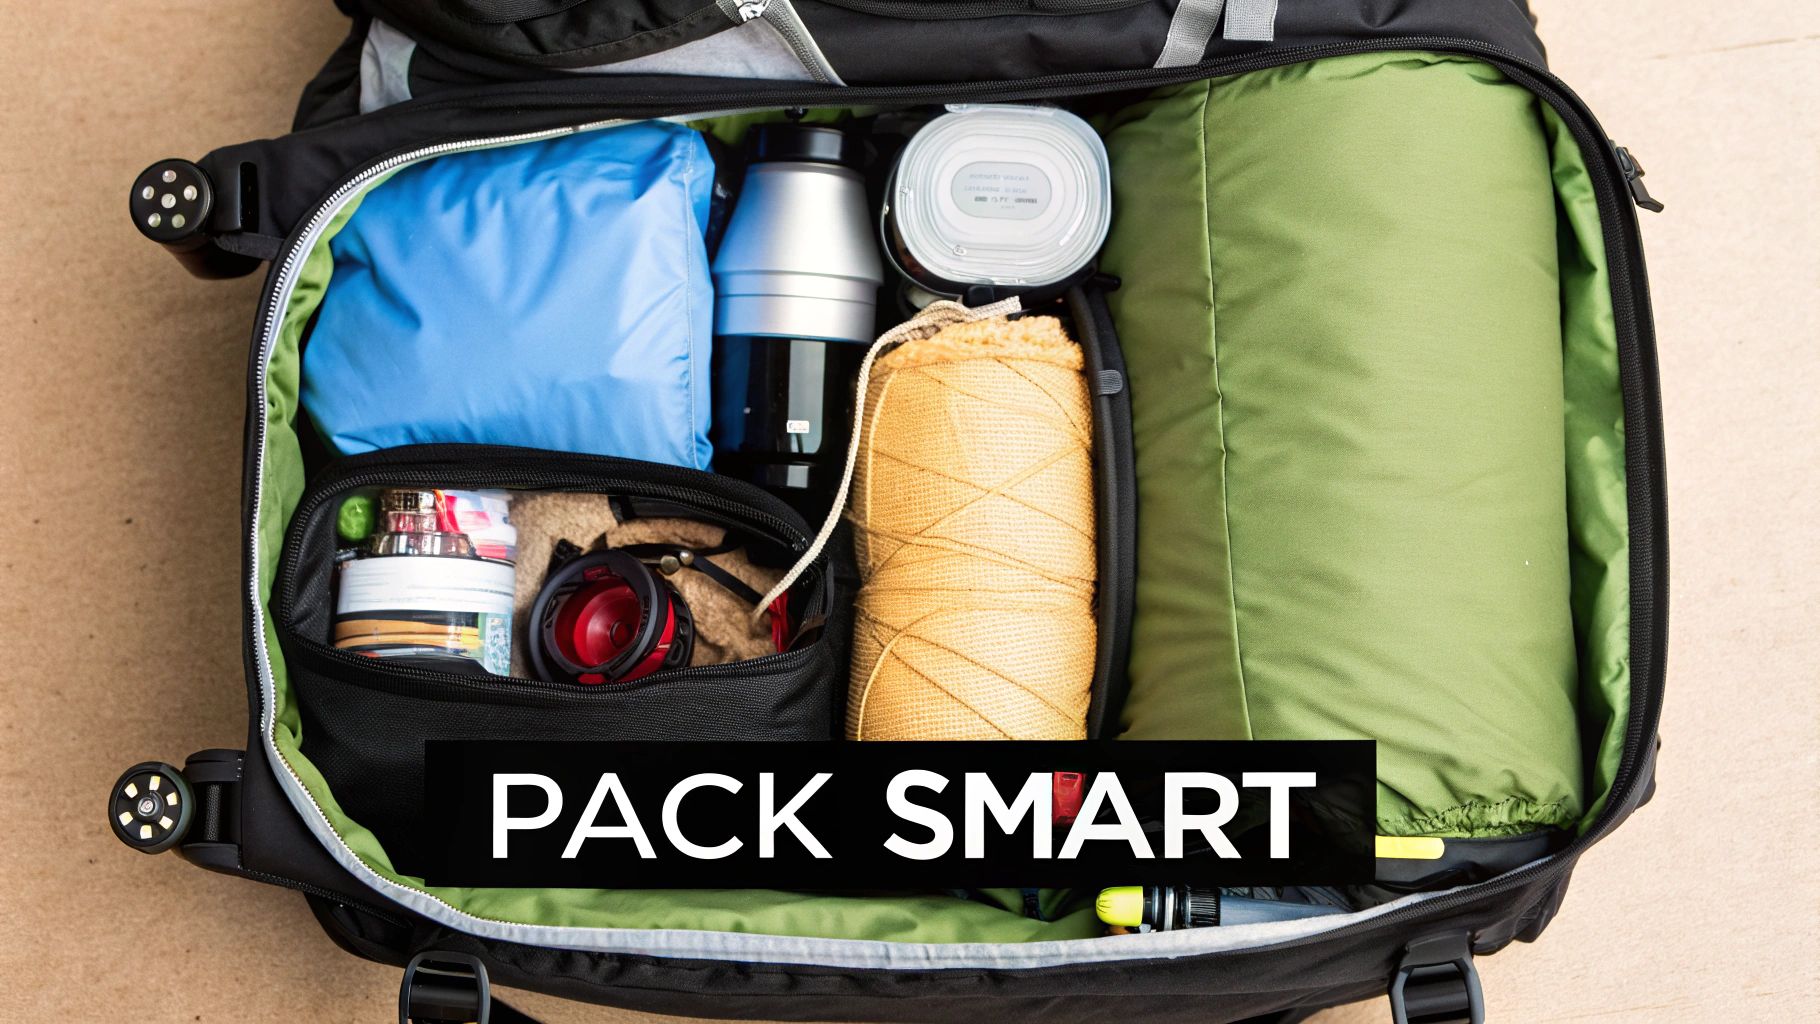
The A-B-C Method of Smart Packing
Over the years, hikers have figured out a simple system that just works. It's often called the A-B-C method, and it’s a foolproof way to organize your pack for peak performance on the trail.
- A is for Accessibility: These are the things you’ll be reaching for all day long. Stuff you need to grab without tearing your whole pack apart. Think snacks, your rain jacket, a water filter, and your map or GPS.
- B is for Balance: This is the most important part. Your heaviest gear—like a full water bladder, your food stash, and cooking supplies—needs to be packed right up against your back, sitting roughly between your shoulder blades.
- C is for Compression: Dead air is your enemy. Use compression sacks to squish down your sleeping bag and clothes, then cram smaller items like spare socks or a beanie into any nook and cranny you can find. A tightly packed bag won't have stuff shifting around every time you move.
Following this simple framework makes your pack organized and biomechanically sound, which means you'll be using a lot less energy with every step.
Reducing Weight and Maximizing Space
Before a single thing goes into your pack, lay everything out on the floor. Seeing it all at once is the best way to spot things you don't really need or where you’ve accidentally packed duplicates. An easy first win? Get rid of all that commercial packaging. Repackage things like trail mix and dehydrated meals into basic plastic baggies. You’ll be surprised how much weight and bulk that cuts.
Another game-changer is using compression sacks, especially for those puffy items that take up tons of room.
A sleeping bag can feel like it hogs half your pack, but a good compression sack can easily shrink its volume by 30% or more. That frees up a ton of valuable real estate for other gear.
This doesn't mean you need to run out and buy a bunch of expensive ultralight gear. Start small. Swap that heavy Nalgene bottle for a disposable Smartwater bottle. Pour sunscreen and bug spray into tiny travel-sized containers. Every single ounce you save makes a huge difference over a long day on the trail.
Putting It All Together: A Step-by-Step Guide
Alright, let's put these ideas into practice and actually load up the pack.
- Bottom Zone (Bulky, Not Heavy): Start by stuffing your sleeping bag into the bottom compartment. Other items you won't touch until you're setting up camp for the night, like your sleeping pad or camp clothes, can go here too. This creates a solid base for everything else.
- Core Zone (Heaviest Items): This is where your heaviest gear lives. If you use a water reservoir, slide it into its sleeve right against the back panel first. Then, pack your food bag, stove, and fuel can in this central zone, keeping the weight high and tight against your spine.
- Top Zone (Frequently Used): The top of your main compartment is for your "just-in-case" gear. This is where you want your rain jacket, a puffy insulating layer, and your first-aid kit. Your toilet kit and some snacks are also great to have right on top for quick access.
- Accessory Pockets: The smaller pockets are gold. Use the "brain" (the top lid) and hip belt pockets for the little things you need constantly. This is the perfect spot for your map and compass, your phone, chapstick, and a handful of trail mix.
When you pack with this kind of deliberate, layered strategy, you end up with a pack that's not just a bag on your back, but a comfortable and efficient tool for the journey ahead.
High-Tech Gear and Specialized Equipment
Once you've got the fundamentals down, you can start looking at specialized gear that can seriously upgrade your safety and efficiency on the trail. Don't think of these items as luxuries; they're smart investments. These are the modern tools that solve old-school problems, from finding your way through confusing terrain to getting clean water without a second thought.
This kind of gear is becoming a bigger part of how we all get outdoors. The market for navigation and safety devices is projected to grow at a 7.18% CAGR through 2030. It makes sense. Modern hikers are using tech to avoid getting lost—the cause of 30% of backcountry incidents. And compact emergency beacons have already cut down response times by up to 40% in some areas. If you want to dive deeper, you can find more insights about this growing market and how it’s making hiking safer.
Navigating with Modern Tech
A map and compass are classic for a reason, and you should always have them. But dedicated GPS devices and satellite messengers give you a powerful edge, especially when you're far from any cell towers.
- Dedicated GPS Units: These things are built tough. They're rugged, weather-resistant, and come loaded with detailed topographic maps and tracking features that blow most offline smartphone apps out of the water.
- Satellite Messengers: For real peace of mind, nothing beats one of these. You can send pre-set "I'm okay" messages or custom texts to family and friends. Most importantly, you have an SOS button that sends your exact location to emergency responders if things go seriously wrong.
These gadgets don't replace common sense or basic navigation skills, but they give you a safety net that used to be reserved for professional expedition teams.
Trekking Poles: Four-Wheel Drive for Your Legs
Ever see hikers with poles and wonder if they really help? The answer is a huge "yes." Think of trekking poles as giving yourself a second pair of limbs. They take a massive amount of impact off your knees and ankles, especially on those long, grinding downhills.
When you're climbing, they let you use your upper body to help push yourself up, which saves a ton of energy in your legs. They’re also lifesavers for stability when you're crossing a stream or navigating a patch of slippery mud. A simple slip can end a trip, and poles can prevent that from happening.
Think of trekking poles as a tool for endurance and injury prevention. By distributing the load across your entire body, they can reduce the compressive force on your knees by as much as 25% over the course of a day's hike.
On-the-Go Hydration and Power
Finally, let's talk about two other game-changers that solve the constant trail challenges: finding clean water and keeping your electronics alive.
Water Filters and Purifiers
You can't carry all the water you need for a multi-day trip—it’s just too heavy. A lightweight water filter or purifier is an absolute must for any hike longer than a few hours. These devices strip harmful bacteria and protozoa from streams, lakes, and springs, letting you fill up on safe drinking water wherever you find it. You can get anything from a simple squeeze filter to a UV light purifier that even zaps viruses.
Solar Chargers and Power Banks
Your phone, GPS, and headlamp are all critical pieces of safety gear, and they all run on batteries. For any overnight trip, a compact power bank is essential for keeping them charged. On longer expeditions, a small, packable solar panel lets you recharge your power bank whenever the sun's out, giving you a nearly endless source of power.
Common Questions About Packing for a Hike
Even after you've laid everything out and checked your list twice, a few nagging questions always seem to pop up. Don't worry, that's completely normal. Getting these last-minute details sorted is what builds the confidence you need to hit the trail feeling prepared and secure.
Let's dive into some of the most common questions hikers ask. We'll give you direct, practical answers to help you fine-tune your packing strategy.
How Heavy Should My Backpack Be?
This is the million-dollar question, and the truth is, there's no single magic number. It's really about a simple ratio. The gold standard guideline is to keep your pack weight at or below 20% of your body weight, especially for multi-day trips. So, if you weigh 150 pounds, you’d aim for a pack that's 30 pounds or less.
But think of that as a starting point, not a hard-and-fast rule. Your personal fitness level, the ruggedness of the trail, and the length of your trip all play a massive role. A seasoned backpacker on a relatively flat trail might comfortably carry a bit more, while someone new to hiking and tackling steep climbs should definitely aim for less.
Your pack is your partner on the trail. A lighter one lets you move more efficiently, puts less strain on your knees and back, and frankly, just lets you enjoy the scenery more. The best way to figure out your sweet spot is to start on the lighter side and adjust as you gain more experience and strength.
What Is the Most Common Packing Mistake?
It’s a dead heat between two classic blunders: packing way too many "just-in-case" items and seriously underestimating how much water you'll need. The first one just weighs you down and saps your energy. The second one can be downright dangerous.
Getting dehydrated on the trail is no joke—it can lead to exhaustion, bad decisions, and even heat-related illnesses. A good rule of thumb is to carry at least one liter of water for every two hours of hiking. Remember to pack even more if you're hiking in hot, dry, or high-altitude conditions.
The best way to avoid both mistakes is to be ruthless with your gear choices. Before anything goes into your pack, ask yourself one simple question: "Is this item's function truly worth its weight?" This little mental check helps you leave the non-essential gadgets at home and make sure you have room for what really matters—like enough water.
Do I Need Expensive Gear to Start Hiking?
Absolutely not. The idea that you need to drop hundreds of dollars on high-end gear just to walk on a local trail is a complete myth. While a few key pieces are worth investing in, you can easily get started on a budget. The trick is to spend smart, focusing on the two things that have the biggest impact on your comfort and safety.
Here’s a quick breakdown of where to invest and where you can save:
-
Invest Here:
- Footwear: Good hiking shoes or boots are non-negotiable. A great fit prevents blisters and gives you the ankle support needed to avoid a nasty sprain.
- Backpack: A comfortable pack that fits your torso correctly will make carrying your load feel so much lighter. It’s the foundation of your whole system.
-
Save Here:
- Clothing: You don't need fancy, brand-name apparel. Basic athletic clothing you already own—made from synthetics like polyester—works just fine.
- Other Gear: You can find perfectly good and affordable options for things like water bottles, headlamps, and first-aid kits.
How Should I Adjust My Gear for Hiking with Kids?
Taking kids on the trail is an incredible experience, but it definitely requires a few packing adjustments to keep everyone happy, safe, and moving forward. The goal shifts from ultralight efficiency to keeping things fun and being prepared for anything.
When you're packing for a family adventure, make sure you add these kid-specific items to your list:
- Extra Snacks and Water: Kids burn through energy and get thirsty way faster than adults. Pack more fun, easy-to-grab snacks than you could possibly imagine needing.
- Kid-Friendly First-Aid: Toss in some colorful character bandages, child-safe bug spray, and any specific medications your child might need. A little fun can make a scraped knee feel much better.
- Engagement Tools: Keep them entertained with a few lightweight items. Think small binoculars, a magnifying glass for checking out cool bugs, or a simple scavenger hunt list for the trail.
Remember, the whole point is to make it a positive experience. A slightly heavier pack filled with extra snacks and fun distractions is a tiny price to pay for a fantastic family day in the great outdoors.
At FindTopTrends, we curate the best gear to get you ready for any adventure without breaking the bank. From essential travel equipment to outdoor pursuits, we make it easy to find high-quality products that fit your lifestyle. Explore our collection of outdoor and travel gear today and get prepared for your next hike!
Leave a comment


