


No products in the cart.

Your wilderness survival gear list needs to be built around the absolute essentials: shelter, water, fire, navigation, and first aid. These aren't just items on a checklist; they are the five pillars that will keep you alive when things go sideways.
Building Your Wilderness Lifeline
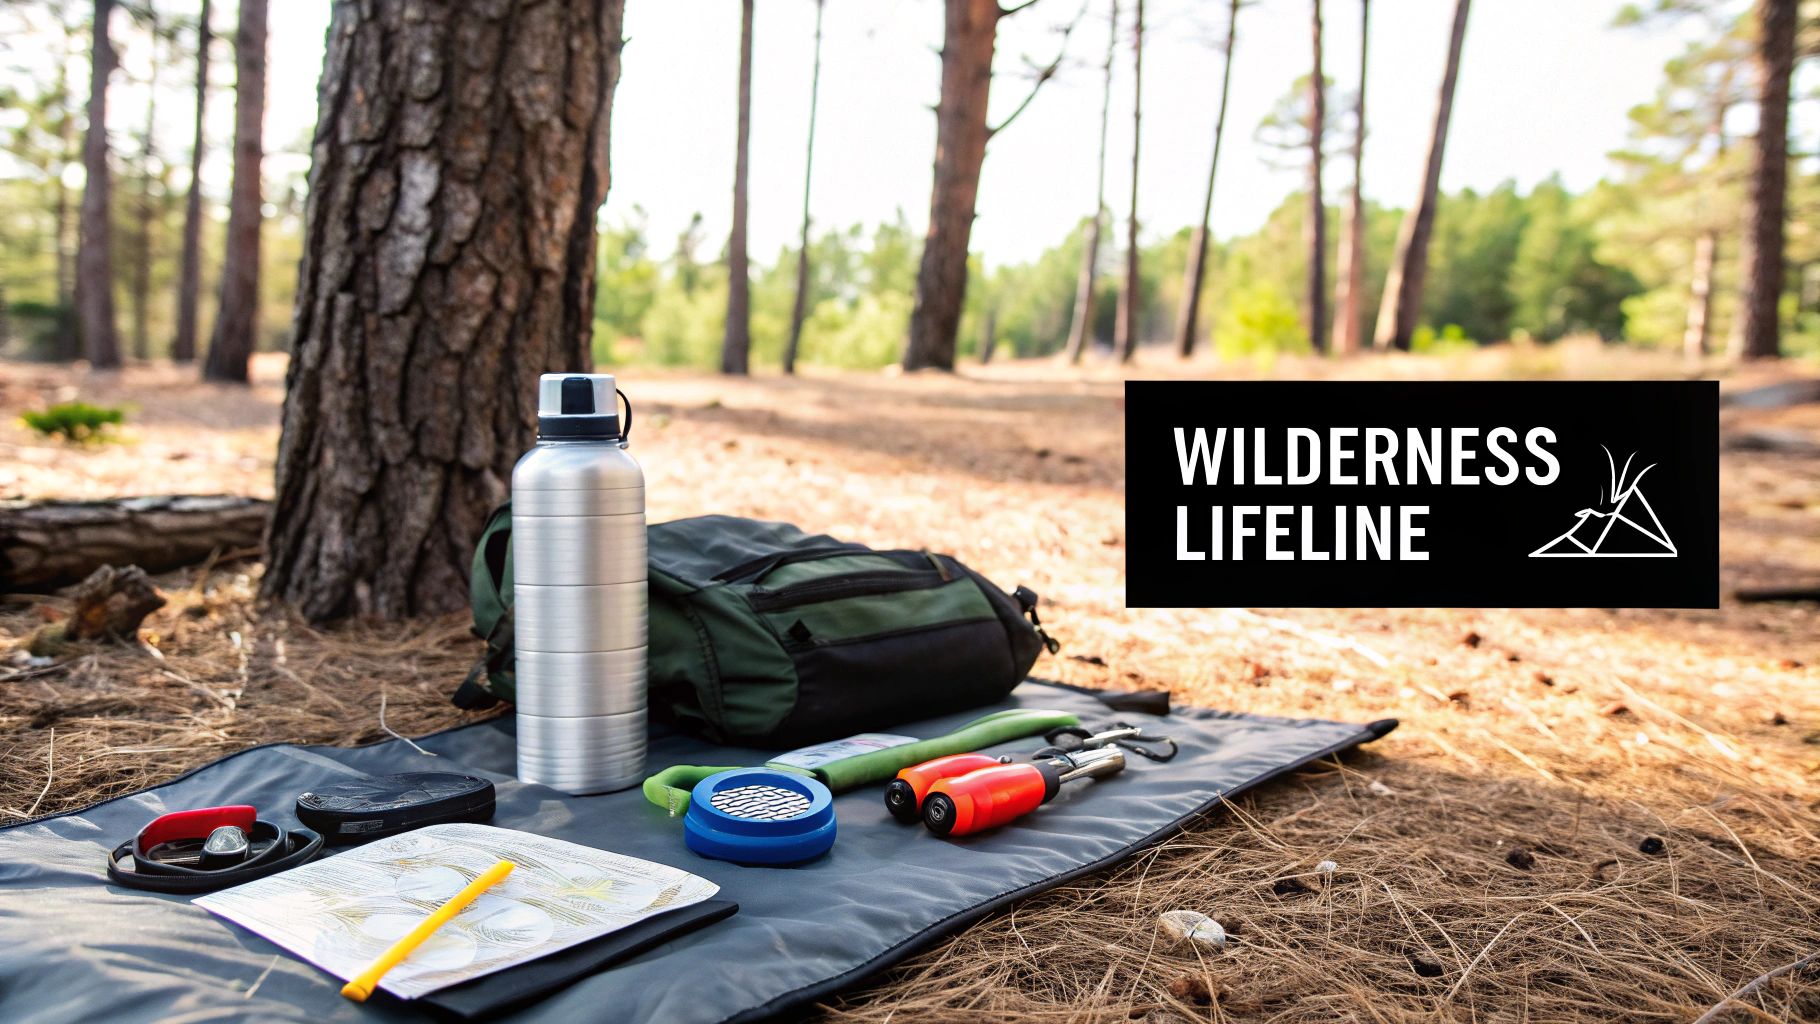
Stepping into the backcountry is a pact you make with nature—a promise to respect its power and show up prepared. A solid survival kit is your end of the bargain. It's not about planning for doomsday, but about smartly managing risk. Forget packing every gadget under the sun; focus on having reliable, redundant systems for the things that truly matter.
The entire philosophy behind a practical kit comes down to a simple, time-tested principle.
The Rule of Threes
This is a survival classic for a reason. In general, a person can survive for:
- 3 minutes without breathable air.
- 3 hours without shelter in extreme conditions.
- 3 days without water.
- 3 weeks without food.
This rule instantly clarifies your priorities. It tells you that staying warm and dry is an immediate problem to solve, with finding clean water right behind it. Food, while obviously important, is much lower on the list in a short-term crisis.
From Buying Gear To Building A System
The moment your mindset shifts, everything changes. Stop thinking about just buying gear and start thinking about building a life-support system. Every single item in your pack should solve a problem, and the best items solve more than one.
This proactive approach is becoming more common. In fact, the global survival tools market is expected to hit USD 2.8 billion by the early 2030s, a huge leap from where it was in 2023. It’s clear more people are realizing the value of being self-reliant. For a great starting point, this NZ Emergency Kit Checklist offers a fantastic overview.
Core Survival Priorities And Essential Gear Categories
The "Rule of Threes" gives us a powerful framework for organizing our gear. It logically connects our biological needs to the physical tools required to meet them.
The table below breaks down exactly how these survival priorities translate into the gear categories we'll be covering.
| Survival Priority | Timeframe | Essential Gear Category | Primary Function |
|---|---|---|---|
| Shelter/Warmth | 3 Hours | Shelter & Fire | Maintain core body temperature |
| Hydration | 3 Days | Water Treatment | Prevent dehydration and illness |
| Signaling/Navigation | Variable | Navigation & Signaling | Find your way or get found |
| Medical Needs | Immediate | First Aid | Treat injuries and prevent infection |
This structure makes it easy to see why each category is critical. A simple cut can become a life-threatening infection out there, which is why a well-stocked first aid kit is non-negotiable. We've actually put together a guide on building your own comprehensive wilderness first aid kit to make sure you're covered.
Now, let's dive into each of these categories and look at the specific gear that will form the backbone of your kit.
Mastering The Core Four Survival Pillars
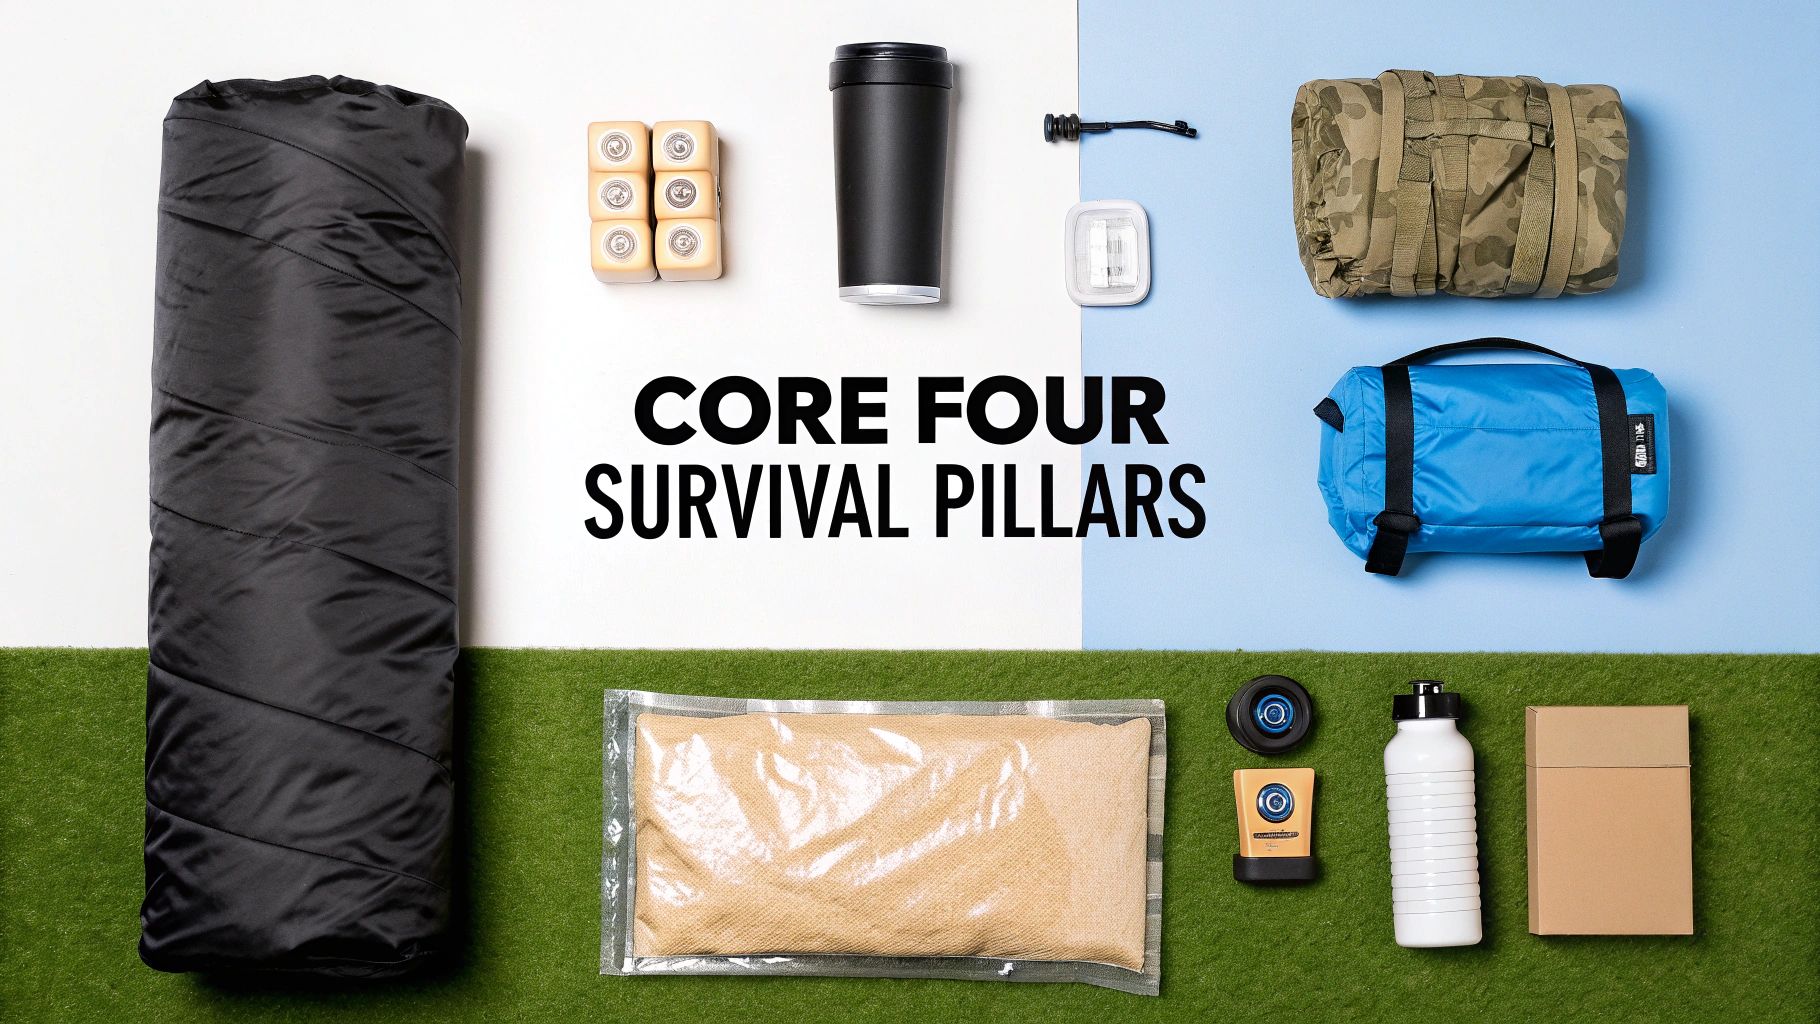
It’s easy to get overwhelmed by endless gear lists, but when you strip it all away, survival comes down to solving a few immediate, life-or-death problems. Think of it like a table with four legs—if one breaks, the whole thing comes crashing down.
These four pillars are shelter, water, fire, and first aid. Let's dig into the gear that supports each one. These are your non-negotiables, the tools that directly fight back against the most urgent threats you'll face in the wild.
Shelter: Your First Defense Against Exposure
The real battle for survival is almost always a fight against the elements. Your body loses heat up to 25 times faster in cold water than it does in cold air. You don't need freezing temperatures to be in trouble; hypothermia can start to set in at a surprisingly mild 10°C (50°F) if you’re wet and exposed. Shelter is how you win this fight.
An emergency shelter isn’t about being comfortable. It’s about creating a personal microclimate that stops your core body temperature from plummeting.
- Emergency Bivvy: This is so much more than a fancy sleeping bag cover. A good bivvy is completely waterproof and windproof, but its secret weapon is the reflective lining that bounces up to 90% of your body heat right back at you. It’s a self-contained shelter you can pull out and climb into in seconds.
- Mylar Space Blanket: No pack should be without one. It’s ridiculously lightweight and compact. While it’s not as tough as a bivvy, it's a critical barrier against wind and rain and uses the same heat-reflective principle. Pro tip: you can also rig it up as a lean-to or use its shiny surface as a signaling device.
When you're picking one, think durability. A basic Mylar blanket is better than nothing, but a heavy-duty, reinforced version or a dedicated bivvy is far less likely to rip when you're cold, tired, and fumbling in the dark.
Water: The Three-Day Clock is Ticking
You can last for weeks without food, but the clock runs out on water in about three days. Long before that, dehydration will wreck your ability to think clearly, drain your energy, and put your organs under serious strain. But just drinking from the nearest stream is a massive gamble against nasty waterborne pathogens like Giardia and Cryptosporidium.
Your water kit needs a bulletproof method for making questionable water safe to drink.
You're really tackling two problems at once: filtration to get the gunk out, and purification to kill the microscopic bugs you can't see. Thankfully, modern gear often does both, giving you confidence in every sip.
Here’s a quick breakdown of your options:
| Method | Budget Option | Premium Option | Pros & Cons |
|---|---|---|---|
| Filtration | Sawyer Squeeze Mini | MSR Guardian Purifier | Pro: Removes bacteria & protozoa. Con: Can clog or freeze. |
| Purification | Iodine Tablets | UV Sterilizer (SteriPEN) | Pro: Kills viruses. Con: Tablets have taste/wait time; UV needs batteries. |
The smart play is to build in redundancy. Use a filter like the Sawyer as your go-to, but always carry purification tablets as a tiny, lightweight backup that can’t break or fail. That way, you’re never without a path to safe drinking water.
Fire: Your Source of Warmth, Safety, and Hope
Fire is one of humanity’s oldest tools for a reason. It does it all: purifies water, cooks food, provides life-saving warmth, keeps predators at a distance, and acts as a powerful signal for rescuers. Being able to make a fire when you're cold, wet, and under pressure is a skill that absolutely depends on having the right gear.
Never, ever rely on a single way to make fire.
- Primary Lighter: Honestly, it’s tough to beat a simple Bic lighter for pure convenience. Just make sure to keep it dry, either in a small waterproof bag or by wrapping the gas valve with a bit of duct tape.
- Backup Ferro Rod: This is a survivalist's best friend. A ferrocerium rod works even when it's soaking wet and throws a shower of sparks that burn incredibly hot—over 3,000°C / 5,400°F. Get comfortable using the spine of your knife to scrape it and direct those sparks into your tinder.
- Stormproof Matches: These aren't the matches in your kitchen drawer. They're designed to burn for a solid 10-15 seconds, even if you dunk them in water or try to light them in a howling wind.
Don't forget the tinder! You need something that will instantly catch a spark. Cotton balls smeared with petroleum jelly, dryer lint you saved from home, or professionally made fire starters are all fantastic choices. They'll catch easily and burn long enough to get your small sticks (your kindling) going.
First Aid: Your Own Backcountry Medic
Out in the wilderness, a tiny blister or a simple cut can quickly spiral into a trip-ending—or life-threatening—infection. A first-aid kit isn't just something to check off a list; it's a primary piece of gear. You need to think beyond cartoon bandages and build a kit to handle real-world backcountry injuries.
Focus on what’s most likely to happen:
- Bleeding Control: You absolutely need a tourniquet and the knowledge to use it correctly. Add in a pair of trauma shears for cutting away clothing, plenty of gauze, and a pressure dressing to handle serious wounds.
- Wound Care: Pack antiseptic wipes, antibiotic ointment, and a mix of bandage sizes, including butterfly closures to help hold a nasty cut together.
- Foot Care: A bad blister can immobilize you. Moleskin or other dedicated blister pads are non-negotiable for treating hotspots before they sideline you completely.
This focus on the fundamentals is backed by experts. Most standard 72-hour emergency kits build their supply lists across five key areas, and that always includes water treatment, shelter, fire, and first aid. You'll see these kits packed with things like purification tablets, Mylar blankets, and multiple fire starters for redundancy. You can learn more about how survival kits are structured from recent market data.
Finding Your Way and Getting Found
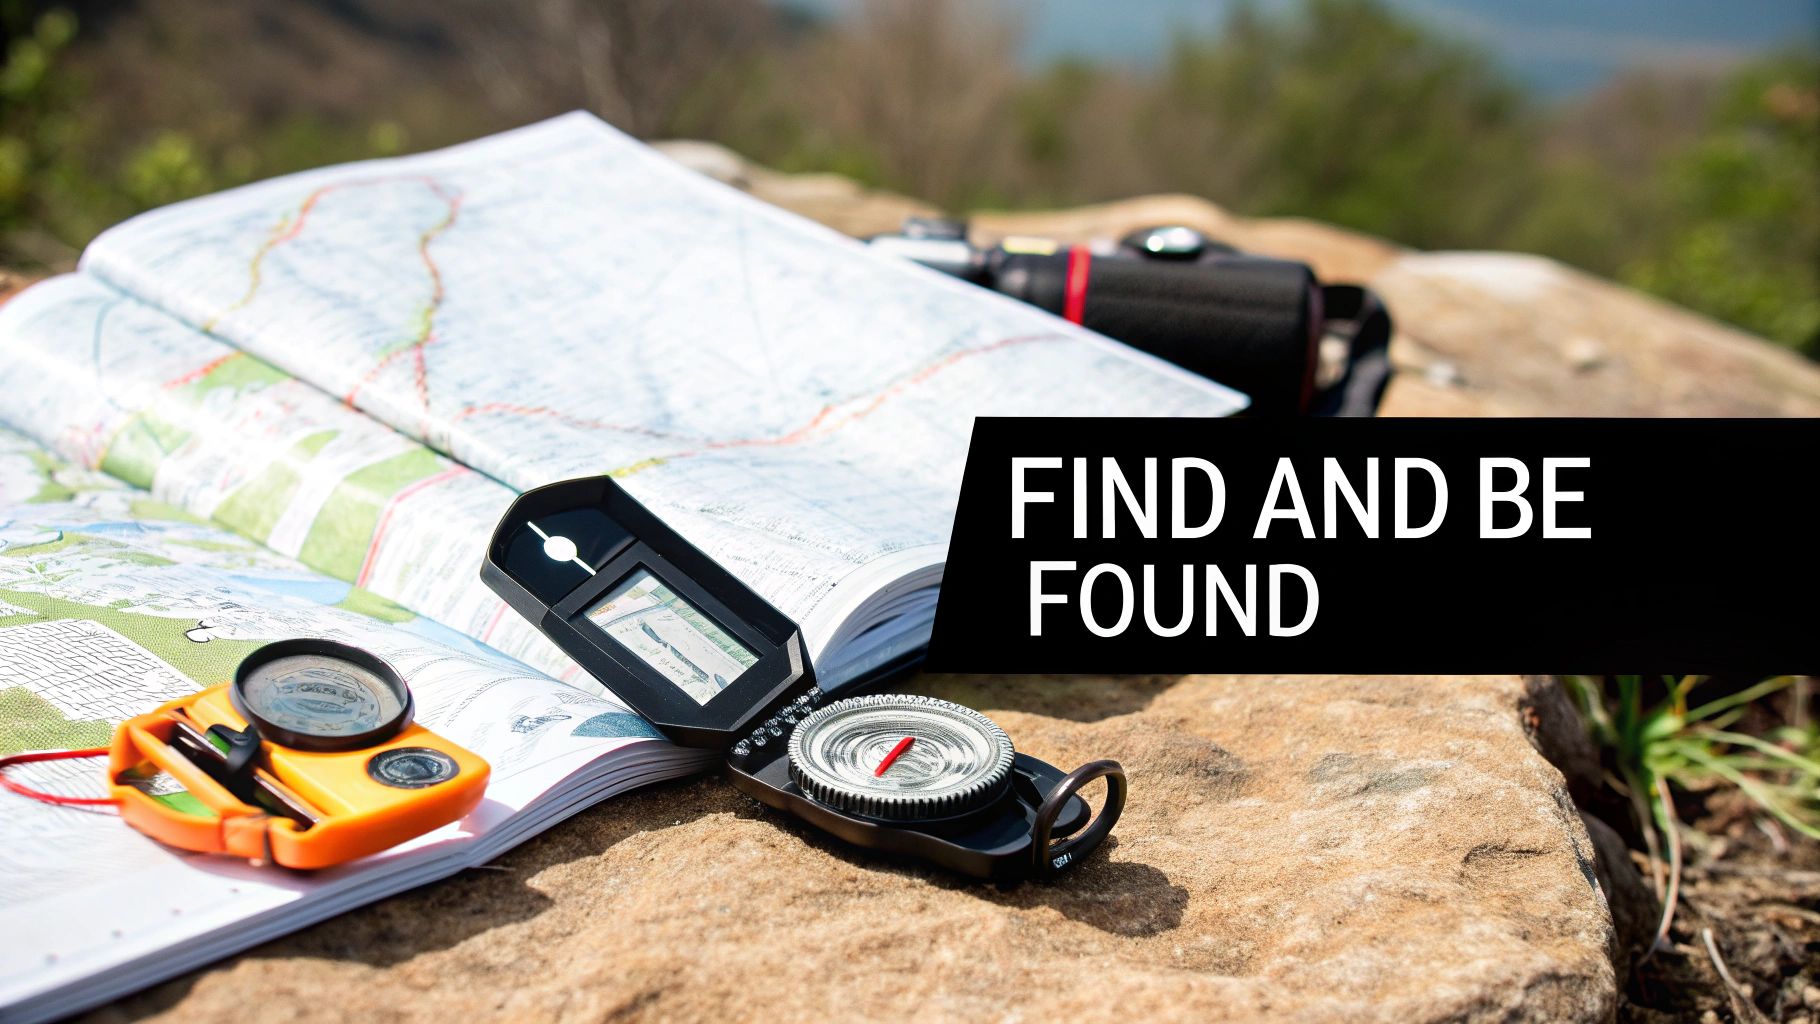
Once you’ve got your core survival needs covered, the next big hurdle is figuring out where you are. Getting lost is terrifying and can quickly turn a fun hike into a life-threatening situation. Your gear needs to solve two key problems: knowing your location and being able to call for help when you're in a bad spot.
It’s easy to lean on modern tech, but a dead battery or a dense forest canopy can render a GPS useless. This is why learning to use analog tools isn't just a nod to old-school bushcraft; it’s a critical layer of self-reliance. Your survival kit absolutely must include tools that don't need a power source.
The Unbeatable Duo: Map and Compass
Your most reliable navigation system, hands down, is the classic map and compass. A good topographic map gives you the lay of the land, showing every hill, valley, and stream. A simple baseplate compass points you north. Used together, they let you figure out exactly where you are and chart a path to safety.
Think of it this way: a GPS tells you where you are, but a map and compass help you understand your surroundings. That deeper situational awareness is priceless when things go wrong.
- Topographic Map: Never go into the backcountry without a detailed, waterproof map of your specific area. Before you even set foot on the trail, mark your planned route and make a habit of tracking your progress.
- Baseplate Compass: Get a liquid-filled compass with a transparent baseplate. One with a declination adjustment is even better, as it makes it much easier to account for the difference between magnetic north (where your needle points) and true north (what's on the map).
Knowing how to use these tools is a foundational skill. If you're looking to build that confidence, our guide to the essential navigation tools for hiking is a great place to start.
Making Noise, Getting Seen: Signaling Gear
If you're lost or hurt, being able to signal for help can be the deciding factor between a scary story you tell later and a tragedy. The goal is to create layers of communication, using gear that grabs attention with both sound and light. This is how you make yourself stand out from the landscape.
The universal signal for distress is a series of three. Three blasts from a whistle, three flashes from a mirror, or three smoky fires—it all means "I need help" to rescuers.
Your signaling kit should be packed where you can grab it in a hurry and include several options.
- High-Decibel Whistle: A pea-less survival whistle is loud. It carries much farther than a yell and uses a fraction of the energy. Three sharp blasts is the universal call for help.
- Signal Mirror: On a clear day, the flash from a signal mirror can be spotted by aircraft from miles away. It's a lightweight, battery-free tool with incredible range.
- Personal Locator Beacon (PLB): This is your big red button. When you activate a PLB, it shoots a distress signal to a satellite network, beaming your exact GPS coordinates to emergency services. It's a serious investment, but it’s a true lifeline for life-or-death situations.
By pairing reliable navigation with effective signaling, you create a robust safety system. You give yourself the tools to get out on your own and, if that fails, you make it a whole lot easier for help to find you.
Essential Tools And Functional Clothing
Once you’ve got shelter, water, and fire figured out, the real game-changers are your tools and your clothing. Think of these as the backbone of your entire kit. They're what allow you to actively solve problems and stay comfortable when conditions turn sour. A good tool makes you more capable, and the right clothing acts like a personal thermostat, protecting you from the elements.
The single most important tool you can carry is a solid, reliable fixed-blade knife. Forget those giant, saw-backed Rambo knives you see in movies. What you really need is a simple, tough knife with a blade around 4-5 inches and a "full tang"—that just means the steel of the blade runs all the way through the handle, making it incredibly strong. It's your go-to for making feather sticks to start a fire, carving notches for a shelter, or prepping a meal.
Your knife is more than just a cutter; it's a problem-solver. It’s the bridge between having supplies and actually being able to use the resources around you to survive.
Hardware That Works When You Do
A knife is your cornerstone, but a couple of other pieces of hardware are non-negotiable, especially when the sun goes down. Darkness doesn't just stop you from getting things done; it makes everything more dangerous.
- Durable Headlamp: A good LED headlamp is a must-have. It frees up your hands to pitch a tent, follow a trail, or cook in the dark. Always, always pack extra batteries or a small power bank to keep it juiced.
- Cordage: You can never have too much rope. At least 50 feet of strong cordage, like paracord, is a fantastic starting point. You'll use it for everything: rigging a tarp, hanging food away from critters, drying wet clothes, or even as a makeshift shoelace in a pinch.
When you're picking out this gear, go for durable and simple. A survival situation is the worst time to be fumbling with complicated features you don't need. You want gear that’s intuitive and built to take a beating. For more ideas on how to pick gear that's both tough and lightweight, check out resources like an ultralight thru-hiking gear list.
Why Cotton Kills and Layering Saves Lives
Your clothing is your first and most important shelter. Its entire job is to manage moisture and keep your body temperature stable. This is where one of the oldest and most important rules of the outdoors comes in: "cotton kills."
It’s not an exaggeration. Cotton is like a sponge; it soaks up sweat and rain and loses all its insulating power when wet. This process actively sucks heat away from your body, setting you up for hypothermia even on a cool, damp day.
The secret to staying warm and dry is a smart layering system. Instead of one big, bulky jacket, you use several thinner layers that you can add or remove. This gives you total control over your temperature, letting you adapt to changing weather or how hard you're working.
Here’s how it breaks down into three simple, functional layers:
- Base Layer: This is what’s right against your skin. Its only job is to pull sweat away from your body to keep you dry. You want materials that excel at this, like merino wool or synthetics (polyester).
- Mid-Layer: This is your insulation. It's designed to trap your body heat and keep you warm. Think fleece jackets, down vests, or synthetic "puffy" coats. You can even stack a couple of thin ones for more precise control.
- Shell Layer: This is your armor against the elements. A good shell layer is waterproof and windproof, stopping rain and wind from getting in. Crucially, it should also be "breathable," meaning it lets the moisture from your other layers escape so you don't get clammy.
Mastering this system is what will keep you comfortable and safe, whether you're hiking in a chilly drizzle or sitting still in the cold. It's all about adaptability, which helps you conserve precious energy when it matters most. As you round out your kit, you might find our guide on the best camping stove for backpacking useful for making sure your meal system is just as well-thought-out.
How To Customize Your Survival Kit
Let's get one thing straight: there is no such thing as a perfect, one-size-fits-all survival kit. Anyone who tells you otherwise is selling something. The gear that will save your life in a sun-scorched desert is worlds away from what you’d need on a wind-blasted mountain ridge.
The real key to survival prep is to stop looking for a universal checklist. Instead, think of your gear as an adaptable system. Your environment, the length of your trip, and even whether you're alone or with a group will shape what goes into your pack. It’s all about being a smart packer, not just a gear collector. A kit built for you and your trip is always the most effective.
Tailoring Your Gear To The Environment
Where you’re headed is the single biggest factor influencing your pack. A deep forest throws different challenges at you than a desert or a high-alpine trail, and your gear needs to reflect that.
-
Desert Survival: Here, water and sun protection are everything. That means packing extra water capacity—think a large bladder plus a backup bottle. Sun protection isn't just for comfort; it's critical survival gear. You'll want a wide-brimmed hat, quality sunglasses, and high-SPF sunscreen.
-
Mountain Survival: In the mountains, insulation and wind protection are your best friends. You'll absolutely need to add warmer mid-layers, a bombproof wind shell, and insulated gloves and a warm hat. For icy or snowy trails, traction devices like microspikes can be a literal lifesaver.
-
Forest Survival: In a dense forest, you can't always count on a clear view of the sky, which means GPS signals can be spotty. This is where robust navigation tools like a map and compass really shine. A reliable fire-starting kit is also essential for warmth and signaling, especially in damp environments where finding dry tinder is a chore.
Adjusting For Trip Duration And Group Size
How long you plan to be out there directly impacts how much you need to carry, especially when it comes to consumables. A quick day hike has completely different requirements than a week-long trek.
For any multi-day trip, you'll need to scale up your food supply and water purification capacity. You’ll also want a more substantial shelter than a simple emergency bivvy and a larger first-aid kit that can handle a wider range of issues over a longer period.
Traveling in a group is a huge advantage for distributing weight. Not everyone needs to carry a tent, a water filter, or a full cook set. By sharing the load for these "communal" items, everyone’s pack gets lighter without sacrificing a single bit of preparedness.
The most effective strategy is to build a modular system. Keep your absolute core survival items—knife, fire starter, shelter, water filter—in a dedicated, small pouch that always goes in your pack. Then, you can add or subtract other modules based on the specific trip.
This flowchart is a great way to visualize how to think about your clothing layers based on what the weather is doing.
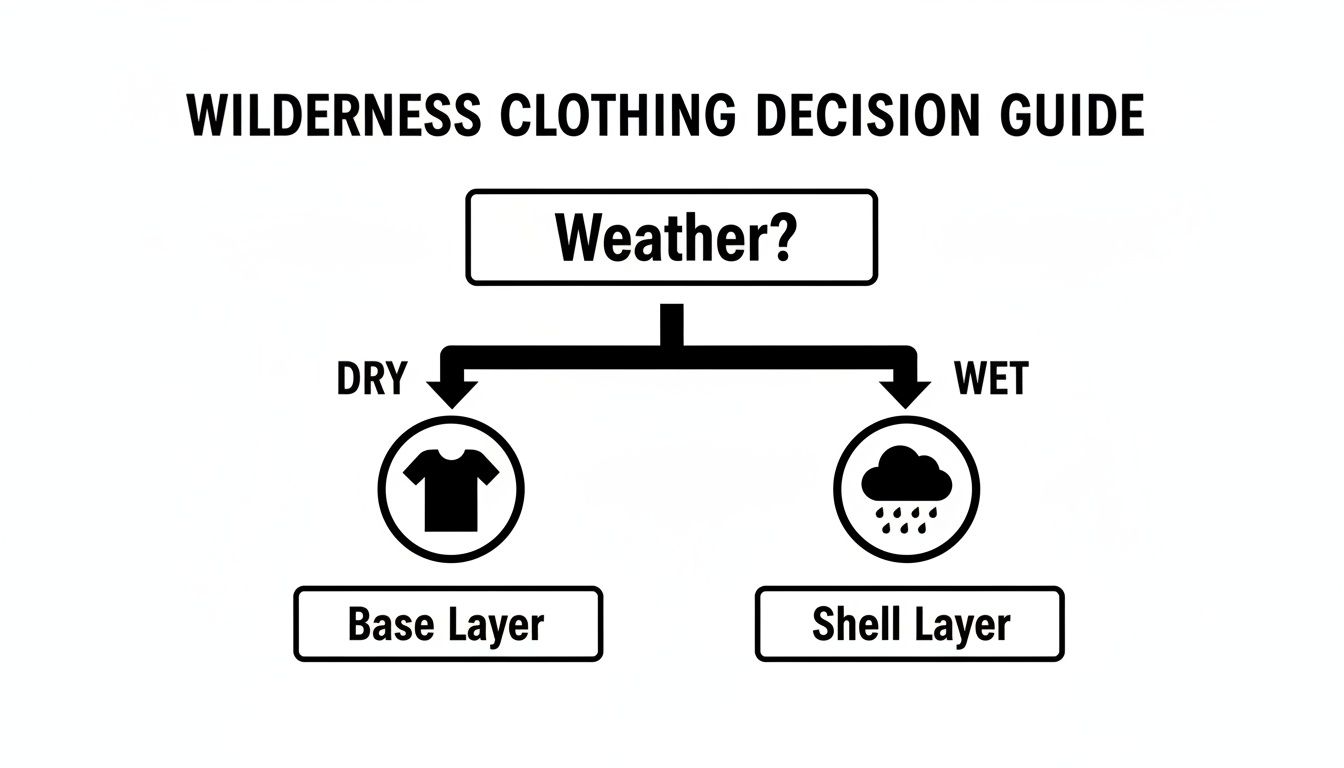
As you can see, the decision-making process is simple. Your outermost layer is dictated entirely by whether you're dealing with wet or dry conditions—a fundamental principle for staying safe and comfortable outdoors.
Scenario-Based Gear Checklist Adjustments
Putting it all together, your "core" kit is just the foundation. From there, you add or swap items based on where you're going and for how long. The table below gives you a clear idea of how to modify your pack for different scenarios.
| Gear Item | Core Kit (Always Pack) | Desert Add-on/Modification | Cold Mountain Add-on/Modification | Multi-Day Trip Add-on |
|---|---|---|---|---|
| Water | Filter/Purifier, 1L Bottle | 3L+ Bladder, Electrolytes | Insulated Bottle Sleeve | Higher-Capacity Filter |
| Shelter | Emergency Bivvy/Blanket | Tarp for Sun Shade | 4-Season Tent or Bivvy | Lightweight Tent/Tarp |
| Clothing | Rain Jacket, Base Layer | Sun Shirt, Wide-Brim Hat | Insulated Jacket, Gloves, Hat | Extra Socks, Base Layers |
| Navigation | Map, Compass, GPS/Phone | - | - | Power Bank, Solar Charger |
| First Aid | Personal Kit | Blister Care, Tweezers | Hand Warmers, Trauma Shears | Expanded Kit, Medications |
| Tools | Knife, Headlamp, Fire Kit | - | Snow Shovel, Ice Axe | Camp Stove, Fuel, Pot |
| Food | Emergency Bars (24-hr) | Salty Snacks | High-Calorie Dense Food | Full Meal Plan (2000+/day) |
| Traction | - | - | Microspikes/Crampons | - |
This approach ensures you have exactly what you need for the adventure ahead without carrying a single ounce of unnecessary weight. It's about being prepared, not just packing a lot of stuff.
Never underestimate the power of these basics. Search-and-rescue teams consistently report that having even simple gear dramatically increases a person's chances of survival. A reliable way to start a fire, signal for help, and get out of the elements can mean the difference between a bad story and a tragedy.
Outdoor safety experts often stress a 72-hour mindset because many remote rescue operations can take several days to coordinate and execute. As more people explore the outdoors, understanding how to prepare is more important than ever, a trend reflected in the growth of the outdoor equipment market.
Your Wilderness Gear Questions Answered
Putting together a solid survival kit can feel a bit overwhelming. You're hit with a barrage of opinions, gear reviews, and a million "what-if" scenarios. It's totally normal to have questions, so let's tackle some of the most common ones I hear. This should help you cut through the noise and pack with real confidence.
What Is The Single Most Important Piece Of Survival Gear?
Ask any seasoned survivalist, and they’ll tell you that your brain is your number one tool. But when we talk about physical gear, one item consistently rises to the top: a high-quality, fixed-blade knife.
Nothing else comes close in terms of versatility. A good knife is what we call a "force multiplier"—it lets you do things you simply couldn't do otherwise. You can make feather sticks for a fire, build a shelter, gut a fish, and handle a hundred other critical tasks. It's really the one tool that can make all the other tools you might need.
Right behind the knife, you have your fire-starting and shelter-building gear. Why? Because keeping your core body temperature stable is the most immediate threat you'll face in most emergencies.
How Much Should I Spend On My Survival Kit?
You absolutely do not need to drain your bank account to be prepared. You can put together a bomber kit that will see you through the worst for under $150. The trick is knowing where to spend your money.
Invest in quality where failure is not an option. Your knife, fire starters, water filter, and emergency shelter are the cornerstones of your kit. Prioritize their reliability above all else.
You can definitely go cheap on other items without sacrificing safety. For instance:
- A simple, rugged pouch or a basic backpack does the same job as a fancy tactical one.
- Bank line is a fraction of the cost of paracord and is just as strong for most shelter-building or repair tasks.
- The legendary $30 Mora knife is a perfect example; it's trusted by experts and will outperform many flashy knives that cost three times as much.
The smart play is to start with a reliable, budget-friendly core kit. As you get out there and gain more experience, you can upgrade pieces over time when you figure out what really works for you.
How Should I Maintain My Survival Gear?
That top-of-the-line gear is completely worthless if it fails the moment you need it. A little bit of maintenance goes a long way and ensures your tools are ready to go when everything is on the line. This doesn't have to be a major chore; just a quick check-in a few times a year is all it takes.
Make this a non-negotiable habit after every trip:
- Clean and Dry Everything: Dump out your kit and let every single item air out. This prevents the gear-killers: mold, mildew, and rust.
- Inspect Your Tools: Put a fresh edge on your knife and wipe the blade with a light coat of oil. Strike your ferro rod a few times and test your lighter to make sure they're working flawlessly.
- Check Expiration Dates: A lot of things have a shelf life. Look at the dates on batteries, first-aid ointments, medications, and water purification tablets. Once a year, toss and replace anything that's expired or getting close.
When you're done, store the whole kit in a cool, dry place where you can grab it in a hurry—the trunk of your car or a closet by the door are perfect spots. A quick 15-minute inspection every six months is the best insurance you can't buy.
Should I Buy A Pre-Made Kit Or Build My Own?
This is the classic debate, but for my money, the answer is clear. Building your own kit is always the better long-term strategy. When you research and select every item yourself, you're forced to learn about it. You’ll understand its purpose, its weak points, and exactly how to use it. That knowledge is priceless.
That said, pre-made kits aren't useless. They can be a great starting point if you’re just getting into this and need something ready for your next trip now.
For beginners, a hybrid approach often works best:
- Start with a decent pre-made kit. This gets you a basic safety net right out of the box.
- Critically evaluate every single item inside. Is the knife flimsy? Are the fire starters cheap junk?
- Systematically upgrade the weak points. Over time, replace the low-quality stuff with reliable gear you’ve personally researched and chosen.
This method ensures you're prepared from day one while you gradually build a personalized, high-quality system that you know inside and out and can trust completely.
At FindTopTrends, we're dedicated to helping you find the essential outdoor and travel gear you need to stay safe and prepared on your adventures. Explore our curated collections to build a kit you can trust.
Visit us to discover trending gear.
Leave a comment


